Pincushion Caddy – Pattern projects have become essential for sewists and crafters who want to keep their tools organized while adding a handmade touch to their workspace. Right from the first stitch, working with a Pincushion Caddy – Pattern provides functionality, charm, and creativity in a single project. A pincushion caddy not only keeps your needles and pins in place but also offers extra pockets and compartments for scissors, threads, seam rippers, clips, and other daily sewing tools. This makes it an excellent item for both beginners and experienced creators looking to upgrade their sewing setup.
Whether you enjoy quilting, embroidery, garment sewing, or general crafting, a Pincushion Caddy – Pattern helps you stay efficient and tidy. Instead of searching through drawers or containers, you can keep your essentials within reach at all times. These caddies come in various designs, shapes, and sizes, making them customizable and adaptable to your personal needs. Many crafters love creating pincushion caddies as gifts, as they are practical, adorable, and easy to personalize.
In this article, you will discover the essential steps, tools, materials, and creative possibilities of crafting a pincushion caddy using a Pincushion Caddy – Pattern. The content is optimized for SEO, written in a natural and friendly tone, and aligned with Google AdSense guidelines to ensure quality and usability. By the end, you will understand how to construct a functional and beautiful caddy and how to incorporate your personal style into every detail.
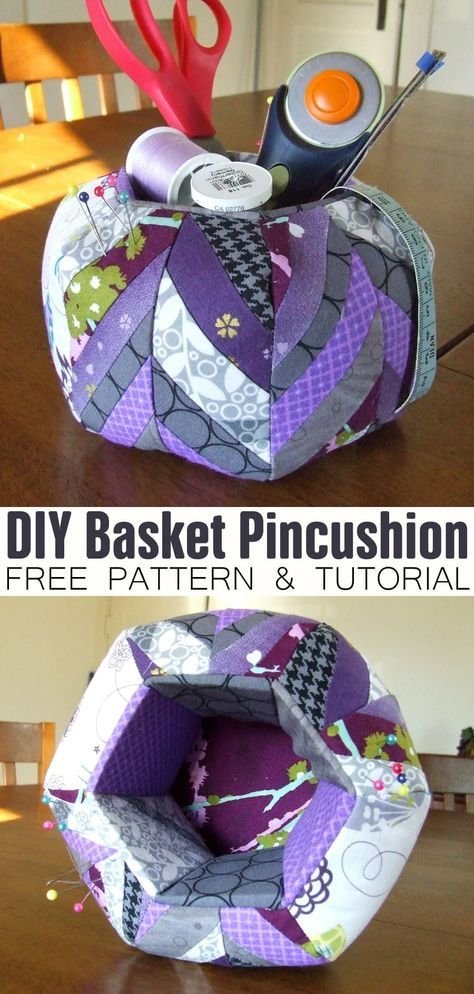
A Pincushion Caddy – Pattern typically includes instructions for constructing both the central pincushion and the surrounding compartments or pockets. The pincushion is usually positioned in the center and filled with a firm stuffing material to hold pins securely. The pockets around it help organize small sewing tools, keeping everything accessible while you work.
The basic shape of a pincushion caddy varies widely. Some designs feature a circular base with pockets arranged like petals, while others are rectangular or square with evenly spaced compartments. The shape you choose depends on your personal preference and the tools you plan to store in your caddy.
Many patterns include recommendations for stabilizers or interfacing. These elements help maintain the structure of your Pincushion Caddy – Pattern, ensuring it remains firm and functional over time. The right interfacing can make your pockets stand up properly without collapsing, giving your caddy a professional look.
Understanding the pattern structure before beginning is essential. Read through all the steps, diagrams, and measurements to ensure you know how each part comes together. Some pincushion caddy patterns involve quilting or piecing techniques, while others rely on simple sewing constructions suitable for beginners.
Patterns often allow customization. You can choose to add extra pockets, attach small loops for hanging tools, or include a handle for portability. This flexibility is what makes the Pincushion Caddy – Pattern such a fun project—there are always ways to make it uniquely yours.
A well-designed pincushion caddy enhances your sewing experience. By understanding how the pattern works and how each piece connects, you set the foundation for a beautiful, durable, and highly functional sewing organizer.
To create a Pincushion Caddy – Pattern, start by gathering the essential materials. High-quality cotton fabrics are ideal because they are durable, easy to sew, and available in countless colors and prints. You may choose coordinating fabrics for a unified look or mix different patterns for playful contrast.
Interfacing or stabilizers are important to give your caddy structure. Fusible interfacing is especially helpful for reinforcing pockets and the base. If the pattern calls for foam or batting, make sure to use the recommended thickness to ensure a firm, supportive structure.
Stuffing material is a key component. Polyester fiberfill is commonly used for the pincushion section, but crushed walnut shells are also popular among crafters because they add weight and help sharpen pins. Choose the filling that best suits your needs and sewing style.
You will also need basic sewing tools such as fabric scissors, a rotary cutter, a cutting mat, pins, clips, and a sewing machine. A hand-sewing needle may be necessary for closing openings after stuffing the pincushion. Having an iron nearby will help you press seams and keep your pieces crisp and neat.
Some crafters like to add embellishments such as buttons, ribbons, lace, or decorative stitching. These elements help personalize the Pincushion Caddy – Pattern and transform it into a more decorative piece. However, keep functionality in mind when adding embellishments, as the caddy should remain practical for daily use.
Finally, prepare your workspace before beginning. Since pincushion caddies involve assembling several small pieces, having an organized sewing area ensures smoother construction. Lay out all fabric pieces in the order you plan to sew them, and keep your tools and materials within easy reach.
Begin the Pincushion Caddy – Pattern by cutting all fabric pieces according to the measurements provided. Precision is important because small pieces must fit together neatly. Using a rotary cutter and ruler helps maintain sharp, accurate edges.
Next, prepare the pockets. Most pincushion caddy patterns require folding or gathering fabric pieces to create pocket panels. Some designs include pleats that allow pockets to expand, making them useful for thicker tools like scissors or seam rippers. Press each piece carefully to ensure clean edges and a polished appearance.
Once the pockets are prepared, attach them to the base fabric. Depending on the design, the base may be circular, rectangular, or hexagonal. Sewing the pockets in place requires accuracy, as misalignment can affect the overall structure and appearance of the finished caddy.
After sewing the pockets, focus on assembling the pincushion center. Sew the pincushion pieces together, leaving a small opening for stuffing. Fill the pincushion firmly with the material of your choice and close the opening with a hand-sewn ladder stitch to maintain a clean finish.
Attach the pincushion to the base according to the pattern instructions. Some patterns attach it by sewing it directly onto the base, while others secure it using ties or buttons. Make sure the pincushion is firmly attached so it will not shift during use.
The final step is assembling the outer structure, closing seams, and adding any additional elements such as handles or decorative stitching. When finished, your Pincushion Caddy – Pattern creation should be sturdy, balanced, and ready to use in your sewing room.
The beauty of a Pincushion Caddy – Pattern lies in its versatility. While traditionally used for sewing tools, it can be adapted for many other purposes, making it a wonderful and practical handmade item.
One popular use is organizing craft supplies beyond sewing. Artists use pincushion caddies to store paintbrushes, markers, and small art tools. The pockets make organization easy and visually appealing.
Another creative idea is using the caddy as a desk organizer. Pens, pencils, USB drives, clips, and small stationery items can be stored neatly around the pincushion center. This adds a personal handmade touch to your work environment.
Pincushion caddies also make thoughtful gifts. Since they are practical and customizable, they are perfect for birthdays, holidays, or as a special handmade gesture for craft-loving friends. Choose fabrics that reflect the recipient’s personality to make the gift more meaningful.
Some sewists create themed caddies based on seasons or holidays. For example, floral prints for spring, cozy plaids for winter, or cute festive patterns for Christmas. This makes the Pincushion Caddy – Pattern not only useful but also decorative.
Using a caddy as part of a sewing kit bundle is another creative use. Combine it with matching zipper pouches, needle books, and fabric trays to create a complete organization set. This can be especially appealing for beginner sewists who are just starting to build their tool collection.
Finally, pincushion caddies can be displayed as part of your craft room décor. Their handmade charm and colorful fabrics add warmth to any sewing space while keeping your tools neatly arranged.
What is a Pincushion Caddy – Pattern?
It is a sewing pattern that guides you in creating a pincushion with surrounding pockets or compartments for organizing tools.
Is this project beginner-friendly?
Yes. Many patterns are simple enough for beginners, although some include more advanced techniques like pleating or quilting.
What materials do I need?
You will need cotton fabric, interfacing, stuffing, thread, and basic sewing tools such as scissors, pins, and a sewing machine.
Can I customize my pincushion caddy?
Absolutely. You can change the fabric, pocket sizes, embellishments, and overall shape according to your needs.
What is the best stuffing for the pincushion?
Polyester fiberfill is common, but crushed walnut shells add weight and help sharpen pins.
How do I keep the caddy sturdy?
Use the recommended interfacing or stabilizer and press all seams carefully during construction.
Can I use the caddy for things other than sewing tools?
Yes. It can be used for office supplies, art materials, small cosmetics, or children’s craft tools.
How long does the project take?
Most pincushion caddies can be completed within a few hours, depending on the complexity of the pattern.
Do I need a sewing machine?
A machine is recommended for durability, but some caddies can be sewn by hand with extra time and care.
Are pincushion caddies washable?
Yes, if made with washable fabrics and washable stuffing, though hand washing is often recommended to preserve their shape.
Conclusion
Creating a Pincushion Caddy – Pattern is a rewarding project that combines practicality, creativity, and personalized craftsmanship. Throughout this article, you learned how to understand the pattern, prepare materials, sew the structure, and customize your caddy for various uses.
I hope this guide inspires you to craft your own pincushion caddy and enjoy the convenience it brings to your sewing or crafting space.