Granny Square Christmas Stocking – Pattern projects have become one of the most charming and nostalgic ways to celebrate the holiday season through crochet. Right from the first stitch, this festive design brings together the warmth of handmade crafts and the timeless beauty of classic granny squares. In this article, you will learn how to create a beautiful and functional Granny Square Christmas Stocking – Pattern, using a humanized, SEO-optimized approach that follows Google AdSense–friendly guidelines. Whether you are a beginner or an experienced crocheter, this guide will help you craft a stocking that stands out in your holiday décor.
Starting with the essential structure and purpose of the Granny Square Christmas Stocking – Pattern, we’ll walk through the history behind the design and why this festive project remains so popular. The iconic granny square style fits perfectly with Christmas themes because it combines tradition and creativity. The stocking itself can be used as decoration, a personalized gift, or even a practical holder for holiday treats.
Before moving into the detailed subtitles, it’s important to understand how versatile this pattern can be. You can adapt the colors, the number of squares, and even the dimensions to match your holiday décor. In addition, using the Granny Square Christmas Stocking – Pattern throughout your crafting journey reinforces creativity while maintaining a consistent theme. Now that we’ve set the foundation, let’s explore each part of this festive project with clarity and confidence.
The Granny Square Christmas Stocking – Pattern is built using multiple classic granny squares that are stitched together to form the traditional stocking shape. Each square is typically made using three or four rounds of stitches, making the pattern accessible even to beginners. Because granny squares are foundational in crochet, this project is a wonderful opportunity to practice essential techniques.
One of the biggest advantages of this pattern is its flexibility. You can use traditional Christmas colors like red, green, white, or gold, or you can create a modern color palette for a contemporary holiday look. The granny squares allow for creative freedom without complicating the pattern structure.
Another benefit of the Granny Square Christmas Stocking – Pattern is that it can be worked in different yarn weights. Light yarn produces a small, delicate stocking suitable as a tree ornament, while medium or bulky yarns create larger, more functional stockings for gift-giving. Adjusting your hook size will also influence the final appearance.
Stitch variation is another way to personalize your stocking. While the classic granny square uses clusters of double crochet stitches, some crocheters enjoy adapting the square to include textured stitches such as puff or bobble stitches to add dimension. This adds charm without increasing difficulty too much.
Many crafters appreciate how travel-friendly this pattern is. Since you crochet individual squares, you can carry your yarn and hook anywhere and complete a few squares whenever convenient. Later, assembling the stocking becomes a simple and enjoyable process.
Finally, this stocking pattern provides an emotional element as well. Handmade decorations often become treasured keepsakes, especially when made for family members, children, or festive events. Creating a Granny Square Christmas Stocking – Pattern can easily become a heartfelt holiday tradition.
To begin working on your Granny Square Christmas Stocking – Pattern, it’s important to gather all the necessary materials. The basic supplies include yarn in your chosen holiday colors, a hook size that complements your yarn, scissors, and a tapestry needle for sewing the squares together. Acrylic or cotton yarns are both popular options.
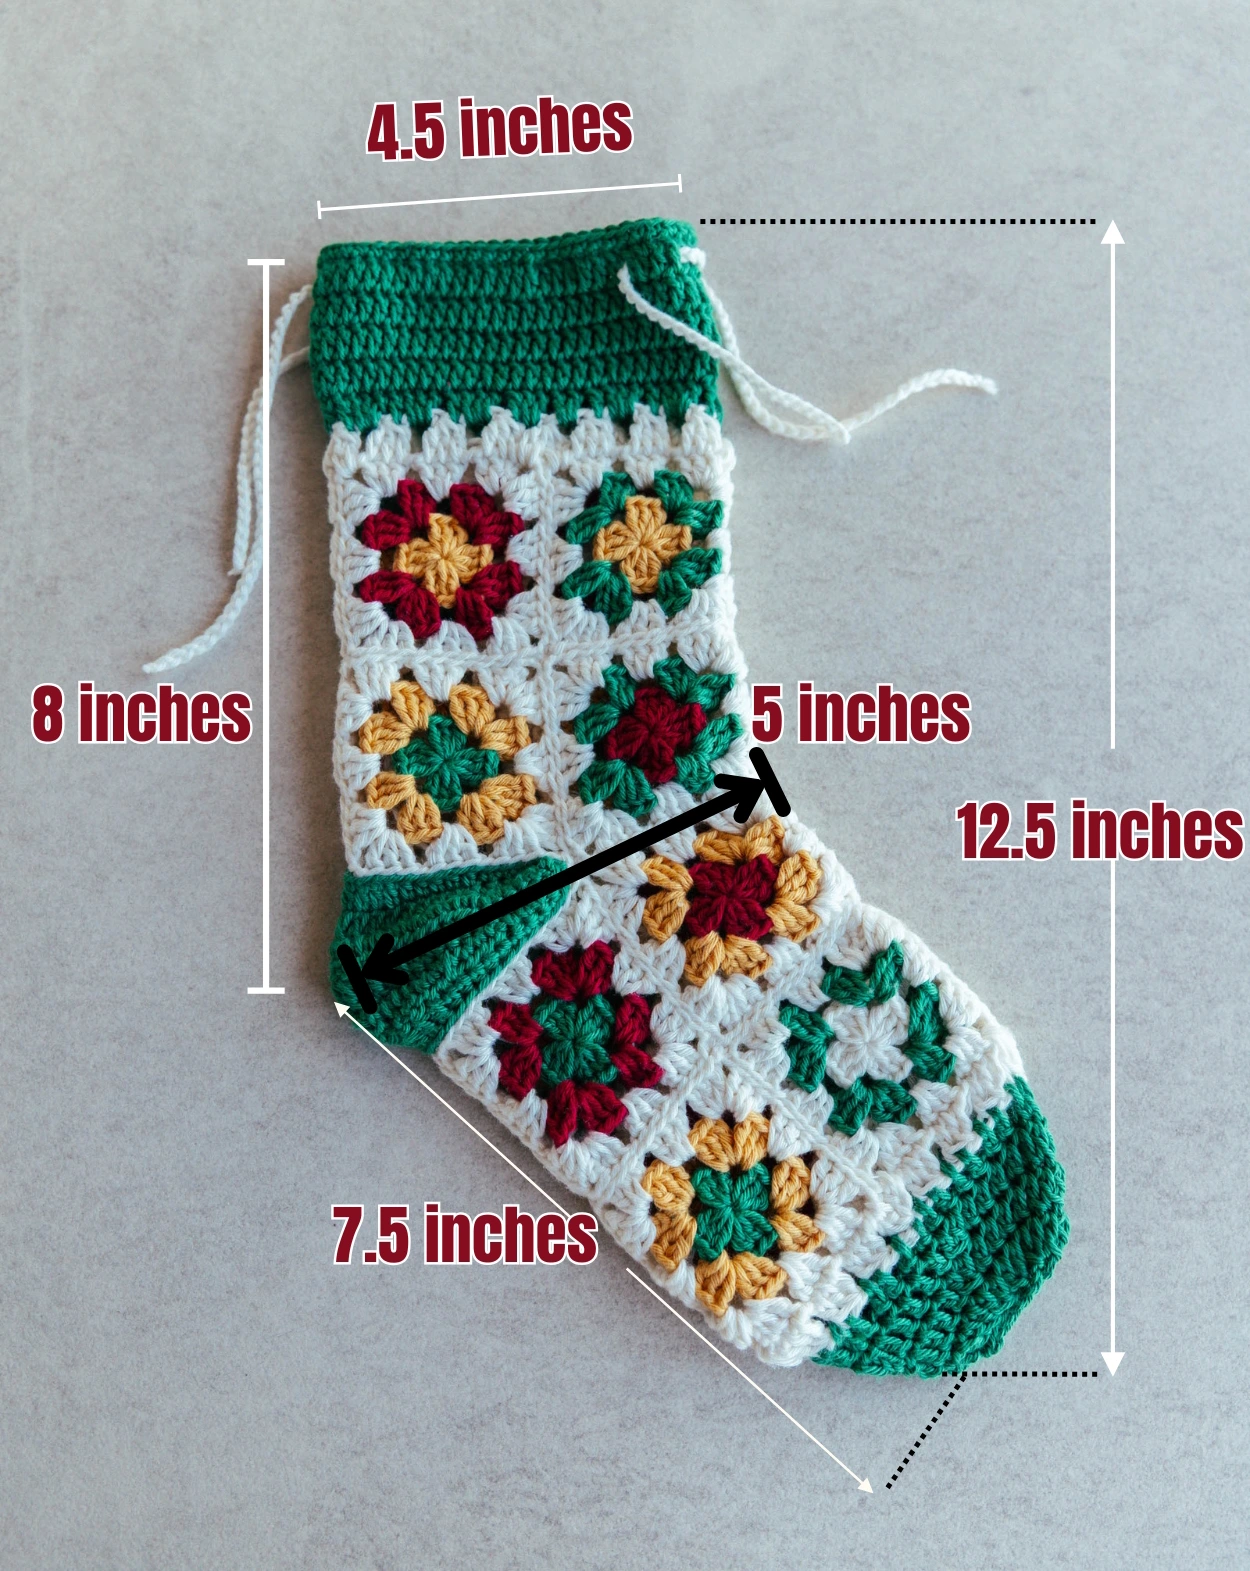
Before crocheting the squares, decide the size you want your stocking to be. The number of squares will determine the final size. Smaller squares create a more delicate stocking, while larger squares produce a roomy stocking for holding gifts or décor items.
Color planning is another essential preparation step. You can sketch out or visualize the arrangement of your squares before crocheting them. Some people prefer symmetrical patterns, while others enjoy blending random colors for a lively holiday effect. Either approach works well.
Make a few sample squares first to ensure you’re satisfied with your tension and stitch consistency. Granny squares should lie flat and maintain a neat shape. If your square curves or warps, adjust your hook size or tension before moving forward.
You should also organize your workspace to keep the process enjoyable and frustration-free. A small box or basket helps keep your finished squares in order, and good lighting ensures you can easily count stitches and follow the rounds.
Lastly, familiarize yourself with the steps required to assemble the squares once crocheted. Joining methods such as the whip stitch, slip-stitch seam, or single-crochet seam each produce different visual results. Choose the one that best suits your desired look for the Granny Square Christmas Stocking – Pattern.
Start your stocking by crocheting the required number of granny squares. Most stockings use between six and twelve squares, depending on size. Each square begins with a magic ring or chain circle, followed by rounds of double crochet clusters that expand outward.
Once your squares are complete, lay them out in the shape of a stocking. This usually includes arranging squares for the foot area, the leg, and the heel. The visual layout helps you confirm the arrangement before sewing anything together.
Next, begin joining the squares using your chosen method. Many crocheters prefer sewing them together because it gives a smoother appearance, but slip stitching can create a decorative ridge if you want the joins to stand out. Keep your stitches consistent to maintain a clean finish.
After assembling the body of the stocking, you will need to add a border. Many patterns suggest a simple round of single crochet around the entire stocking to make the edges uniform. You can use white yarn for a snowy effect or match your main color for a cohesive look.
Now it’s time to crochet the hanging loop. A short chain reinforced with single crochet stitches works perfectly. Attach the loop securely to the top corner of the stocking, making sure it can support the stocking’s weight when filled.
Finally, weave in all loose ends using a tapestry needle. This step gives your stocking a polished look and prevents unraveling. Once finished, your Granny Square Christmas Stocking – Pattern is ready to display, gift, or fill with holiday surprises.
One of the most delightful aspects of the Granny Square Christmas Stocking – Pattern is its versatility. These stockings are perfect for hanging on the fireplace mantel as part of classic Christmas décor. You can create matching stockings for the whole family using personalized color schemes.
You can also use these stockings as gift holders. Filling them with chocolates, small toys, or holiday treats makes for a heartwarming and reusable gift package. Handmade packaging always adds a personal touch.
Another creative option is using the stocking as a decorative wall hanging. Whether on a bedroom door, entryway, or holiday party display, the stocking adds charm and seasonal spirit to any space.
Smaller stockings made with thin yarn can become lovely Christmas tree ornaments. Add a small loop and hang them alongside lights and ornaments for a cozy handcrafted look.
You can also make stockings for pets. Many people enjoy creating customized holiday items for their cats and dogs, and a small granny square stocking is the perfect size for treats and small toys.
Finally, these stockings can be included in craft fairs or online handmade shops if allowed by the pattern designer. Holiday crochet items are always popular, and the timeless granny square style attracts many buyers.
FAQ – Frequently Asked Questions
1. Is the Granny Square Christmas Stocking – Pattern beginner-friendly?
Yes, it is beginner-friendly because the basic granny square requires only simple stitches like double crochet.
2. How many squares do I need for one stocking?
Most stockings require 6–12 squares depending on the desired size.
3. What yarn works best for this project?
Medium-weight acrylic yarn is ideal, but cotton or wool blends also work depending on your preference.
4. Can I use different granny square designs?
Absolutely. Any square with similar measurements can be substituted for a unique look.
5. How do I attach the squares together?
You can sew them with a tapestry needle or join them with slip stitches or single crochet seams.
6. Can I make the stocking bigger?
Yes, simply use larger squares, more squares, or thicker yarn to increase the size.
7. How do I hang the stocking?
Crochet a small loop and attach it to the top corner securely.
8. Can this stocking hold heavy items?
If reinforced properly and made with sturdy yarn, it can hold small to medium items.
9. Is blocking necessary?
Blocking is optional but helps ensure your squares are even and lie flat.
10. How can I personalize the stocking?
Add initials, embroidery, unique colors, or decorative appliqués.
Conclusion
Creating a Granny Square Christmas Stocking – Pattern is a festive and rewarding project that allows you to combine tradition, creativity, and practical skills.
Throughout this article, you learned about materials, step-by-step instructions, assembly tips, and creative uses to make your stocking truly special. I hope this guide inspires you to craft your own holiday keepsake.