Crochet Heart Granny Square Pouch Written – Pattern projects have become increasingly popular among crafters who love blending creativity with practical handmade items. In this article, you will find a complete, SEO-optimized, and Google AdSense-friendly guide that teaches you how to create your own charming pouch based on a classic granny square design featuring a beautiful heart motif. From beginners to advanced makers, everyone can enjoy working with a Crochet Heart Granny Square Pouch Written – Pattern, especially because it offers both aesthetic appeal and functional use.
The beauty of a Crochet Heart Granny Square Pouch Written – Pattern is that it allows you to practice essential crochet techniques while producing a unique pouch perfect for gifting or personal use. This item can be adapted to many styles, whether you like romantic, boho, minimalist, or colorful accessories. Moreover, crafting this pouch is incredibly satisfying because it grows quickly and leaves plenty of room for personalization.
Throughout this article, you will learn the structure, materials, steps, and customization ideas that make this pattern so enjoyable. By understanding the fundamentals behind a Crochet Heart Granny Square Pouch Written – Pattern, you can confidently create a handmade accessory that stands out. Below, we begin with the essential overview that will help guide your project from start to finish.
1. Understanding the Structure of a Crochet Heart Granny Square Pouch Written – Pattern
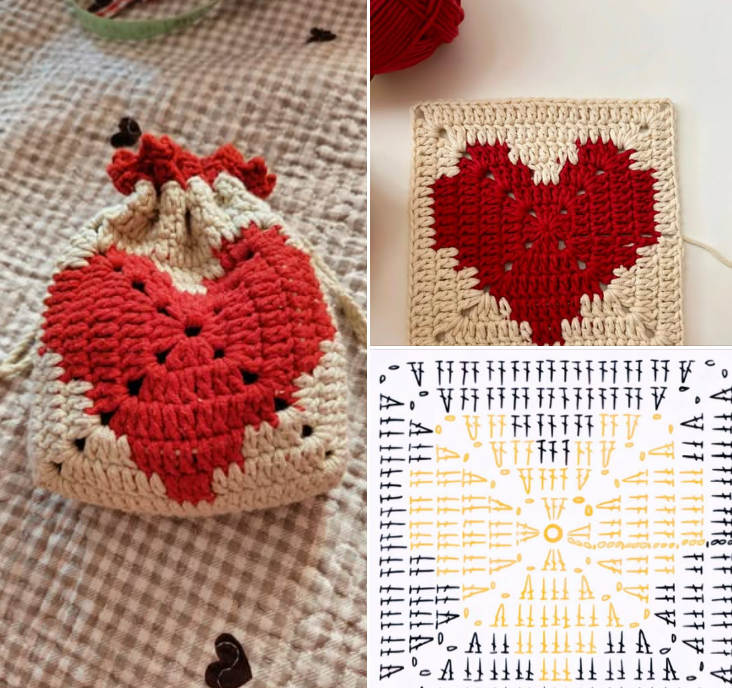
A Crochet Heart Granny Square Pouch Written – Pattern generally begins with the creation of a heart motif placed at the center of a traditional granny square. This central heart is typically made using simple stitches arranged to form a neat, symmetrical shape that stands out visually.
The granny square surrounding the heart builds outward in rounds, giving the pouch a balanced and sturdy structure. Each round expands the square, allowing you to adjust the size based on your preference for a small coin purse or a larger pouch.
Working with granny squares is ideal for beginners because the stitch repetition gives confidence and helps improve consistency. The addition of the heart motif adds a fun intermediate challenge without overwhelming new makers.
Once two identical granny squares are crocheted, they are joined together to form the pouch body. The joining method can vary—whip stitch, slip stitch, or single crochet edging—depending on your preferred finish.
A lining can be added for extra durability, though it is optional. Many crafters enjoy adding fabric linings to give the pouch a polished look, especially when it will hold small or delicate items.
To complete the pouch, a zipper, button, or drawstring closure is attached. This final step transforms the crocheted squares into a functional and stylish accessory.
2. Materials and Tools Needed for a Crochet Heart Granny Square Pouch Written – Pattern
To successfully make a Crochet Heart Granny Square Pouch Written – Pattern, you’ll need high-quality yarn. Cotton yarn is widely recommended because it offers excellent stitch definition and durability. Acrylic yarn can also be used for a softer and more flexible pouch.
Choosing the right hook is equally important. Typically, a 3.0mm to 4.0mm crochet hook works well for pouches, producing a tight enough stitch to maintain shape without gaps.
In addition to yarn and a hook, you’ll need scissors and a tapestry needle for weaving in ends and joining the granny squares. A stitch marker can help you keep track of rounds, especially when creating the heart motif.
If you prefer adding a lining, choose a lightweight cotton fabric. This prevents stretching and adds stability to the pouch. Simple hand-stitching or a sewing machine will work for attaching the lining.
For closure options, consider a small zipper, button, snap, or even a crocheted strap with a loop. Each choice offers a different style, allowing you to customize the pouch to your liking.
Finally, decorative items like beads, appliqués, or embroidery can be added to make your Crochet Heart Granny Square Pouch Written – Pattern even more unique and personal.
3. Step-by-Step Guide to Creating the Crochet Heart Granny Square Pouch Written – Pattern
Start your Crochet Heart Granny Square Pouch Written – Pattern by crocheting the heart motif. Typically, the heart is formed using a combination of basic stitches such as single crochet, half-double crochet, double crochet, and treble crochet. These stitches are arranged in a circular base that gradually shapes into a heart as you work increases and specific stitch placements.
Once the heart is complete, you will begin transforming it into a granny square. Work around the heart with chain spaces and clusters, forming the traditional granny square appearance while keeping the motif centered.
Continue adding rounds until the square reaches your desired pouch size. Consistency in stitch tension is key here, as uneven stitches may distort the square shape.
After completing two matching squares, place them with the right sides facing outward and begin joining them. Many crafters prefer single crochet for a sturdy and decorative seam.
Leave the top of the pouch unjoined to create the opening. Once the sides and bottom are fully joined, turn your attention to finishing touches such as weaving in loose ends and trimming excess yarn.
If you choose to add a zipper or button closure, do so now. Attach the closure securely to ensure the pouch is durable and functional for everyday use.
4. Creative Customization Ideas for Your Crochet Heart Granny Square Pouch Written – Pattern
A Crochet Heart Granny Square Pouch Written – Pattern offers countless opportunities for customization, allowing you to create a pouch that fits your style perfectly. One common customization is experimenting with color combinations. For example, using contrasting colors for the heart and the square background makes the heart stand out beautifully.
Another creative idea is adding a border around the pouch. A scalloped edge, picot trimming, or a simple single crochet border can give the pouch a more refined look.
If you enjoy adding texture, consider incorporating bobble stitches or puff stitches to create raised elements around the granny square. These stitches add depth and visual interest.
Personalization is also possible by attaching charms, initials, embroidered designs, or decorative beads. These additions make the pouch an excellent gift option with a thoughtful handmade touch.
Using variegated yarn is another easy way to add uniqueness to your pouch. The natural color changes in the yarn create a beautiful gradient effect that complements the heart motif.
Lastly, consider adding a wrist strap or shoulder strap to turn your pouch into a mini-bag. This transforms your Crochet Heart Granny Square Pouch Written – Pattern into a practical accessory for daily use.
FAQ – Crochet Heart Granny Square Pouch Written – Pattern
1. Is the Crochet Heart Granny Square Pouch Written – Pattern beginner-friendly?
Yes. Although the heart motif includes a few intermediate stitches, the pattern overall is suitable for beginners willing to learn.
2. What yarn is best for making this pouch?
Cotton yarn is ideal due to its durability and excellent stitch definition, especially for granny square projects.
3. How long does it take to make a pouch?
Most crafters can complete one pouch in 1–3 hours, depending on experience and desired size.
4. Can I add a lining to my pouch?
Yes, adding a lining enhances structure and prevents stretching. It is optional but highly recommended.
5. What closures work best?
Zippers provide the most secure closure, but buttons, snaps, and drawstrings are also great alternatives.
6. Can the pouch be washed?
Handwashing is recommended, especially if the pouch includes a lining or decorative additions.
Conclusion
Creating a Crochet Heart Granny Square Pouch Written – Pattern is a delightful project that blends creativity, practicality, and skill building.
From understanding the structure to selecting materials, crafting the heart motif, assembling the pouch, and adding custom touches, this guide has provided everything you need to confidently complete your handmade accessory. This project is beginner-friendly, highly customizable, and perfect for gifting or personal use.