Crochet Chicken Bag – Pattern projects have become incredibly popular among crafters who love fun, functional, and creative handmade accessories. In this article, you will find a fully original, Google-AdSense-friendly, SEO-optimized guide designed to help you craft your own chicken-themed bag with personality and charm. From materials to finishing touches, this tutorial uses the keyword Crochet Chicken Bag – Pattern naturally and strategically to enhance both clarity and search visibility.
Working on a Crochet Chicken Bag – Pattern is a delightful experience for beginners and advanced crocheters alike. This project combines basic crochet techniques with imaginative shaping, resulting in a bag that is cute, practical, and guaranteed to attract attention. Whether you want a fun accessory, a unique gift, or a handmade item to sell, this pattern offers endless possibilities.
Throughout this article, you will find clearly structured sections, natural language, human-like explanations, and essential SEO practices. Before we move into the detailed steps, it’s important to understand how accessible and enjoyable creating a Crochet Chicken Bag – Pattern can be—even if you’re not an expert yet.
1. Materials Needed for a Crochet Chicken Bag – Pattern
Choosing the right materials is the first and one of the most important steps when starting your Crochet Chicken Bag – Pattern. Quality materials ensure durability, shape, and a polished appearance for your final creation.
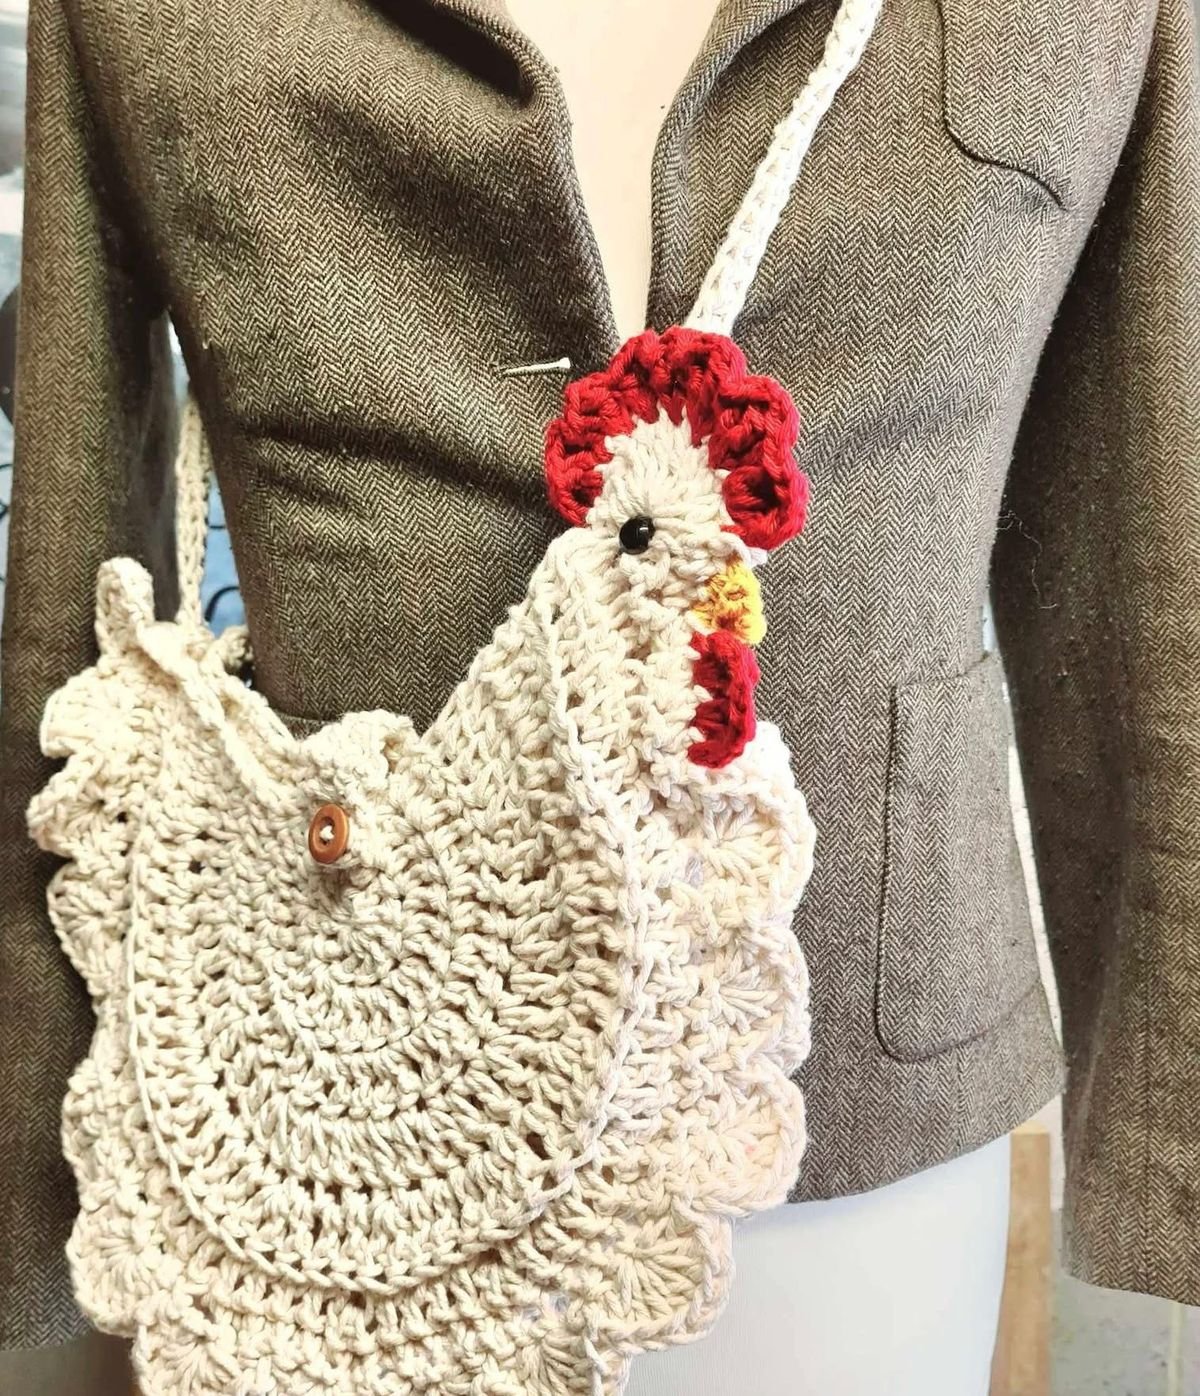
Most crafters prefer medium-weight acrylic yarn for this project because it provides structure without being too stiff. You will need white or cream yarn for the chicken body, yellow for the beak and feet, and red for the comb and wattle. Acrylic is budget-friendly, widely available, and easy to work with, making it a great choice for beginners.
Your crochet hook size should match your yarn weight. For a standard chicken bag, a 4.0 mm or 4.5 mm hook works perfectly. A slightly smaller hook can also help maintain tight stitches, which is ideal for bag projects since loose stitching may weaken the structure.
You will also need a yarn needle for sewing the pieces together and weaving in your ends. Stitch markers are optional but very helpful, especially for keeping track of rounds when working on the bag’s circular base or shaping the chicken’s head.
A zipper or drawstring can be used depending on how you want your bag to close. Both options are functional and safe, especially if you plan to use the bag for carrying everyday items.
Finally, consider adding safety eyes or crocheted eyes to give your chicken bag personality. Small extras like buttons, decorative feathers, or fabric lining can also elevate the appearance of your Crochet Chicken Bag – Pattern and make it uniquely yours.
2. Creating the Chicken Body Base
The body is the largest and most essential part of your Crochet Chicken Bag – Pattern, and it starts with a round or oval base. This base supports the shape and determines how spacious your bag will be.
Begin by making a magic ring and crocheting a series of single crochet stitches into it. This creates a secure, tight center which is crucial for bag strength. Increase evenly around the circle to grow the base to your desired size. Most chicken bag bases measure between 6 to 9 inches in diameter.
Once the base is complete, you will start building the height of the bag by crocheting around without increasing. This allows the walls of the chicken body to rise. Keep your tension consistent to avoid uneven sides, which can affect the overall appearance and stability.
To create a sturdy bag, many crocheters prefer working with tighter stitches or even lining the bag later with fabric. While lining is optional, tighter stitching is recommended for structural integrity, especially if you plan to carry heavier items.
As you continue crocheting upward, the chicken body begins to take shape. You can choose to keep it cylindrical or add gentle shaping to make it rounder. The beauty of a Crochet Chicken Bag – Pattern is that you are free to customize the shape to match your vision.
When your bag reaches your desired height, you can begin preparing for the top section where the chicken’s head will be attached. This transition marks the beginning of the character and charm that make these bags so popular.
3. Shaping the Chicken’s Head, Comb, and Features
The personality of your Crochet Chicken Bag – Pattern truly comes to life when you start crafting the chicken’s head and facial features. These details are what make your bag adorable and instantly recognizable.
Begin the head separately using white or cream yarn. Much like the body, the head is crocheted in the round. Start with a magic ring, increase evenly, and stop increasing when the head reaches the desired width. Then continue working evenly to form the height of the head.
Once the head shape is complete, you can add the beak. The beak is usually created by crocheting a small triangle using yellow yarn. A tight stitch pattern helps it hold its shape. Sew the beak securely in place using your yarn needle.
Next comes the red comb and wattle—the most iconic chicken features. The comb is typically crafted by crocheting a short piece with scalloped edges. You can make it tall, short, or even curly depending on your preferred style. Attach it to the top of the head for a classic chicken look.
The wattle is added below the beak and can be made from a simple chain loop or a tiny crocheted oval. While optional, this detail enhances the overall charm and makes the chicken more expressive.
Finally, add the eyes. Safety eyes are easy to use and give a polished look, but if you prefer a fully crocheted or embroidered option, that works perfectly too. Once the face is complete, sew the head onto the body of the bag carefully so it sits securely and symmetrically.
4. Adding the Strap and Final Details
Now that your chicken shape is complete, it’s time to finish your Crochet Chicken Bag – Pattern with a practical strap and personal touches. The strap not only makes the bag usable but also allows you to customize the length and style.
You can crochet the strap using a simple chain followed by rows of single or half-double crochet stitches. This creates a sturdy and comfortable handle. Make the strap longer if you want a crossbody bag or shorter for a handbag style.
Attach the strap securely to both sides of the bag. Reinforce the attachment points with extra stitches to ensure durability, especially if the bag will carry heavier items. Strong attachment points are essential for long-term use.
If you prefer a more modern look, you can use a pre-made strap with metal clips or even a leather strap. These can be sewn onto crocheted loops or attached with metal rings.
At this stage, you can also add the closing mechanism. A zipper will make the bag secure, but a crocheted drawstring gives it a rustic and charming appearance. Choose whichever option suits your style and usage needs.
For an extra touch of creativity, many crafters add crocheted wings to the sides of their chicken bag. These small additions give your bag more character and detail without adding complexity.
Before you finish, weave in all loose ends, trim extra threads, and inspect your bag for symmetry and strength. Your Crochet Chicken Bag – Pattern is now complete and ready to be enjoyed or gifted.
FAQ About Crochet Chicken Bag – Pattern
1. Is this project suitable for beginners?
Yes. While the Crochet Chicken Bag – Pattern includes shaping and assembly, beginners with basic stitch knowledge can complete it successfully.
2. How long does it take to complete the bag?
Depending on your skill level and available time, it can take anywhere from one day to several days.
3. Can I choose different colors for my chicken bag?
Absolutely. You can use traditional white and red or make a colorful, whimsical chicken bag with any yarn shades you like.
4. Do I have to add a zipper?
No. Many crafters use a drawstring instead. Both options work well and are safe for daily use.
5. What yarn is best for this pattern?
Medium-weight acrylic yarn is recommended because it is durable, structured, and easy to work with.
6. Can I line the bag?
Yes. A fabric lining adds strength and a professional finish, especially if you plan to carry heavier items.
Conclusion
Creating a Crochet Chicken Bag – Pattern is a fun and rewarding experience that blends creativity, practicality, and unique handmade charm.
In this article, you learned the materials needed, how to build the body, create the chicken’s features, and add final personal touches.