Oh Tannenbaum Christmas Tree Hat – Pattern is a festive and creative crochet project that brings the joy of the holiday season to life. From the very first stitch, you can feel the Christmas spirit growing as your hat begins to take shape—just like decorating a miniature tree you can actually wear. A Oh Tannenbaum Christmas Tree Hat – Pattern is charming, fun to make, and perfect for holiday parties, cozy winter outings, or as a unique handmade gift. This article will walk you through all the essential steps to create a beautiful Christmas tree hat while keeping the content optimized for SEO and within Google AdSense policies.
Crocheting a Christmas tree hat gives you the opportunity to blend functionality with festive flair. The hat itself is warm and comfortable, while the decorations—stars, baubles, garlands, and more—bring it to life in the most delightful way. With a Oh Tannenbaum Christmas Tree Hat – Pattern, you have endless possibilities for customization, whether your style leans toward minimalistic elegance or a brightly decorated, joyful design full of holiday cheer.
With this guide, you will not only learn how to create the base of the hat but also how to add decorative layers that mimic a real Christmas tree. From yarn selection to final embellishments, these detailed instructions will help beginners and intermediate crocheters alike create a wearable piece that spreads holiday magic wherever it goes.
1. Materials Needed for Oh Tannenbaum Christmas Tree Hat – Pattern
Before you begin working on your Oh Tannenbaum Christmas Tree Hat – Pattern, gathering the right materials will ensure that your finished project is both durable and visually appealing. Choosing the right yarn, hook, and accessories is crucial for creating a hat that captures the essence of a Christmas tree.
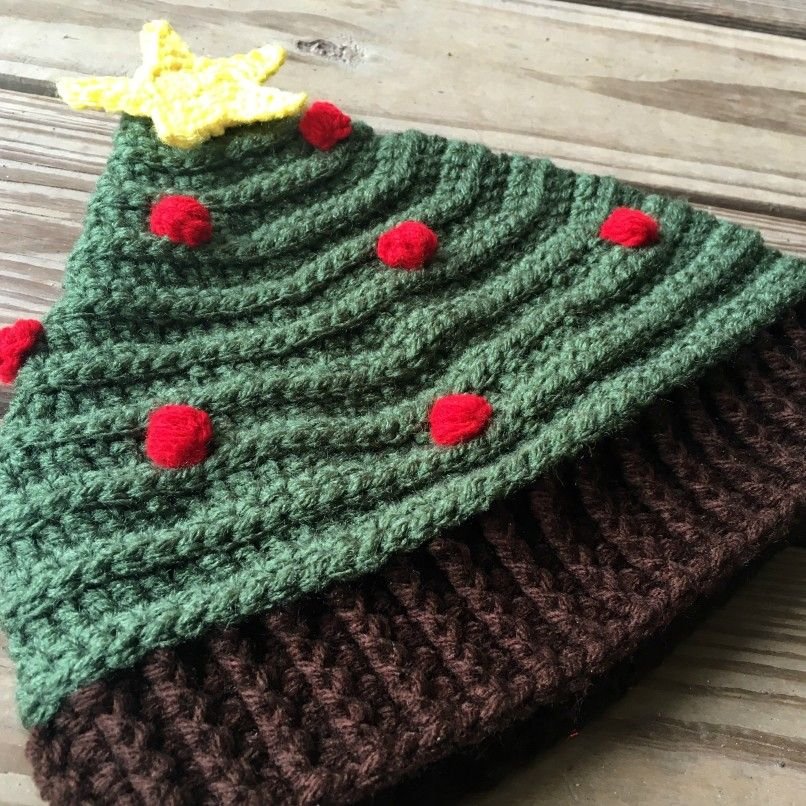
Start with yarn selection. A rich green shade is essential for achieving that classic Christmas tree appearance, but you can also experiment with deep emerald, bright green, or even glitter-infused yarn. Using a worsted-weight yarn provides enough structure to make the tree shape stand tall while keeping the hat soft and comfortable.
Your crochet hook size will typically range from 4.5 mm to 5.5 mm depending on your tension and the yarn you choose. Using the recommended hook size ensures that your stitches are tight enough to hold shape but flexible enough to form naturally around the head. The Oh Tannenbaum Christmas Tree Hat – Pattern looks best with consistent stitch tension throughout.
In addition to yarn, you will need small embellishments like gold or silver yarn for tinsel, tiny pom-poms for ornaments, beads for lights, or even mini bells for added charm. These accessories help create a festive and lively appearance that turns a simple hat into a wearable Christmas decoration.
You will also need stitch markers, a yarn needle, scissors, and optional lightweight stuffing to help the top of the tree stand upright. These tools make construction easier and ensure the details of your Oh Tannenbaum Christmas Tree Hat – Pattern hold properly over time.
Lastly, having a measuring tape will help you ensure the hat fits perfectly. Taking accurate measurements is a key part of any crochet project and guarantees that your Christmas tree hat is comfortable enough for all-day wear.
2. Shaping the Christmas Tree Base
The base of your Oh Tannenbaum Christmas Tree Hat – Pattern begins as a simple beanie shape, but it gradually transforms into a festive, tree-like structure. This shaping process is what gives the hat its unmistakable Christmas charm.
Start by creating a magic ring and working your first round of stitches. Double crochet or half-double crochet stitches are commonly used because they offer flexibility and add volume. Expanding the crown evenly is essential for creating a solid foundation for the tree shape.
Work the rounds in continuous or joined rounds, depending on your preference. As you increase, start forming gentle ridges or layers in the hat body. These layers represent the “branches” of your Christmas tree. Many crocheters achieve this effect by alternating between stitch types or adding picot stitches to mimic fluffy branches.
As you move down the hat, you can gradually decrease the number of increases per round. This helps the hat taper in a tree-like fashion, giving it a triangular silhouette. The Oh Tannenbaum Christmas Tree Hat – Pattern works best when the shaping is subtle and smooth.
Pay close attention to your tension during this phase. Uneven tension can cause lumps or an awkward shape. The more consistent your stitches, the more natural and tree-like your hat will appear once finished.
By the time you reach the brim, your hat should resemble a stylized Christmas tree shape. From here, you can begin adding decorative features that will bring your Oh Tannenbaum Christmas Tree Hat – Pattern to life.
3. Decorating the Oh Tannenbaum Christmas Tree Hat – Pattern
Once your base is complete, it’s time to decorate your Oh Tannenbaum Christmas Tree Hat – Pattern. This is the most creative and enjoyable part of the project because it allows you to personalize your hat with festive flair.
Start with the star at the top of the tree. This iconic feature can be crocheted using a small star pattern or created from felt for a lightweight option. Attach it securely at the peak of the hat using sturdy stitching to ensure that it stays upright.
Next, add garlands. These can be made using simple chain stitches in gold, silver, red, or white yarn. Wrap them gently around the hat or sew them into place for a more permanent look. Garlands help enhance the Christmas tree aesthetic and create a sense of movement.
Crocheted “ornaments” or tiny pom-poms make perfect baubles for your tree. You can either sew them directly onto the hat or attach them with a bit of hot glue if the hat will be used strictly as decoration. These ornaments give your Oh Tannenbaum Christmas Tree Hat – Pattern a playful, colorful appearance.
Beads or sequins can also be added to mimic Christmas lights. Make sure they are securely attached, especially if the hat is intended for children. Lightweight beads create the appearance of sparkling lights without making the hat heavy.
You can also add textured stitches like puff stitches or bobbles to mimic real pine branches. These stitches give the hat dimension and help the decorative elements stand out beautifully.
When all decorations are in place, step back and examine your design. You can rearrange elements or add more layers until your Oh Tannenbaum Christmas Tree Hat – Pattern looks exactly the way you imagined.
4. Finishing Touches and Customization Options
The final steps in completing your Oh Tannenbaum Christmas Tree Hat – Pattern involve refining the details and making any last-minute adjustments that enhance comfort and durability.
Start by reinforcing all attachments. Stars, ornaments, beads, and garlands should be sewn securely to prevent them from loosening during use. Strong stitching ensures your hat withstands regular wear.
Next, trim any excess yarn ends and weave them neatly into the interior. A clean finish helps the hat feel professional and polished. Your Oh Tannenbaum Christmas Tree Hat – Pattern should look tidy both inside and out.
Consider adding a soft lining if you want extra warmth or comfort. A fleece lining can make the hat cozier, especially if the yarn feels scratchy. This addition is optional but recommended for those living in colder climates.
Another fun customization option is to add earflaps or braided ties. These features not only keep the hat secure on the head but also enhance its whimsical holiday look.
If you want your hat to stand upright like a real Christmas tree, you can lightly reinforce the interior with mesh, foam, or stuffing. Just make sure these materials don’t make the hat uncomfortable or too heavy.
Finally, try on your finished hat or place it on a hat stand to admire your work. The joy of seeing your completed Oh Tannenbaum Christmas Tree Hat – Pattern is part of what makes crochet so rewarding.
FAQ About Oh Tannenbaum Christmas Tree Hat – Pattern
1. Is the hat suitable for beginners?
Yes, beginners can follow the Oh Tannenbaum Christmas Tree Hat – Pattern with patience, especially if they are comfortable with basic increases.
2. What yarn works best?
Worsted-weight green yarn works best for the tree base, with metallic or colorful yarn for decorations.
3. Can I wash the hat?
Hand washing is recommended to protect decorations and keep the hat in good shape.
4. Is it safe for children?
Yes, but avoid small detachable decorations for young children.
5. How do I keep the tree shape upright?
Use lightweight stuffing or a supportive stitch pattern to help it stand.
6. Can I customize colors?
Absolutely! Try sparkle yarn, pastel Christmas palettes, or even a snowy white tree.
Conclusion
Creating a Oh Tannenbaum Christmas Tree Hat – Pattern is a joyful and festive crochet project that captures the magic of the holiday season.
From shaping the tree base to decorating with stars, garlands, and ornaments, each step offers an opportunity for creativity and fun. This article covered materials, shaping techniques, decorating ideas, and customization options so you can create a unique wearable Christmas masterpiece.