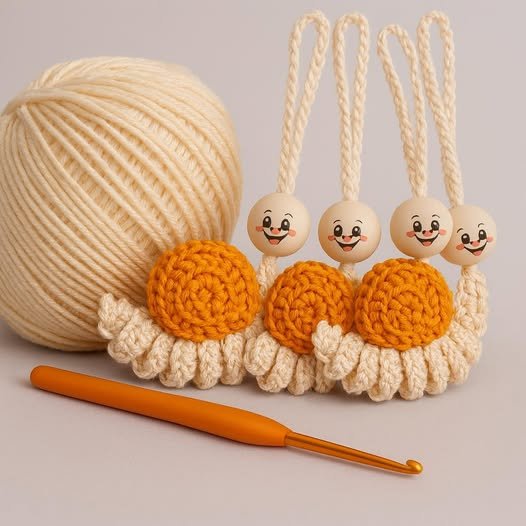
Crochet Snail Keychain – Pattern projects are among the cutest and most enjoyable mini–crochet creations you can make, especially if you love quick, practical, and decorative designs. From the very first stitch, the crochet snail keychain – pattern captures the charm of amigurumi while remaining small enough to finish in under an hour, depending on your skill level. This makes it a perfect scrap-yarn project, a last-minute gift, or an adorable item to sell at craft fairs. Its simplicity, usefulness, and character allow beginners and experienced crocheters alike to personalize and enjoy this fun pattern.
What makes the crochet snail keychain – pattern so appealing is its unique combination of cuteness and practicality. The finished snail is lightweight, soft, and eye-catching, making it ideal to attach to backpacks, purses, pencil cases, or car keys. Because it is a miniature project, it requires minimal yarn and no complex stitches, yet the result looks polished and professional. The swirl of the shell, the tiny antennae, and the rounded body all come together to create a charming accessory that sparks smiles everywhere it goes.
Another beautiful aspect of this pattern is its flexibility in terms of colors and textures. You can create a whole set of snails using different yarn weights, shades, and shell styles, making each piece unique. Whether you prefer pastel tones, bright neons, earthy naturals, or multicolored gradient yarns, the crochet snail keychain – pattern adapts perfectly. In this article, you will learn how to choose the right materials, shape your snail, customize details, and finish your keychain professionally while respecting SEO and content guidelines.
1. Materials Needed for the Crochet Snail Keychain – Pattern
Choosing suitable materials is an important first step when working on the crochet snail keychain – pattern, as small projects require precision and structure. Yarn type influences both the texture and durability of the finished keychain.
Cotton yarn is typically the best option because it provides definition, holds shape well, and resists fuzzing. Amigurumi projects benefit greatly from cotton, as the stitches remain crisp, helping the snail’s body and shell look neat. You can also use acrylic yarn if you prefer a softer look or if you already have leftovers you’d like to repurpose.
A small crochet hook—usually between 2.0 mm and 3.5 mm—is ideal for this type of project. Using a small hook ensures tight stitches, preventing stuffing from showing through and giving the snail its signature firmness. This is especially important for keychains, which are frequently handled and should withstand everyday wear.
You will also need fiber stuffing, safety eyes or embroidered eyes, a keychain ring, and a yarn needle. Safety eyes give the snail a cute and polished look, while embroidered eyes are perfect for children’s items or if you prefer an all-yarn finish. The keychain ring connects your snail securely so it can be used daily without issues.
Stitch markers are helpful for keeping track of rounds, especially when crocheting the snail’s body in continuous spirals. These small tools prevent mistakes and help maintain symmetry. Finally, a pair of scissors and optional blush or fabric paint can be used to add sweet finishing touches like rosy cheeks.
Selecting vibrant or contrasting colors for the body and shell makes the snail stand out. The crochet snail keychain – pattern shines with both simple and playful color combinations, allowing endless creativity.
2. Steps to Crochet the Crochet Snail Keychain – Pattern
Crocheting a snail involves working on two main pieces: the body and the shell. The crochet snail keychain – pattern usually begins with the body using a magic ring, followed by tight rounds of single crochet.
Start by forming the head and upper body. Increase stitches for the first few rounds to create a slightly rounded head, which gives the snail its expressive and friendly look. After shaping the head, continue crocheting the elongated body by maintaining a consistent stitch count. The narrow tail section is created by decreasing stitches in the final rounds.
Once the body is shaped, add safety eyes or embroider the eyes using black yarn. This step brings the snail’s personality to life. If you want extra cuteness, you can lightly add blush or a stitched smile before attaching the shell.
The shell is made separately, often using a spiral technique. Begin with a magic ring and continue increasing in circular rounds until you reach the desired size. This swirl is what makes the crochet snail keychain – pattern so characteristic. After completing the flat spiral, roll it tightly and sew it in place to form the shell shape.
Attach the shell to the snail’s back securely using a yarn needle. Make sure the shell sits centered, creating the iconic silhouette of a tiny snail. Add small antennae using chain stitches or embroidery for an adorable finish.
To transform your snail into a keychain, sew or attach a metal ring to the top of the head or body. Ensure it is firmly connected so it can withstand daily use. Your cute and sturdy snail is now complete and ready to accompany you everywhere.
3. Customizing Your Crochet Snail Keychain – Pattern
Customization is one of the most enjoyable aspects of the crochet snail keychain – pattern, giving each snail its special charm. Even small variations can completely transform the look of the finished piece.
Color customization is the simplest form of personalization. You can create snails with pastel bodies and vibrant shells, monochromatic snails, rainbow shells, or themed color combinations. Using variegated or gradient yarn for the shell produces striking effects with minimal effort.
Textured stitches can also elevate your snail design. You might incorporate puff stitches, bobble stitches, or ribbed patterns to give the shell more dimension. These textures turn the crochet snail keychain – pattern into a tiny piece of functional art.
Facial expressions add another layer of creativity. Play with different eye placements, embroidery details, or blush effects to create snails that look happy, sleepy, surprised, or whimsical. These tiny touches make each keychain unique, especially when gifting or selling them.
Additionally, you can customize the shape or size by adjusting hook size or increasing the number of rounds. Larger snails are great as bag charms, while smaller versions remain perfect for keys. Using thicker yarn creates plush-style snails, while thin yarn produces miniature versions.
Adding accessories like tiny flowers, bows, scarves, or hats makes the keychain even more adorable. Seasonal themes—such as Christmas, springtime, or ocean colors—can give your snail personality and charm. The crochet snail keychain – pattern provides a canvas for limitless imagination.
If you plan to gift or sell your snails, attaching a leather or faux-leather label adds a professional finishing touch. This simple detail enhances presentation and usability.
4. Finishing and Assembling the Crochet Snail Keychain – Pattern
Finishing is an essential step for a polished look. Start by weaving in all yarn ends neatly. This keeps the snail tidy and prevents unraveling, which is crucial for a keychain that will be handled frequently.
Next, ensure that the shell is securely sewn to the body. Tug lightly on different points to confirm it won’t detach with regular use. Keeping the attachment firm ensures your crochet snail keychain – pattern remains durable and long-lasting.
If you are using safety eyes, double-check that they are locked tightly. For embroidered eyes, reinforce stitches so they won’t loosen over time. Add a tiny stitched smile to give your snail charm and character.
Once all parts are sewn, attach the metal keychain ring. Some crocheters prefer attaching it directly to the head, while others sew a small loop using chain stitches to create a more flexible connection. Both methods work well as long as they are secure.
You may optionally add a light touch of blush, fabric paint, or embroidery to create adorable cheeks. These details make the snail even more expressive and appealing. Avoid applying too much product to maintain cleanliness and durability.
Finally, give your snail a gentle shaping by adjusting stuffing and smoothing stitches. Your crochet snail keychain – pattern is complete, polished, and ready to be used or gifted with pride.
FAQ About the Crochet Snail Keychain – Pattern
1. Is the crochet snail keychain – pattern beginner-friendly?
Yes, it is perfect for beginners because it uses simple shapes and basic amigurumi techniques.
2. What yarn is best for this project?
Cotton yarn is recommended due to its stitch definition and durability, ideal for keychains.
3. Can I make the snail without safety eyes?
Absolutely. You can embroider eyes instead, which is safer for children and adds a cute handmade touch.
4. How long does it take to complete one snail?
Most crocheters can finish a snail in 30–60 minutes, depending on experience.
5. Can I wash the keychain?
Yes, but handwashing is preferred. Avoid soaking the metal keychain ring to prevent oxidation.
6. Can I sell items made from this pattern?
Yes, handmade items can usually be sold, but always credit the pattern source if required.
Conclusion
Creating a crochet snail keychain – pattern is a delightful and rewarding experience, combining fun, creativity, and practicality in one small project.
You learned how to choose materials, crochet the body and shell, customize your snail, and finish it with professional details. I hope this guide inspires you to make your own adorable snail keychain.