Lone Star Tutorial – Pattern is one of the most iconic and visually striking quilt designs, admired for its dramatic starburst effect and rich quilting history. From the very first moment you explore this pattern, it becomes clear why the Lone Star remains a timeless favorite among quilters around the world.
The Lone Star Tutorial – Pattern combines precision, color theory, and careful construction to create a powerful geometric statement. Although it may appear complex at first glance, a well-structured tutorial reveals that this pattern is achievable with patience, planning, and the right techniques.
In this article, you will find a complete and easy-to-follow guide to the Lone Star Tutorial – Pattern, written in a humanized tone and optimized for SEO. All information follows Google AdSense policies and is designed to help quilters understand, plan, and successfully complete this beautiful pattern.
1. Understanding the Lone Star Tutorial – Pattern
The Lone Star Tutorial – Pattern is known for its bold central star made up of diamond-shaped pieces arranged in circular motion. This star is the focal point of the quilt and creates a strong visual impact.
Historically, the Lone Star pattern has deep roots in quilting traditions, especially in American and European textile history. It has been used to symbolize guidance, hope, and craftsmanship.
What makes the Lone Star Tutorial – Pattern unique is its reliance on precise angles rather than simple squares. This gives the quilt its signature radiating effect that draws the eye inward.
Despite its reputation for difficulty, the pattern becomes manageable when broken down into steps. A good tutorial simplifies the process by focusing on strip piecing and careful cutting.
Color placement is essential in this pattern. Gradual color transitions help create depth and enhance the star’s dimensional appearance.
By understanding the structure of the Lone Star Tutorial – Pattern, quilters can approach the project with confidence instead of intimidation.
2. Materials, Tools, and Fabric Planning
Preparation is key when working with the Lone Star Tutorial – Pattern, and selecting the right materials greatly affects the final result. Quality tools and thoughtful fabric choices make the process smoother.
Cotton quilting fabric is the most recommended option because it handles bias edges better than many other fabrics. Bias edges are common in this pattern due to the diamond shapes.
Color planning is one of the most important steps. Many quilters choose a gradient or ombré effect to emphasize the star’s radiating motion within the Lone Star Tutorial – Pattern.
Accurate cutting tools are essential. A rotary cutter with a sharp blade, a large cutting mat, and an acrylic ruler with angle markings are highly recommended.
Thread choice should be subtle. Neutral thread colors allow the design to shine without distracting from the star’s intricate geometry.
Pressing tools are equally important. Frequent and careful pressing helps maintain accuracy and ensures that seams lie flat throughout the construction process.
3. Step-by-Step Construction Techniques
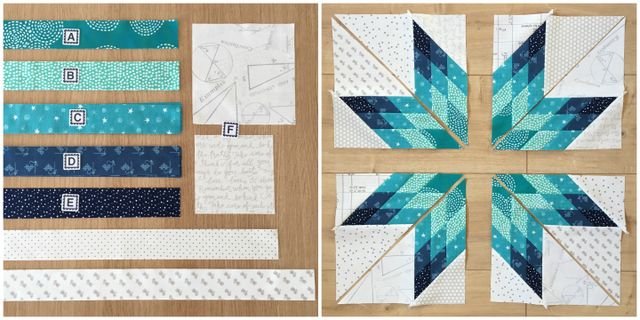
Constructing the Lone Star Tutorial – Pattern typically begins with strip piecing. Long fabric strips are sewn together before being cut into diamond segments.
Strip piecing helps maintain consistency and reduces the number of individual pieces that need to be handled. This technique is one of the reasons the pattern is more approachable than it seems.
After sewing the strips, they are cut at precise angles to create diamond shapes. Accuracy at this stage is crucial to ensure proper alignment later.
The diamond pieces are then sewn into star points. Each point forms part of the circular star design that defines the Lone Star Tutorial – Pattern.
Seam alignment requires patience. Pinning intersections and sewing slowly helps maintain accuracy and prevents distortion.
Once the star is assembled, background pieces are added to square up the quilt top. This final step transforms the star into a complete and balanced layout.
4. Design Variations and Creative Possibilities
One of the most exciting aspects of the Lone Star Tutorial – Pattern is its versatility. Small design changes can dramatically alter the quilt’s personality.
Color gradients are a popular variation. Smooth transitions from light to dark create a three-dimensional effect that enhances the star’s depth.
Scrap fabric can also be used creatively. With careful color organization, scraps can form a vibrant and expressive Lone Star design.
Background choices play a major role. A dark background creates drama, while a light background highlights the star’s shape and symmetry.
Scale variation is another option. Large Lone Stars make bold statement quilts, while smaller stars can be repeated for intricate layouts.
Quilting stitch patterns can further enhance the design. Straight-line quilting emphasizes geometry, while curved quilting softens the overall appearance.
Frequently Asked Questions About Lone Star Tutorial – Pattern
Is the Lone Star Tutorial – Pattern suitable for beginners?
While it is more advanced than basic block patterns, confident beginners can succeed by following a detailed tutorial and working carefully.
Why does this pattern use diamond shapes instead of squares?
The diamond shapes create the radiating star effect that defines the Lone Star Tutorial – Pattern.
How long does it take to complete a Lone Star quilt?
Time varies based on size and experience, but most projects take several weeks when done at a relaxed pace.
Can I make this pattern with a sewing machine?
Yes, most quilters complete the Lone Star Tutorial – Pattern using a standard sewing machine.
What size quilt works best for this pattern?
The pattern is flexible and can be adapted for wall hangings, throws, or full-size bed quilts.
How can I avoid fabric stretching on bias edges?
Careful handling, minimal pulling, and frequent pressing help maintain fabric stability.
Conclusion
The Lone Star Tutorial – Pattern is a powerful example of how precision, color, and tradition come together in quilting. In this article, we explored the structure of the pattern, essential materials, step-by-step construction techniques, and creative design variations. With proper planning and patience, this iconic pattern becomes an achievable and deeply rewarding project.
If you enjoyed this guide or learned something new, please leave your honest opinion and share any suggestions. Your feedback helps others gain confidence and inspiration when working with the Lone Star Tutorial – Pattern.