Finding the perfect Tulip Time Quilt – Pattern is like discovering a breath of fresh spring air for your sewing room, offering a timeless blend of floral elegance and geometric precision. Whether you are a seasoned quilter looking for a seasonal project or a beginner eager to master the art of appliqué and piecing, this specific design provides a wonderful canvas for creativity. The Tulip Time Quilt – Pattern has gained immense popularity in the quilting community because it captures the fleeting beauty of tulips in a permanent, cozy medium that can be passed down through generations.
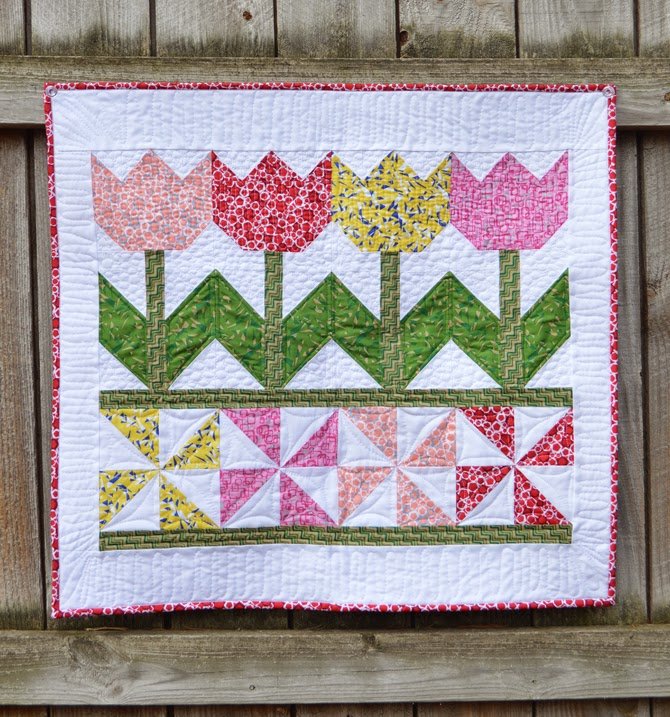
When you embark on a project involving the Tulip Time Quilt – Pattern, you are engaging in a tradition that celebrates the renewal of nature. Most variations of this quilt pattern focus on vibrant colors—think deep reds, sunny yellows, and soft pinks—set against a crisp white or cream background to make the petals pop. The Tulip Time Quilt – Pattern is versatile enough to be adapted into a wall hanging, a table runner, or a full-sized bedspread, depending on how many blocks you choose to create and how you scale the individual floral units.
High-quality quilting instructions and a well-drafted Tulip Time Quilt – Pattern are essential for ensuring that your points align perfectly and your curves are smooth. Since this design often incorporates both traditional piecing and fusible appliqué, it serves as an excellent educational tool for those looking to expand their skill set. By following a structured quilt tutorial, you can transform simple fabric scraps into a stunning botanical masterpiece that honors the heritage of floral quilting while maintaining a modern, clean aesthetic.
1. Understanding the Essentials of the Tulip Time Quilt – Pattern
The Tulip Time Quilt – Pattern is a specialized design that focuses on the iconic silhouette of the tulip flower, often utilizing a mix of square blocks and triangular units. To succeed with this pattern, you must first understand the relationship between the “head” of the tulip and the “stem,” which requires careful measurement. Most versions of the Tulip Time Quilt – Pattern rely on Half-Square Triangles (HSTs) to create the pointed edges of the petals.
Choosing the right fabric is the next crucial step when working with a Tulip Time Quilt – Pattern. We recommend using 100% cotton quilting fabric to ensure the best texture and durability. Since tulips come in almost every color imaginable, you have the freedom to choose a monochromatic palette or a wild “garden” variety of hues. Always pre-wash your fabrics to prevent bleeding, especially if you are using high-contrast colors like red petals against a white background.
Precision cutting is the backbone of a successful Tulip Time Quilt – Pattern. Using a rotary cutter and a non-slip ruler will help you maintain the exact dimensions required for the blocks to fit together seamlessly. Many quilters prefer to use a quarter-inch seam allowance, which is the standard for most quilt patterns. If your cuts are off by even a fraction, the “petals” of your tulip might look lopsided once the blocks are joined.
The “Time” element in the Tulip Time Quilt – Pattern name often refers to the joy of seasonal quilting. This project is particularly popular during the spring months, coinciding with actual tulip festivals around the world. Because the design is modular, you can easily calculate how much fabric you need by multiplying the requirements of a single block by the total number of blocks in your desired layout.
For those who find traditional piecing difficult, some versions of the Tulip Time Quilt – Pattern offer an appliqué method. This involves cutting the tulip shapes out of fabric and sewing them onto a background square using a satin stitch or a blanket stitch. This method allows for more organic, rounded shapes that more closely mimic the look of a real flower compared to the angular look of a pieced block.
Finally, the Tulip Time Quilt – Pattern usually includes a border strategy that frames the floral blocks. A simple “stop border” in a neutral color, followed by a wider floral print border, can give the quilt a professional, finished look. Don’t forget to consider the quilting motif you will use at the end; “stipple quilting” or “echo quilting” around the tulips can add a beautiful sense of movement to the finished piece.
2. Advanced Techniques for the Tulip Time Quilt – Pattern
Once you are comfortable with the basics, you can elevate your Tulip Time Quilt – Pattern by incorporating “fussy cutting” techniques. Fussy cutting involves selecting a specific motif from a printed fabric—like a small ladybug or a different flower—and centering it within the tulip petal. This adds a layer of detail and storytelling to your quilt blocks that makes the finished product truly unique.
Another way to enhance the Tulip Time Quilt – Pattern is through the use of color gradients or “ombré” fabrics. By using a fabric that fades from a dark shade to a light shade, you can give your tulips a three-dimensional appearance. This technique mimics the way light hits a real flower petal, adding depth and a sophisticated touch to the quilt design without requiring complex sewing.
The Tulip Time Quilt – Pattern often features green stems and leaves, which provide a grounding contrast to the bright petals. To make these elements stand out, consider using different shades of green for the leaves to create a more natural, variegated look. Some quilters even use decorative stitching on the stems to simulate the veins of a leaf, adding a tactile element to the quilt.
If you are looking to save time, the Tulip Time Quilt – Pattern can be adapted for strip piecing. This involves sewing long strips of fabric together before cutting them into segments, which can significantly speed up the construction of the tulip “heads.” However, this requires very accurate sewing to ensure that the strips remain straight and the resulting blocks are square.
For a more modern interpretation of the Tulip Time Quilt – Pattern, you might consider “negative space.” Instead of filling the entire quilt top with flower blocks, you can scatter a few tulips across a large expanse of a single solid color. This minimalist approach highlights the quilt pattern’s geometry and makes the individual tulips the undisputed stars of the show.
Working with bias edges is often necessary when creating the diagonal lines in a Tulip Time Quilt – Pattern. Because fabric cut on the bias (diagonally) tends to stretch, it is helpful to use a light starch to stabilize the pieces before sewing. This ensures that your tulip petals don’t warp or lose their shape during the assembly process, keeping the pattern crisp and clean.
3. Selecting Tools and Fabrics for Your Quilt Project
To achieve the best results with your Tulip Time Quilt – Pattern, having the right tools is non-negotiable. A high-quality sewing machine with a consistent straight stitch is your best friend. Additionally, many quilters find that a walking foot is helpful when it comes to joining the layers of the quilt “sandwich” (top, batting, and back), as it prevents the layers from shifting.
When it comes to the Tulip Time Quilt – Pattern, the batting choice can change the entire “drape” of the quilt. For a vintage, crinkly look, 100% cotton batting is ideal. If you prefer a loftier, fluffier quilt that shows off the quilting stitches, a polyester or wool blend might be a better choice. The batting provides the warmth and weight, so choose based on how the quilt will be used.
The Tulip Time Quilt – Pattern also requires a thoughtful selection of threads. While many people default to standard all-purpose thread, using a 50-weight cotton thread can result in flatter seams and a more professional finish. You might choose a thread that matches your background fabric for the piecing and a contrasting “variegated” thread for the actual quilting to add extra color.
Organization is key when handling the many small pieces of a Tulip Time Quilt – Pattern. Using “design boards” or even a piece of flannel taped to a wall allows you to lay out your tulip blocks before you sew them. This helps you check the color distribution and ensures that you haven’t accidentally turned a petal or a leaf upside down before it’s too late to fix.
If your Tulip Time Quilt – Pattern involves appliqué, you will need fusible web or stabilizer. These products help hold the flower shapes in place while you sew them down, preventing the fabric from fraying or bunching. There are many “lightweight” options available today that don’t make the quilt feel stiff, preserving the soft, cuddly nature of the finished textile.
Lastly, don’t overlook the importance of a fresh sewing machine needle. A sharp needle (size 80/12 is usually best for quilting cotton) will prevent skipped stitches and fabric snags. Since the Tulip Time Quilt – Pattern involves sewing through several layers of fabric at the seam intersections, a strong, sharp needle is essential for maintaining the integrity of your stitch work.
4. Tips for Long-Term Care and Display
Once you have completed your Tulip Time Quilt – Pattern, proper care is vital to ensure it lasts for decades. Avoid hanging your quilt in direct sunlight, as UV rays can fade the vibrant “tulip” colors over time. If you are displaying it on a bed, try to rotate it occasionally so that it wears evenly and doesn’t develop permanent creases in one specific area.
Washing a quilt made from a Tulip Time Quilt – Pattern should be done sparingly. When it is necessary, use a gentle, fragrance-free detergent and a cold water cycle. Many experts recommend using “color catchers”—small sheets that absorb excess dye—to prevent the bright reds or purples of the tulips from staining the lighter background fabric during the first few washes.
When storing your Tulip Time Quilt – Pattern masterpiece, avoid plastic bins, which can trap moisture and lead to mildew. Instead, wrap the quilt in a clean white cotton sheet and store it in a cool, dry place. It is also a good idea to refold the quilt every few months in different directions to prevent “permanent fold lines” from weakening the fabric fibers.
If you choose to display your Tulip Time Quilt – Pattern on a wall, use a hanging sleeve. This is a tube of fabric sewn to the back of the quilt that allows a rod to pass through, distributing the weight evenly. Never use clips or nails, as these create stress points that can tear the fabric or distort the beautiful floral pattern you worked so hard to create.
Sharing your work is part of the quilting journey. Once your Tulip Time Quilt – Pattern is finished, consider labeling it. A quilt label should include your name, the date, the name of the pattern, and perhaps a small note about why you made it. This turns the quilt into a historical document, ensuring that future owners know the story behind the stitches.
Ultimately, the Tulip Time Quilt – Pattern is more than just a sewing project; it is a labor of love. Whether you give it as a gift for a wedding, a new baby, or keep it as a centerpiece for your own home, it serves as a reminder of the patience and creativity required to turn simple thread and cloth into a work of art. Enjoy every step of the process, from the first cut to the final binding.
FAQ: Frequently Asked Questions about the Tulip Time Quilt – Pattern
1. Is the Tulip Time Quilt – Pattern suitable for absolute beginners?
Yes, it can be! While some versions are complex, many Tulip Time Quilt – Patterns use basic Half-Square Triangles and squares, which are fundamental quilting shapes. If you are a beginner, look for a “pieced” version rather than an “intricate appliqué” version to start with.
2. How much fabric do I typically need for a throw-sized Tulip Time Quilt?
Generally, for a medium-sized throw (about 50″ x 60″), you will need approximately 3 to 4 yards of background fabric and a variety of fat quarters or scrap pieces for the tulips and leaves. Always check the specific requirements on your chosen pattern before purchasing.
3. Can I use different flower colors in the same quilt?
Absolutely! In fact, many people love the Tulip Time Quilt – Pattern because it looks like a “scrappy” garden. Using a variety of pinks, reds, oranges, and purples can give the quilt a very organic and lively feel.
4. What is the best way to quilt the finished top?
For a Tulip Time Quilt – Pattern, “stitch-in-the-ditch” is a great way to highlight the shapes. If you have a longarm machine or are sending it to a professional, a “floral” or “leaf” pantograph design complements the theme perfectly.
5. Can I make the tulips larger or smaller?
Yes. Most patterns are based on a grid. You can scale the block size up (e.g., from 6 inches to 12 inches) as long as you adjust all the component pieces proportionally. This is a great way to make a fast baby quilt using just a few large tulip blocks.
Conclusion
In this article, we have explored the wonderful world of the Tulip Time Quilt – Pattern, covering everything from the basic construction and fabric selection to advanced techniques and long-term care.
We learned that whether you choose piecing or appliqué, the key to a beautiful quilt lies in precision, color choice, and the use of high-quality tools. This pattern remains a favorite because it bridges the gap between traditional craftsmanship and modern design, offering something for every skill level.