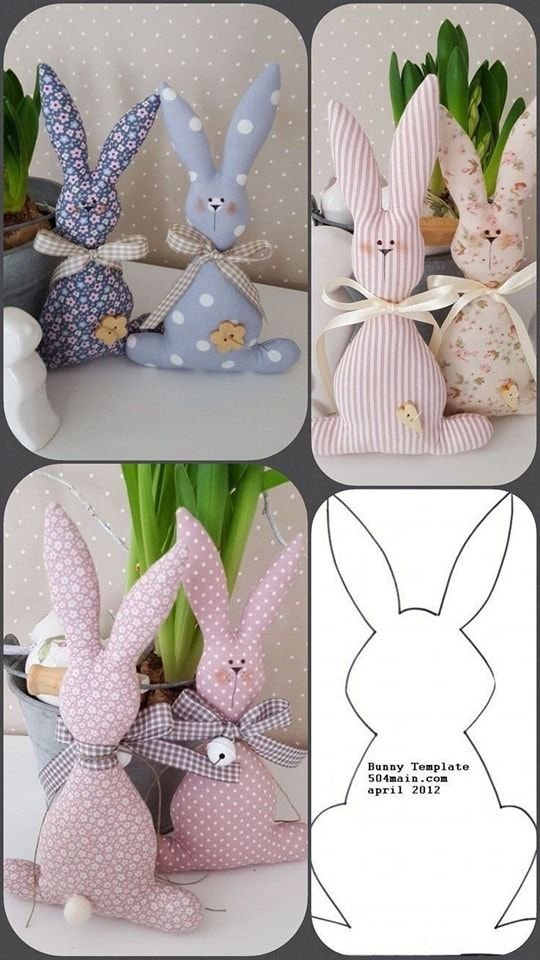
Finding the perfect Easter fabric bunny – Pattern is a wonderful way to breathe new life into your seasonal decorations while indulging in the calming art of sewing. As spring approaches, many crafters seek out unique projects that capture the whimsy of the holiday, and a handmade plush rabbit is a timeless choice that appeals to both children and adults. This specific Easter fabric bunny – Pattern offers a versatile foundation, allowing you to create everything from rustic farmhouse decor to bright, modern nursery toys using just a few simple materials and your sewing machine.
The beauty of following an Easter fabric bunny – Pattern lies in the ability to personalize every detail, ensuring that no two bunnies are exactly alike. By choosing different textile textures—such as soft linens, vibrant quilting cottons, or even recycled vintage flannels—you can transform the same basic design into a variety of characters. Whether you are an experienced sewist or a curious beginner, the Easter fabric bunny – Pattern provides a manageable challenge that results in a high-quality, professional-looking stuffed animal that is much more meaningful than any store-bought alternative.
To achieve the best results with your Easter fabric bunny – Pattern, it is essential to focus on the small details, such as the precision of your curves and the quality of your stuffing. These handmade bunnies serve as excellent gifts for Easter baskets, charming mantel displays, or even “worry pets” for little ones. In this guide, we will explore the nuances of selecting the right supplies, mastering the technical assembly, and adding the finishing touches that make your Easter fabric bunny – Pattern a standout project in your spring crafting repertoire.
1. Selecting the Right Materials for Your Easter fabric bunny – Pattern
The foundation of a successful Easter fabric bunny – Pattern starts with the fabric itself. For a classic look, 100% quilting cotton is the most popular choice because it is easy to cut, sew, and press. However, if you want a more tactile experience, consider using minky fabric or a soft fleece, which can give your bunny a cuddly, high-end toy feel that children will adore.
Interfacing is a “secret weapon” when working with an Easter fabric bunny – Pattern. If you are using a very thin or stretchy fabric, applying a lightweight fusible interfacing to the wrong side of the material can provide much-needed stability. This ensures that when you stuff the bunny, the seams don’t pull or distort, and the final shape remains true to the original pattern silhouette.
Choosing the right stuffing is equally important for your Easter fabric bunny – Pattern. High-quality polyester fiberfill is the standard, but for a more eco-friendly approach, you can use wool roving or even clean fabric scraps. To help your bunny sit upright, you might consider adding a small pouch of plastic poly-pellets or dried beans at the bottom of the body before finishing your closure.
The thread you select should be durable and color-matched to your primary fabric. A 50-weight polyester thread is ideal because it is strong enough to withstand the pressure of stuffing without snapping. When following the Easter fabric bunny – Pattern, using a slightly shorter stitch length (about 2.0mm) will create stronger seams that prevent the fill from peeking through the stitches.
Don’t forget the tools required to bring your Easter fabric bunny – Pattern to life. A pair of sharp fabric shears, a marking pen that disappears with heat or water, and a long doll needle for embroidery are essential. You will also find a “turning tool” or even a simple chopstick incredibly helpful for pushing out the tips of the ears and the rounded edges of the bunny’s paws.
Finally, consider the embellishments that will define your bunny’s personality. Safety eyes are a great option for professional results, but embroidery floss is better for creating a soft, “primitive” look. When you use the Easter fabric bunny – Pattern, the face is where the magic happens, so take your time selecting the perfect shades for the nose, eyes, and those iconic long whiskers.
2. Technical Construction Tips for the Easter fabric bunny – Pattern
The first technical step in the Easter fabric bunny – Pattern is the layout and cutting. Always pay attention to the grainline of the fabric; if you cut your pieces “off-grain,” the bunny might twist or look lopsided after it is stuffed. Pin your paper pattern pieces securely to the fabric and use a sharp blade to ensure the edges are crisp and easy to align during the sewing process.
Sewing the curves of an Easter fabric bunny – Pattern can be the most challenging part for beginners. The trick is to go slowly and use your “needle down” function to pivot the fabric every few stitches. Since bunny ears and heads are full of rounded lines, taking your time here ensures that your final plushie doesn’t have “pointy” or jagged edges where they should be smooth.
Clipping and notching the seam allowances is a non-negotiable step in the Easter fabric bunny – Pattern. After sewing the pieces together but before turning them right side out, you must make small snips into the curves. This allows the fabric to expand or contract as needed, resulting in a stuffed animal that has a perfectly round head and ears that lay flat and elegant.
The “turning opening” is a detail often overlooked in an Easter fabric bunny – Pattern. Most patterns suggest leaving an opening at the bottom or the back of the bunny. Ensure you backstitch heavily at the start and end of this opening, as this area will be under a lot of stress when you are pushing the fabric through and later when you are stuffing it.
Stuffing your Easter fabric bunny – Pattern project requires a “small and steady” approach. Instead of grabbing a large handful of fiberfill, use small tufts. Start by firmly stuffing the tips of the ears and the limbs, using a tool to pack the fill into the tightest corners. This prevents “cellulite” or lumpy spots and gives your bunny a smooth, professional appearance.
To finish your Easter fabric bunny – Pattern with style, use the ladder stitch (also known as the invisible stitch) to close the turning opening. This hand-sewing technique hides the thread completely, making the seam look like it was done on a machine. A well-executed ladder stitch is the hallmark of a master crafter and ensures your bunny looks great from every single angle.
3. Customizing Your Easter fabric bunny – Pattern for Different Styles
One way to elevate your Easter fabric bunny – Pattern is through “fussy cutting.” This involves placing your pattern piece over a specific motif on your fabric—like a flower or a ladybug—so that it appears centered on the bunny’s belly or ears. This level of intentionality makes your handmade bunny feel like a piece of custom art rather than a mass-produced item.
Mixed media is another fun way to use the Easter fabric bunny – Pattern. Instead of making the entire bunny out of one fabric, try using a contrasting fabric for the “inner ears” or the “paws.” A floral print inside the ears paired with a solid linen body is a classic Easter design that adds depth and visual interest to the finished toy.
If you want a vintage feel for your Easter fabric bunny – Pattern, consider “tea-staining” your fabric before you begin. This gives the material a muted, antique cream color that looks beautiful with rustic ribbons and wooden buttons. You can also lightly sand the edges of the finished bunny or use a bit of blush on the cheeks to give it a “shabby chic” appearance.
For those making the Easter fabric bunny – Pattern as a toy for a baby, consider adding a sensory element. You can insert a small “rattle box” or a piece of crinkle paper inside the bunny’s body or ears. These small additions turn a simple decorative item into a developmental tool that engages a child’s sense of hearing and touch.
Adding accessories is a great way to expand on the Easter fabric bunny – Pattern. You can sew a tiny removable waistcoat, a lace collar, or even a small fabric carrot for the bunny to hold. These extra pieces allow you to tell a story with your craft, transforming the bunny into a character that can be played with or displayed in a seasonal scene.
Lastly, you can scale the Easter fabric bunny – Pattern up or down to create a “bunny family.” Most printers allow you to adjust the scale of a PDF pattern; by printing at 50% or 150%, you can create a set of nesting bunnies in various sizes. This is a wonderful way to decorate a nursery or create a centerpiece for your holiday dinner table.
4. Care, Maintenance, and Gifting Your Fabric Creations
Once you have completed your Easter fabric bunny – Pattern, proper care is essential, especially if it is intended for a child. If you used high-quality cotton, the bunny can usually be spot-cleaned with a damp cloth. For a deeper clean, place the bunny in a mesh laundry bag and use a delicate cycle with cold water, then allow it to air dry to maintain its shape and “fluff.”
Storage is another factor to consider for your Easter fabric bunny – Pattern project. If the bunny is part of your seasonal decor, store it in a breathable cotton bag during the off-months. Avoid plastic bins which can trap moisture and lead to a “musty” smell. Keeping it in a cool, dry place ensures that the fabric and stuffing don’t degrade over time.
Gifting a bunny made from an Easter fabric bunny – Pattern is a heartfelt gesture. To make it even more special, attach a small “handmade with love” tag that includes the date and the type of fabric used. If the bunny is for a child, it is also helpful to include care instructions so the parents know how to keep the new companion clean and safe.
If you are making these bunnies from an Easter fabric bunny – Pattern to sell at craft fairs, presentation is key. Tie a pretty grosgrain ribbon around the bunny’s neck and package it in a clear bag with some paper straw at the bottom. This “nest” presentation highlights the Easter theme and makes the product look ready to be placed directly into a gift basket.
For those who enjoy a “zero-waste” lifestyle, the Easter fabric bunny – Pattern is the ultimate way to use up your scrap bin. You can make “patchwork” bunnies by sewing small strips of fabric together before cutting out your pattern pieces. This creates a vibrant, eclectic look that is environmentally friendly and utilizes every last inch of your precious fabric stash.
Ultimately, the goal of the Easter fabric bunny – Pattern is to bring a bit of joy and creativity into your life. Whether you are sewing alone as a form of meditation or crafting with your children to teach them a new skill, the process is just as important as the finished product. Every stitch you take is a celebration of the spring season and the enduring beauty of handmade traditions.
FAQ: Frequently Asked Questions about Easter fabric bunny – Pattern
1. Is the Easter fabric bunny – Pattern suitable for someone who has never sewn a toy before?
Absolutely! This pattern is a fantastic “entry-level” project for softie making. Because bunnies have relatively simple shapes compared to other animals, it is a great way to learn the basics of stuffing and closing a 3D object without getting frustrated by overly complex pieces.
2. How much fabric do I need for one standard-sized bunny?
Typically, you can make a medium-sized bunny (about 10-12 inches tall) using two fat quarters of fabric. If you are using the same fabric for the entire bunny, half a yard is more than enough. This makes it a very affordable project to start.
3. Can I sew the Easter fabric bunny – Pattern entirely by hand?
Yes, you can. While a sewing machine is faster, hand-sewing with a backstitch provides a very strong and charming result. Hand-sewing is actually preferred by some for the smaller details, as it gives you more control over the fabric as you navigate tight curves.
4. What is the best way to create the bunny’s face?
For beginners, embroidery is the safest and most forgiving method. You can use a simple satin stitch for a triangular nose and French knots for the eyes. If you are comfortable with tools, safety eyes provide a very clean and “pro” look, but remember they aren’t recommended for children under three.
5. How do I make the ears stand up or flop down?
If you want standing ears, you can insert a layer of stiff felt or a specialized “peltex” stabilizer inside the ear pieces before sewing. For floppy ears, simply use a soft fabric without any stabilizer, and the weight of the fabric will naturally pull them down for a “lop-ear” look.
6. Can I sell the bunnies I make from this pattern?
This depends on the specific designer of the Easter fabric bunny – Pattern you are using. Most independent designers allow you to sell items made from their patterns on a small scale (like at local craft fairs), but it is always polite to credit the pattern designer on your product tag.
Conclusion
In this article, we have thoroughly explored the rewarding process of working with an Easter fabric bunny – Pattern, from the initial selection of cottons and stabilizers to the fine details of stuffing and invisible stitching.
We discussed how to personalize your creation using fussy cutting, embroidery, and mixed textures, ensuring your bunny has a unique personality. Whether you are crafting for your own home, preparing a gift for a loved one, or stocking up for a spring craft fair, this pattern is a versatile and joyful way to celebrate the season.