Creating Origami Butterflies in Fabric- Pattern projects is a breathtaking way to merge the ancient Japanese art of paper folding with the tactile beauty of textile arts. While traditional origami uses paper, adapting an Origami Butterflies in Fabric- Pattern allows for a durable, washable, and versatile piece of art that can be used in home decor, fashion, or as unique gifts. The transition from paper to fabric requires a slightly different approach, focusing on how the material holds a crease and maintains its delicate butterfly shape through various folding techniques.
The beauty of following a specific Origami Butterflies in Fabric- Pattern is the ability to transform scraps of leftover cotton fabric into something truly elegant. This technique, often referred to as “fabric origami” or “folding fabric,” relies on geometric precision to create the symmetrical wings and body of the butterfly. By mastering the pattern, you can create a swarm of colorful insects that won’t wilt or tear like their paper counterparts, making them perfect for embellishing pillows, quilts, or even making hair accessories for children.
To successfully execute an Origami Butterflies in Fabric- Pattern, one must understand the relationship between fabric weight and structural integrity. A fabric that is too thick will become bulky and difficult to fold, while a material that is too thin may not hold the crisp lines necessary for the butterfly aesthetic. In the following sections, we will explore the materials, the step-by-step folding logic, and the creative ways you can use this pattern to enhance your sewing repertoire and bring a touch of nature-inspired art into your creative space.
1. Selecting the Ideal Materials for your Origami Butterflies in Fabric- Pattern
The first step in any Origami Butterflies in Fabric- Pattern is choosing a fabric that responds well to heat and pressure. 100% cotton fabric is widely considered the gold standard for this craft because it takes a sharp crease when pressed with an iron. Since the butterfly shape requires multiple layers of overlapping material, a lightweight quilting cotton ensures that the final product remains delicate and not overly chunky or distorted.
In addition to the base material, a successful Origami Butterflies in Fabric- Pattern often requires a secret ingredient: fabric starch or stiffener. Unlike paper, which has natural rigidity, fabric is inherently floppy. By saturating your fabric with heavy starch before you begin the pattern, you give the material a paper-like quality. This allows the origami folds to stay in place securely, giving your butterflies the structural support they need to “fly” on their own.
You will also need a reliable steam iron to act as your primary “folding tool.” In traditional paper origami, you use your fingernails to sharpen a crease, but with an Origami Butterflies in Fabric- Pattern, the heat of the iron sets the memory of the fabric fibers. A precision tip on your iron is particularly helpful for reaching into the small corners of the butterfly wings during the intricate final stages of the folding process.
Measuring tools are equally vital for a professional-looking fabric butterfly. Because origami is based on mathematical symmetry, starting with a perfectly square piece of fabric is non-negotiable. Using a rotary cutter and a self-healing mat ensures that your initial square is precise. If your starting piece is even slightly off-kilter, the Origami Butterflies in Fabric- Pattern will result in lopsided wings that fail to capture the natural grace of a real butterfly.
Don’t forget the finishing touches such as hand-sewing needles and embroidery floss. While the majority of the Origami Butterflies in Fabric- Pattern is achieved through folding, a few small “tack stitches” are often necessary to keep the butterfly body from unfolding over time. Using a matching thread color makes these stitches invisible, maintaining the illusion that the fabric is being held together solely by the magic of the fold.
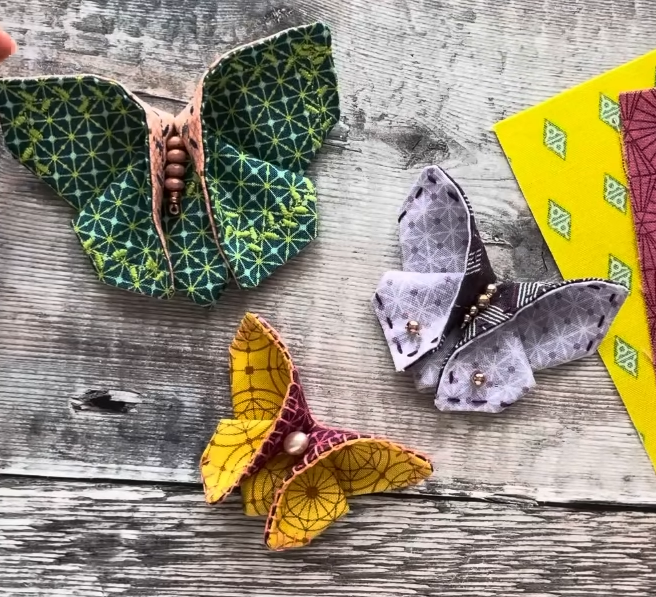
Lastly, consider the visual impact of your fabric choice. Prints with small, non-directional patterns work best for Origami Butterflies in Fabric- Pattern because they look great from every angle. High-contrast colors between the front and back of the fabric can also create a stunning effect, as the origami technique often reveals both sides of the material during the wing construction, adding depth and realism to your finished butterfly.
2. Preparing the Fabric for the Butterfly Folding Process
Preparation is the most critical phase of the Origami Butterflies in Fabric- Pattern. You cannot simply take a piece of raw fabric and expect it to behave like paper. You must first “treat” the material to accept the origami logic. This involves washing the fabric to remove any factory sizing, drying it, and then applying a generous amount of spray starch until the fabric feels almost like parchment paper.
Once the fabric is stiffened, you must cut it into a perfect square, typically ranging from 5 to 8 inches depending on the desired size of your butterfly. The Origami Butterflies in Fabric- Pattern relies on the “X” and “plus” axis folds. These initial guidelines are pressed into the fabric to create a map for the more complex moves. It is helpful to mark the center point lightly with a water-soluble fabric pen to stay oriented.
The next step in preparing your Origami Butterflies in Fabric- Pattern involves folding the square into a “waterbomb base” or a “preliminary base.” This is a classic origami move where the corners are tucked inward to create a multi-layered triangle. Because you are working with fabric, you must be careful not to stretch the material on the bias (the diagonal grain). Stretching will cause the butterfly to warp, ruining the crisp lines of the pattern.
Steam is your best friend during this preparation phase. Each time you make a fold according to the Origami Butterflies in Fabric- Pattern, you should hit it with a burst of steam and then let it cool for a few seconds. This “sets” the fibers in their new position. Professional crafters often use a clapper—a wooden block—to press down on the hot fabric folds, resulting in the flattest, sharpest edges possible for your fabric butterfly.
If you are using two different fabrics joined together (a double-sided butterfly), you might use a fusible web to bond them. This adds more thickness, so you must adjust your Origami Butterflies in Fabric- Pattern expectations accordingly. Double-sided butterflies look amazing but require more patience and a hotter iron to penetrate the multiple layers of fabric and adhesive during the final wing shaping.
Finally, check the edges for any fraying. Since the Origami Butterflies in Fabric- Pattern involves a lot of handling, raw fabric edges can sometimes start to unravel. A tiny bit of fray check or clear glue along the cut edges of your square can prevent this. This ensures that the finished Origami Butterflies in Fabric- Pattern looks clean and professional, with no loose threads distracting from the intricate geometry of the wings.
3. Mastering the Wings and Body of the Fabric Butterfly
Now comes the heart of the Origami Butterflies in Fabric- Pattern: the actual transformation into a 3D shape. After creating your base triangle, you will fold the top flaps toward the center peak. This creates the upper portion of the butterfly wings. It is essential to ensure these flaps are perfectly mirrored; the symmetry of the Origami Butterflies in Fabric- Pattern is what gives it its lifelike and aesthetic appeal.
The “flip and fold” maneuver is where many beginners struggle with the Origami Butterflies in Fabric- Pattern. You must turn the fabric over and pull the bottom point upward, extending it past the top edge. This creates tension in the fabric, which naturally causes the lower wings to pull inward and the body to arch. This tension is the “soul” of the butterfly, giving it a sense of movement as if it is about to take flight.
As you fold the small tip over the edge to lock the body, you are completing the structural integrity of the Origami Butterflies in Fabric- Pattern. This “locking fold” is often where a tiny bit of fabric glue or a single stitch is used. Because fabric has more “spring” than paper, it wants to return to its flat state. Securing this central point ensures that your origami work doesn’t come undone the moment you let go.
The shaping of the wings is a creative choice within the Origami Butterflies in Fabric- Pattern. Some prefer the pointed, “swallowtail” look, which is achieved by leaving the corners sharp. Others prefer a more rounded, “monarch” style. You can achieve this by slightly tucking the tips of the fabric wings inward and pressing them. This customization makes each fabric butterfly a unique piece of art rather than a carbon copy.
One of the unique aspects of an Origami Butterflies in Fabric- Pattern compared to paper is the ability to “sculpt” the wings. You can gently curve the fabric with your fingers while it is still warm from the iron. This adds a realistic, organic dimension to the butterfly. Unlike paper, which might crease or tear if you manipulate it too much, the fabric fibers are resilient and will hold a soft curve beautifully.
To finish the body, some crafters like to wrap a small piece of wire or chenille stem around the center. This not only reinforces the Origami Butterflies in Fabric- Pattern but also provides “antennae” for the butterfly. Whether you choose a minimalist approach with just fabric or an embellished approach with wire and beads, the core pattern remains the foundation of the entire design.
4. Creative Applications for your Origami Butterflies in Fabric
Once you have mastered the Origami Butterflies in Fabric- Pattern, the possibilities for application are endless. One popular use is as a 3D embellishment for quilts. Instead of a flat applique, a fabric butterfly adds texture and shadow to the quilt top. You can sew them down only by the body, allowing the wings to remain free and “flutter” whenever the quilt is moved or draped over a bed.
In the world of fashion, these butterflies make incredible brooches or hair clips. Because the Origami Butterflies in Fabric- Pattern results in a sturdy structure (especially when heavily starched), they can withstand being worn on a lapel or a headband. You can even use silk or satin fabric to create elegant versions for formal events, weddings, or as a unique alternative to a traditional boutonniere.
Home decor is another area where the Origami Butterflies in Fabric- Pattern shines. You can create a “shadow box” display with dozens of butterflies in varying sizes and colors, or string them together to create a whimsical mobile for a nursery. Since they are made of fabric, they bring a softness and warmth to a room that plastic or paper decorations simply cannot replicate.
For those who enjoy gift-wrapping, a fabric butterfly serves as a reusable and eco-friendly gift topper. Instead of a plastic bow, you can pin an Origami Butterflies in Fabric- Pattern creation onto the ribbon. The recipient gets a beautiful gift and a handmade keepsake they can use later as an ornament or a pin. This adds a personal, “handmade with love” touch to any present.
You can also incorporate the Origami Butterflies in Fabric- Pattern into table settings. Use them as napkin rings by attaching a small loop of elastic to the back of the butterfly. This is a great way to impress guests at a garden party or a spring brunch. Using fabric that matches your tablecloth or napkins creates a cohesive and sophisticated look that looks much more expensive than it actually is.
Finally, consider the educational value. Teaching the Origami Butterflies in Fabric- Pattern to children or sewing students is a great way to explain geometry, patience, and the properties of different textiles. It is a low-cost project that provides immediate satisfaction. Once someone understands the logic of the pattern, they can spend hours experimenting with different fabrics, colors, and scales to create their own textile garden.
FAQ: Common Questions about Origami Butterflies in Fabric
Can I use synthetic fabrics for this pattern?
While you can use synthetics like polyester, they are much harder to work with for an Origami Butterflies in Fabric- Pattern. Synthetic fibers don’t “hold” a crease as well as natural fibers like cotton or linen. If you do use synthetics, you will likely need to use a lower iron temperature to avoid melting the fabric, and you will definitely need to secure the folds with stitches.
How do I make the butterflies waterproof?
If you plan to use your fabric butterflies outdoors or on items that need frequent washing, you can spray them with a fabric protector or a clear acrylic sealer. This will help them repel water and maintain their origami shape even in humid conditions. However, for best results, it is recommended to keep them as indoor decorative items.
What is the best size to start with?
For beginners, a 6-inch square is the ideal size to practice the Origami Butterflies in Fabric- Pattern. Anything smaller can be fiddly and difficult to fold with multiple layers of fabric, and anything much larger might require extra stiffener to prevent the wings from drooping under their own weight.
Can I wash the fabric butterfly once it is folded?
Washing is not recommended once the Origami Butterflies in Fabric- Pattern is complete. The water will dissolve the starch that is keeping the folds crisp, and the butterfly will lose its shape. If it gets dusty, a light puff of compressed air or a gentle brushing with a soft-bristled brush is the best way to clean it.
Do I need a special sewing machine for this?
No sewing machine is required! The Origami Butterflies in Fabric- Pattern is primarily a folding and pressing project. You only need a hand-sewing needle for the final tiny tacks to hold the shape together. This makes it a perfect “couch project” that you can do while watching a movie or traveling.
Can I use scrap fabric?
Yes! This is one of the best “scrap buster” projects available. As long as you can cut a perfect square from your fabric scraps, you can turn them into beautiful butterflies. It’s a wonderful way to utilize those beautiful bits of fabric that are too small for a garment but too pretty to throw away.
Conclusion
Mastering the Origami Butterflies in Fabric- Pattern is a journey that combines technical skill with artistic flair. We have covered the importance of selecting the right 100% cotton fabric, the necessity of heavy starching, and the precise steps of the origami folding process using a steam iron.
Whether you are looking to embellish a quilt, create unique fashion accessories, or simply enjoy the meditative process of folding, this pattern offers a world of creative possibilities. By turning flat fabric into a three-dimensional butterfly, you are creating a piece of art that celebrates both nature and craftsmanship.