Creating a Crochet Headphone Organizer – Pattern is one of the most practical and satisfying projects you can undertake if you are tired of untangling a mess of wires every time you want to listen to music. In a world where we are constantly on the move, having a dedicated, handmade accessory to keep your tech gear tidy is a game-changer. This guide will walk you through everything you need to know to craft your own stylish and functional cable management solution.
The beauty of a Crochet Headphone Organizer – Pattern lies in its simplicity and the ability to customize it to your personal style. Whether you are a seasoned pro or a beginner looking for a quick weekend project, this pattern is accessible and rewarding. Using just a small amount of yarn and a few basic stitches, you can create a durable wrap that prevents your earbuds or charging cables from fraying or knotting in your bag.
Beyond the utility, a Crochet Headphone Organizer – Pattern makes for a thoughtful, eco-friendly gift for friends and family. In an era where mass-produced plastic accessories are the norm, a hand-stitched cotton or wool organizer adds a touch of warmth and personality to your everyday carry. Let’s dive into the specifics of how to master this craft and keep your digital life organized with flair.
1. Selecting the Right Materials for Your Crochet Headphone Organizer – Pattern
When you begin your Crochet Headphone Organizer – Pattern, the choice of yarn is the most critical decision you will make. For tech accessories, a mercerized cotton yarn is often the best choice because it provides excellent stitch definition and does not pill over time. Since your organizer will be handled frequently, you want a fiber that is sturdy and can withstand being tossed into a backpack or pocket.
Choosing the correct hook size is also vital to the success of your project. If you use a hook that is too large, the fabric may be too loose, allowing the wires to slip through the gaps. For a standard Crochet Headphone Organizer – Pattern, a 3.5mm or 4.0mm hook is usually ideal for creating a dense, protective fabric that holds its shape under pressure.
Don’t forget the importance of the fastener or button you select for your wrap. Since the primary goal is security, choosing a high-quality wooden or plastic button ensures that the organizer stays closed when you are on the go. You can even use velcro strips or metal snaps if you prefer a more modern, streamlined look for your finished piece.
The color palette you choose for your Crochet Headphone Organizer – Pattern can reflect your personality or even match your favorite pair of headphones. Bright, vibrant neon colors make the organizer easy to find at the bottom of a dark bag, while neutral tones like charcoal, beige, or navy offer a more professional and sophisticated aesthetic for office use.
In addition to yarn and hooks, you will need a few essential notions like a tapestry needle for weaving in ends and a pair of sharp embroidery scissors. Keeping these tools nearby makes the process smoother and ensures that your Crochet Headphone Organizer – Pattern has a clean, professional finish without messy loose threads sticking out.
Finally, consider the durability of your stitches. Using a single crochet (sc) or half double crochet (hdc) creates a thick, opaque texture that is perfect for protecting sensitive wires. By focusing on these dense crochet stitches, you ensure that your Crochet Headphone Organizer – Pattern serves its purpose for years to come without stretching out of shape.
2. Step-by-Step Instructions for the Crochet Headphone Organizer – Pattern
To start your Crochet Headphone Organizer – Pattern, you will begin by making a slip knot and creating a foundation chain. Typically, a chain of 15 to 20 stitches is sufficient for a standard set of earbuds, but you can easily adjust the length if you are organizing thicker USB cables or laptop chargers. The flexibility of the pattern is one of its greatest strengths.
Once your chain is ready, you will work in rows to build the body of the wrap. The most common technique in a Crochet Headphone Organizer – Pattern is to work back and forth in rows of single crochet. This creates a sturdy rectangle that acts as the base for your cable management system. Ensure your tension is consistent so the edges remain straight and even.
As you reach the end of your rectangle, you will need to create a buttonhole. This is achieved by chaining two or three stitches and skipping the corresponding stitches in the previous row. This small gap allows your chosen button to pass through, securing the Crochet Headphone Organizer – Pattern firmly around your coiled headphones or power cords.
After completing the buttonhole, it is time to work a finishing border around the entire piece. Adding a simple slip stitch border or a reverse single crochet (crab stitch) edge gives your Crochet Headphone Organizer – Pattern a polished look. It also adds an extra layer of structural integrity to the edges, preventing the fabric from curling over time.
Before you finish, use your tapestry needle to securely sew the button onto the opposite side of the buttonhole. Make sure the button is centered and sewn tightly using a double strand of yarn. This ensures that even with daily use, the Crochet Headphone Organizer – Pattern remains functional and the button doesn’t pop off during transit.
The final step is the blocking process. While not always necessary for small items, lightly steaming your Crochet Headphone Organizer – Pattern helps the stitches settle and ensures the rectangle lies perfectly flat. Once it is dry, you can wrap your headphones around it, button it up, and enjoy a tangle-free experience for the first time.
3. Customizing and Scaling Your Crochet Headphone Organizer – Pattern
One of the best things about the Crochet Headphone Organizer – Pattern is how easily it can be scaled for different devices. If you are a gamer with large, over-ear headphones, you can simply increase the width and length of the pattern to accommodate the thicker headband. The modular nature of crochet makes it the perfect medium for custom tech solutions.
You can also experiment with different stitch patterns to add texture to your work. Instead of basic single crochet, try using the waffle stitch or moss stitch to give your Crochet Headphone Organizer – Pattern a unique, 3D look. These textured stitches not only look great but also provide extra padding to protect your expensive electronics.
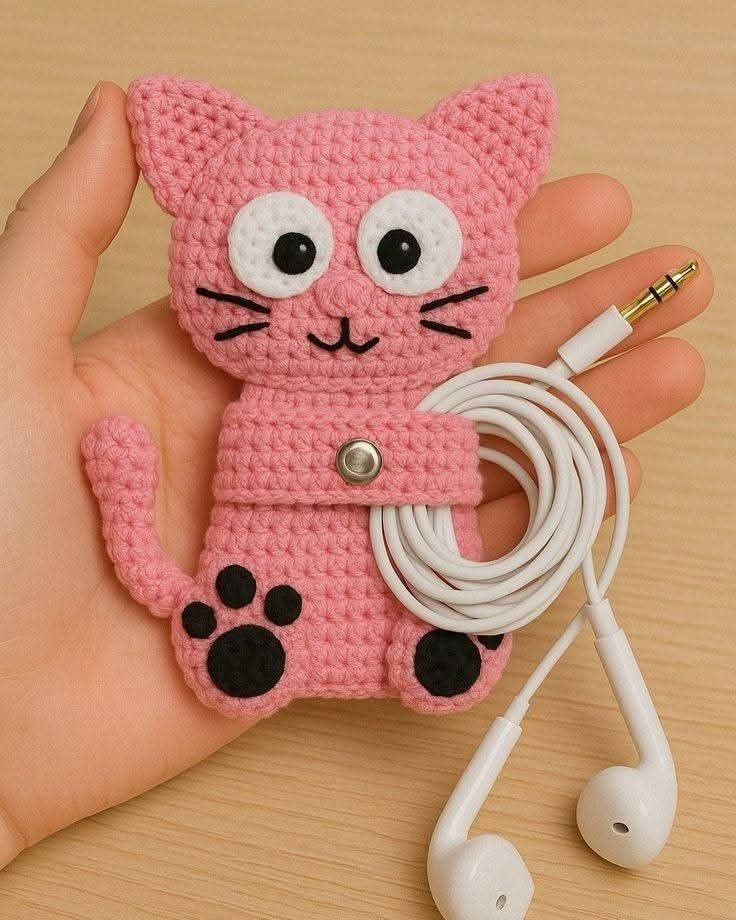
Adding embellishments is another way to make your Crochet Headphone Organizer – Pattern stand out. You could crochet a small flower, star, or animal face and sew it onto the front of the organizer. This is a fantastic way to personalize the item for children or to create a unique crochet accessory that reflects your hobbies and interests.
For those who use multiple cables, you can create a multi-cable organizer by making a longer version of the Crochet Headphone Organizer – Pattern with several buttons along the length. This allows you to secure a phone charger, a tablet cable, and your headphones all in one neat, organized roll that fits perfectly in your suitcase.
Incorporating stripes or variegated yarn can also change the entire vibe of your project. Using a self-striping yarn allows you to achieve a complex look without having to change colors manually. This makes the Crochet Headphone Organizer – Pattern look much more intricate than it actually is, impressing your friends with your “advanced” skills.
Lastly, consider adding a keychain ring or a carabiner to one corner of your Crochet Headphone Organizer – Pattern. This allows you to clip your headphones directly to the outside of your bag or to your belt loop. It’s a practical modification that ensures you never lose your organizer, keeping your tech accessories always within reach.
4. Maintenance and Care for Your Crochet Headphone Organizer – Pattern
Since your Crochet Headphone Organizer – Pattern will be handled daily, it is bound to pick up some dirt or oils from your hands. If you used cotton yarn, your organizer is likely machine washable. However, to preserve the shape and the button, it is usually best to place it inside a mesh laundry bag before tossing it into the wash.
If you chose a more delicate wool blend for your Crochet Headphone Organizer – Pattern, hand washing in lukewarm water with a mild detergent is the safest route. Avoid wringing the fabric, as this can stretch the stitches. Instead, lay it flat on a clean towel and gently press out the excess moisture to maintain its original dimensions.
Over time, you might notice some pilling on the surface of your crochet work. This is a natural occurrence with many yarn types. You can easily refresh your Crochet Headphone Organizer – Pattern by using a fabric shaver or a small pair of scissors to carefully trim away the fuzz, making it look brand new again.
Check the button security periodically. With constant opening and closing, the yarn holding the button can sometimes weaken. If you notice the button feeling loose, take a moment to reinforce it with a few extra stitches. Maintaining your Crochet Headphone Organizer – Pattern ensures that it continues to protect your wires effectively for a long time.
Storing your organizer when not in use is also important. If you have several different versions of the Crochet Headphone Organizer – Pattern, keep them in a small basket or drawer. Avoid leaving them in direct sunlight for extended periods, as UV rays can fade the yarn colors and weaken the fibers over several months.
Finally, remember that crochet is a flexible craft. If your Crochet Headphone Organizer – Pattern eventually wears out or you get a new set of headphones that don’t fit, the yarn can often be unraveled and reused for a different project. This sustainable approach to tech accessories is one of the many reasons why handmade crochet items are so valuable.
Frequently Asked Questions (FAQ)
What is the best yarn for a Crochet Headphone Organizer – Pattern?
The best yarn is generally a 100% cotton or a cotton-blend. Cotton is less stretchy than acrylic or wool, which helps the organizer keep its shape and hold the cables securely without sagging over time.
How long does it take to complete this pattern?
Because of its small size, most people can finish a Crochet Headphone Organizer – Pattern in about 30 to 60 minutes. It is a perfect “one-sitting” project for any skill level.
Can I use this pattern for thick laptop chargers?
Yes! You can easily adapt the Crochet Headphone Organizer – Pattern by increasing the number of starting chains and working more rows until the rectangle is wide enough to wrap around the larger cable bundle.
What if I don’t know how to make a buttonhole?
Making a buttonhole is simple. You just skip a few stitches in one row and replace them with chains. In the next row, you crochet into those chains. It’s a basic technique that is very common in crochet patterns.
Is this project suitable for absolute beginners?
Absolutely. If you know how to chain and do a single crochet, you can successfully complete this Crochet Headphone Organizer – Pattern. It is a great way to practice tension and basic shaping.
Do I need a specific type of button?
Any button that fits through your buttonhole will work. However, flat buttons tend to be more comfortable if you carry the organizer in your pocket, as they don’t poke or snag on other items.
Conclusion
In conclusion, mastering the Crochet Headphone Organizer – Pattern is a fantastic way to combine your love for crafting with a practical need for organization. We have explored everything from choosing the right durable cotton yarns and ergonomic hooks to the step-by-step process of creating a secure, buttoned wrap.
We also discussed how to scale the design for various electronic cables and the best ways to care for your handmade accessory to ensure it lasts. This project proves that you don’t need a lot of time or expensive materials to create something truly useful and beautiful.