The Log Cabin Heart Block – Pattern is one of the most beloved designs in the world of quilting, offering a perfect marriage between traditional geometric structure and romantic symbolism. For generations, the log cabin technique has represented the warmth of the home, with the central square traditionally symbolizing the hearth. By adapting this classic method into a heart shape, quilters can create deeply personal projects that radiate love, making it an ideal choice for anniversary quilts, Valentine’s Day decor, or “thinking of you” gifts for cherished friends and family.
Mastering the Log Cabin Heart Block – Pattern is a rite of passage for many sewists because it teaches the fundamental importance of color value and precise seam allowances. Unlike a standard square-in-square design, the heart variant requires a specific arrangement of “logs” to create the recognizable lobes and point of a heart. This clever manipulation of fabric strips allows you to build a complex-looking image using nothing but simple straight lines, which is why it remains a top recommendation for those looking to expand their quilting skills without needing specialized curved piecing tools.
In this detailed guide, we are going to explore the technical nuances of executing a perfect Log Cabin Heart Block – Pattern. We will discuss how to select the right high-contrast fabrics to make the heart “pop,” the mathematical logic behind strip widths, and the best pressing techniques to ensure your block remains perfectly flat. Whether you are aiming for a scrappy “country” look or a sleek, modern aesthetic, understanding the structural foundation of this quilt block will empower you to create stunning textile art. Let’s dive into the world of creative piecing and discover how to build your heart, one log at a time.
1. Selecting Fabrics and Preparing Your Log Cabin Heart Block – Pattern
The success of any Log Cabin Heart Block – Pattern depends heavily on your choice of fabric values. To make the heart shape clearly visible against the background, you must create a distinct separation between “light” and “dark” fabrics. Typically, the heart itself is composed of warm tones like reds, pinks, or deep purples, while the background utilizes cool or neutral tones like creams, whites, or soft grays. This color value contrast is the secret to ensuring that your geometric work translates into a recognizable heart shape.
Before you cut a single inch of fabric for your Log Cabin Heart Block – Pattern, it is essential to starch and press your material. Because this pattern involves many small strips of fabric, the cumulative effect of minor stretching can lead to a distorted block. Using a high-quality fabric starch provides the “crispness” needed to keep your cotton fabric stable during the cutting and sewing process, resulting in much cleaner corners and a professional-looking finish that lies perfectly flat on your cutting mat.
Accurate cutting is the backbone of the Log Cabin Heart Block – Pattern. Most quilters prefer to use a rotary cutter and a specialized quilting ruler to ensure every strip is exactly the same width—commonly 1.5 or 2.5 inches. Even a discrepancy of a sixteenth of an inch can cause the block to “wave” or become lopsided as you add more layers. Taking the time to square up your fabric and cut precise fabric logs will save you hours of frustration and “seam ripping” later in the project.
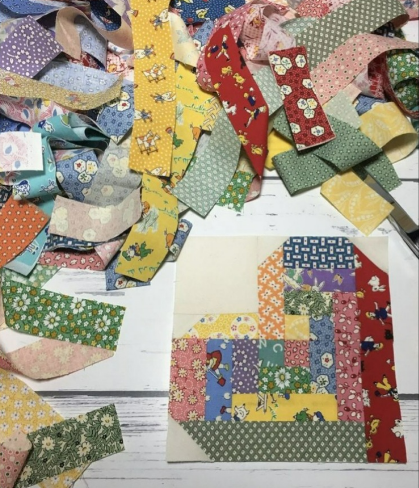
When planning your Log Cabin Heart Block – Pattern, consider the scale of the prints you are using. Small-scale prints or “solids” usually work best because large motifs can get lost when cut into narrow strips. Mixing different textures, such as batiks, calicos, and tone-on-tone prints, adds visual depth to the heart. This scrappy quilting approach allows you to use up leftovers from your fabric stash while creating a rich, multi-dimensional look that captures the eye from across the room.
Organizing your strips before you begin the Log Cabin Heart Block – Pattern is a pro tip that helps maintain focus. Many quilters use “design boards” or simple labeled trays to separate their heart-colored strips from their background-colored strips. Since the heart is formed by a specific sequence of light and dark placements, having your pre-cut strips laid out in the order they will be sewn prevents the common mistake of accidentally sewing a background log where a heart log should be.
Lastly, think about the thread you choose for your Log Cabin Heart Block – Pattern. A high-quality 50-weight cotton thread in a neutral color like tan or grey is usually best. Since there are many seams in a log cabin block, a thick thread can add unnecessary bulk, making it difficult to press the seams flat. A fine, strong quilting thread allows the fabric to sit closely together, which is vital for maintaining the correct overall dimensions of your block as it grows in size.
2. The Step-by-Step Construction of the Heart Geometry
The assembly of a Log Cabin Heart Block – Pattern begins at the center, but unlike a traditional block, it often starts with two small squares or a specific “unit” that forms the base of the heart’s lobes. You will sew these initial pieces together using a precise quarter-inch seam allowance. This scant quarter-inch seam is a favorite technique among professional quilters, as it accounts for the tiny amount of fabric lost when the seam is folded over, ensuring your final measurements remain mathematically perfect.
Once your center unit is ready, you will begin adding “logs” in a clockwise or counter-clockwise fashion, as dictated by your Log Cabin Heart Block – Pattern. The key to the heart shape is the intentional placement of “heart” fabric versus “background” fabric during specific rotations. You aren’t just building a square; you are strategically placing color to carve out the curves and the point. This focal point construction requires careful attention to the pattern diagram for every single row you add.
Pressing is just as important as sewing when working on a Log Cabin Heart Block – Pattern. After adding each strip, you should press the seam toward the newly added log. This prevents “shadowing,” where darker fabric shows through lighter fabric, and helps keep the block from becoming bulky. Always “set” your seam with a dry iron before pressing it open or to the side; this quilting press technique nests the stitches into the fibers, creating a much stronger and flatter join.
As the Log Cabin Heart Block – Pattern grows, you must “square up” your block after every few rounds. Even the best quilters can experience a bit of “drift” where the block starts to become a parallelogram rather than a square. By using a large square ruler to trim away any excess, you ensure that when it comes time to join multiple heart blocks together into a full quilt top, everything aligns perfectly without any bunching or puckered corners.
The “logs” in a Log Cabin Heart Block – Pattern can be of varying widths to create a more modern, “wonky” heart, or they can be strictly uniform for a traditional look. If you are following a specific pattern, stay consistent with your strip widths throughout the entire project. The repetition of the linear strips is what creates the hypnotic visual rhythm that makes log cabin designs so timeless and appealing to both the maker and the viewer.
Completing the final round of your Log Cabin Heart Block – Pattern usually involves adding the background corners that give the heart its final shape. Once these are in place, the “hidden” heart reveals itself fully. It is a magical moment in the process where the individual strips finally transform into a cohesive image. This visual reveal is one of the reasons why quilters find the log cabin heart so rewarding to sew—the transformation from strips to symbols is truly satisfying.
3. Advanced Variations and Creative Design Ideas
Once you have mastered the basic Log Cabin Heart Block – Pattern, you can start experimenting with “half-log” designs. This involves adding strips to only two sides of the center rather than all four, which can create a more elongated or stylized heart. This variation is often used in modern quilting to create a sense of movement and “negative space,” allowing the heart to feel like it is floating or off-center, adding a contemporary twist to a vintage concept.
Another exciting way to customize your Log Cabin Heart Block – Pattern is through “fussy cutting.” This technique involves specifically cutting a piece of fabric so that a particular motif—like a small bird, a flower, or a sentimental phrase—is perfectly centered in the hearth of the heart. Using a fussy-cut center turns the block into a storytelling piece, making it an excellent choice for memory quilts or heritage projects where every scrap of fabric has a specific meaning.
You can also play with the “log” widths within a single Log Cabin Heart Block – Pattern. By using very thin strips for the center and wider strips for the outer edges, you create a “fisheye” or “tunnel” effect that draws the viewer’s eye directly into the center of the heart. This optical illusion quilting adds a sophisticated layer of artistry to your work, elevating a simple block into a gallery-worthy piece of fiber art that showcases your technical range.
Color-blocking is another powerful tool for the Log Cabin Heart Block – Pattern. Instead of using multiple different fabrics for the heart, try using a single solid color for the heart and a high-contrast solid for the background. This creates a “Pop Art” effect that is very popular in minimalist home decor. The clean lines of the log cabin strips combined with bold, saturated colors make the heart look sharp, modern, and incredibly graphic.
For a more vintage or “shabby chic” look, consider using a Log Cabin Heart Block – Pattern with “raw-edge” applique or flannel fabrics. The slightly frayed edges of the flannel give the heart a soft, worn-in feel that is perfect for baby blankets or heavy winter throws. This textural quilting adds a tactile element to the project, making the heart feel even more “cozy” and inviting to the touch, which perfectly matches the theme of the design.
Finally, consider the layout of your finished blocks. You can rotate each Log Cabin Heart Block – Pattern to create different secondary designs. For example, grouping four blocks so the hearts point toward the center creates a completely different visual than lining them up in straight rows. The quilt top layout is the final stage of creativity, where you decide how these individual symbols of love will interact to tell a larger story across the finished quilt.
4. Maintenance and Display of Your Handmade Heart Blocks
Protecting the integrity of your Log Cabin Heart Block – Pattern starts with proper storage before the final quilting process. If you have finished several blocks but aren’t ready to assemble the quilt top, store them flat in a cool, dry place. Avoid folding them, as permanent creases can form in the seam allowances, making it harder to get a perfectly flat finish later. Using a specialized quilt block storage box or even a clean pizza box can keep them safe from dust and pet hair.
When it comes time to wash a quilt made with the Log Cabin Heart Block – Pattern, always use “color catchers.” Because these blocks often feature high-contrast reds and creams, there is a risk of the red dye bleeding into the lighter background. Washing in cold water on a gentle cycle with a color-safe detergent is essential. This preserves the vibrancy of the heart and ensures that the white or cream background stays crisp and unstained for decades.
Air-drying is the best way to maintain the shape of your Log Cabin Heart Block – Pattern. While many modern quilts can handle a low-heat dryer, the numerous seams in a log cabin block can sometimes “shrink” differently, leading to a wavy texture. Laying the quilt flat on a bed of towels or a clean lawn (out of direct sunlight) ensures that the geometric precision of your heart blocks remains intact as the cotton fibers dry and settle.
If you are displaying your Log Cabin Heart Block – Pattern as a wall hanging, be mindful of UV exposure. Constant direct sunlight can fade the “dark” fabrics of your heart, reducing the contrast that makes the pattern work. Using a UV-protective glass if framed, or hanging the textile on an interior wall away from windows, will keep the colors rich and deep, ensuring the heart “glows” as intended for many years to come.
Ironing a completed quilt top featuring the Log Cabin Heart Block – Pattern requires a “pressing” motion rather than a “sliding” motion. Sliding the iron across the surface can stretch the blocks out of shape, especially where there are many small strips. By lifting the iron and placing it back down—a technique known as quilting pressing—you flatten the seams without distorting the overall squareness of the blocks.
Finally, consider the type of quilting “motif” you use over the finished Log Cabin Heart Block – Pattern. A simple “stitch-in-the-ditch” or a basic “stipple” allows the heart shape to remain the star of the show. However, some quilters like to add a “heart-within-a-heart” quilting design, where the stitching follows the contours of the logs. This custom quilting adds a beautiful layer of detail that can only be seen up close, adding a final “secret” touch of love to your project.
FAQ – Frequently Asked Questions
Is the Log Cabin Heart Block – Pattern suitable for a beginner quilter?
Yes, it is very beginner-friendly because it only requires sewing straight lines. However, it does require a high level of attention to detail regarding color placement and seam accuracy. If you can sew a straight line and follow a diagram, you can successfully create this heart quilt block.
What is the best size for the center square of the heart?
In most Log Cabin Heart Block – Pattern designs, the center is either a 1.5-inch or 2.5-inch square. The smaller the center, the more “logs” you can add, resulting in a more detailed and complex-looking heart. Most beginners find starting with 2.5-inch strips and centers to be much easier to handle.
Can I use the “Quilt as You Go” method for this pattern?
Absolutely. The Log Cabin Heart Block – Pattern is perfect for the “Quilt as You Go” technique. This involves sewing the strips directly through the batting and backing, meaning each block is quilted as soon as it is pieced. It’s a great way to finish a project quickly without needing a longarm machine.
Why does my heart look distorted or tilted?
This usually happens due to an inconsistent seam allowance. If your seams aren’t exactly a quarter-inch, the block will grow unevenly. Another reason could be “fabric pull,” where the feed dogs of your machine pull one layer faster than the other. Using a walking foot can help keep both layers of the quilt block moving together.
How many blocks do I need for a lap-sized quilt?
For a standard lap quilt (roughly 50″ x 60″), you would need approximately 30 blocks if each Log Cabin Heart Block – Pattern finishes at 10 inches. Always calculate the “finished size” (the size after it is sewn into the quilt) when planning your layout to ensure you have enough fabric and blocks.
What is the meaning behind the colors in a Log Cabin block?
Traditionally, a red center square represents the “hearth” or heart of the home, while a yellow center can represent a light in the window. In a Log Cabin Heart Block – Pattern, the red is usually extended into the logs themselves to form the symbol of love, reinforcing the theme of a warm and loving household.
Conclusion
The Log Cabin Heart Block – Pattern is a beautiful testament to how traditional techniques can be adapted to express modern emotions. We have explored the critical role of fabric contrast, the precision required in the cutting and sewing process, and the various ways you can customize the design to suit your personal style.
From “fussy cutting” sentimental centers to experimenting with modern color-blocking, the possibilities for this block are as infinite as your imagination. By following the structural logic of the log cabin and maintaining a consistent quarter-inch seam, you can create a durable and stunning piece of art that celebrates the universal symbol of love.