The Flying Geese Block – Pattern is one of the most versatile and beloved designs in the world of quilting, offering a sense of movement and direction that few other blocks can match. Whether you are a beginner looking to master the basics or an experienced quilter aiming for intricate geometric displays, understanding the Flying Geese Block – Pattern is essential for your creative journey. This timeless motif consists of a large central triangle (the “goose”) flanked by two smaller triangles (the “sky”), creating a rectangular unit that can be combined in endless variations to form borders, stars, or flowing lines.
When you dive into the world of patchwork and quilting, the Flying Geese Block – Pattern stands out because of its mathematical elegance and visual impact. It is traditionally twice as wide as it is tall, such as a 2×4 inch or 4×8 inch finished unit, which allows it to nestle perfectly into larger quilt designs. Beyond just being a technical exercise, crafting these blocks allows quilters to play with color theory and fabric contrast, making the “geese” pop against a muted background or blending them for a subtle, textured effect.
In today’s modern quilting scene, the Flying Geese Block – Pattern has been reimagined through various construction methods that save time and reduce fabric waste. From the traditional “stitch and flip” technique to the popular “no-waste” method that produces four units at once, there is a strategy for every skill level. As we explore this guide, you will learn how to perfect your seam allowance, choose the right quilting tools, and troubleshoot common issues like blunted points, ensuring your project looks professional and polished.
1. Understanding the Anatomy of the Flying Geese Block – Pattern
The Flying Geese Block – Pattern is fundamentally composed of three pieces of fabric: one large rectangle (or square, depending on the method) and two smaller squares. The large piece represents the “body” of the bird, while the smaller pieces form the “sky” or the background. Achieving a crisp look requires high-quality cotton quilting fabric to prevent stretching during the sewing process.
Precision is the hallmark of a successful Flying Geese Block – Pattern. Because the design relies on sharp angles, even a slight deviation in your 1/4 inch seam allowance can result in lost points. Many quilters prefer using a specialized quarter-inch foot on their sewing machine to maintain consistency throughout the assembly of multiple units.
The mathematical ratio of the Flying Geese Block – Pattern is its most defining characteristic. The width is always double the height. This geometric symmetry ensures that when you join several blocks together, they align perfectly. If your math is off by even a fraction, the “geese” will appear distorted or won’t fit into your final quilt top.
Choosing the right fabric prints can drastically change the mood of the Flying Geese Block – Pattern. For a traditional look, use small floral prints or solid colors. For a more modern quilt design, consider using bold, saturated solids or even directional prints, though the latter requires extra care during the cutting phase to ensure the pattern stays upright.
Pressing is a non-negotiable step when working with the Flying Geese Block – Pattern. You should always press your seams toward the “sky” triangles to reduce bulk. Using a tailor’s clapper or a hot iron without steam can help keep the seams extremely flat, which is vital when you start joining these units into larger quilt rows.
Lastly, the Flying Geese Block – Pattern is often used to create the “points” of an Ohio Star or a Sawtooth Star. Understanding how this single unit functions within larger blocks gives you the creative freedom to design your own custom quilt patterns. It is the building block of many complex secondary designs in textile art.
2. Master the No-Waste Method for Efficiency
The “no-waste” technique for the Flying Geese Block – Pattern is a game-changer for quilters who value both time and materials. Instead of cutting individual triangles, you start with one large square and four smaller squares. This method is highly praised in the quilting community because it eliminates the need to deal with stretchy bias edges until the very last moment.
To start this version of the Flying Geese Block – Pattern, you lay two small squares diagonally on the large square. By sewing a line on either side of the center diagonal, you create a foundation that will eventually yield four identical units. This batch sewing technique is perfect for large projects like king-sized quilts or decorative borders.
Accuracy in marking your lines is crucial for the Flying Geese Block – Pattern. Use a water-soluble fabric pen or a fine pencil to mark the diagonal path. Since you are sewing 1/4 inch away from this line, having a clear visual guide ensures that your geese units are uniform in size and shape.
Once you cut and press the first stage, you add the remaining two small squares to the corners. This second round of sewing and cutting completes the Flying Geese Block – Pattern transformation. It feels almost like magic as the fabric unfolds into four perfect rectangles with sharp, clean points ready for your quilt layout.
One major benefit of this approach to the Flying Geese Block – Pattern is the reduction of fabric scraps. Traditional methods often leave behind small “dog ears” or corner cut-offs that end up in the trash. The no-waste method utilizes nearly every square inch of your designer fabric, making it an eco-friendly choice for the conscious crafter.
After completing your four units, always perform a trimming step. Even the best quilters find that fabric can shift slightly. Using a ruler and rotary cutter to square up your Flying Geese Block – Pattern to the exact “unfinished size” will save you from major headaches when it comes time to assemble the final quilt top.
3. Creative Applications in Modern Quilt Design
The Flying Geese Block – Pattern is not just for borders; it is a powerful tool for storytelling in fabric. In modern minimalism, quilters often use a single “goose” in a vast sea of negative space to create a focal point. This use of negative space highlights the sharp geometry and draws the eye directly to the craftsmanship.
Another popular trend is the “scrappy” Flying Geese Block – Pattern. By using a variety of different fabrics for the geese while keeping the background consistent, you create a vibrant, energetic look. This is an excellent way to use your fabric stash and give a second life to leftover pieces from previous sewing projects.
Directional flow is a unique feature of the Flying Geese Block – Pattern. You can point them upward to represent growth, downward for a cascading effect, or in a circle to create a Dutchman’s Puzzle block. This versatility makes it a favorite for art quilters who want to convey movement and rhythm in their work.
Incorporating the Flying Geese Block – Pattern into sashing can elevate a simple quilt to something spectacular. Instead of plain strips of fabric between blocks, a row of tiny geese adds a layer of sophistication. It creates a “secondary pattern” that bridges the gap between different elements of the quilt composition.
For those who love ombre effects, the Flying Geese Block – Pattern is the perfect canvas. By choosing fabrics that transition from dark to light, you can create a stunning gradient that looks like birds flying into the sunset. This technique requires careful fabric selection but yields professional, high-end results.
Don’t be afraid to experiment with the scale of your Flying Geese Block – Pattern. Making oversized units can result in a bold, graphic quilt that sews up quickly. Conversely, tiny “micro-geese” are a testament to precision piecing and can be used as delicate accents in wall hangings or wearable quilted items like jackets.
4. Troubleshooting and Pro Tips for Perfect Points
The most common frustration with the Flying Geese Block – Pattern is “chopping off” the points when sewing units together. To avoid this, always look for the “X” created by your previous seams on the back of the block. If you sew exactly through the center of that “X,” your goose point will stay perfectly sharp on the front side.
Using starch or a fabric stiffener is a secret weapon when working on a Flying Geese Block – Pattern. Because these blocks involve diagonal cuts, the fabric is prone to stretching on the bias. Starching your fabric before cutting makes it behave more like paper, allowing for much more accurate cutting and piecing.
If you find that your Flying Geese Block – Pattern is coming out too small, check your seam allowance. Often, a “heavy” 1/4 inch (meaning slightly wider than 1/4 inch) will eat up the dimensions of the block. Aim for a scant 1/4 inch seam, which accounts for the space the fabric takes up when it is folded over the thread.
Pinning is your friend when assembling a Flying Geese Block – Pattern. Even if you are an experienced sewist, pinning at the intersection where the point meets the next unit ensures nothing shifts. Use fine glass-head pins that won’t distort the fabric layers, keeping your alignment tight and professional.
Consider using Foundation Paper Piecing (FPP) for the Flying Geese Block – Pattern if you struggle with traditional methods. FPP involves sewing directly onto a paper template, which guarantees perfect results every time. It is especially useful for very small or complex versions of the pattern where manual accuracy is difficult to maintain.
Lastly, always keep your rotary cutter blade sharp. A dull blade can pull the fabric, leading to inaccurate cuts that ruin your Flying Geese Block – Pattern before you even get to the sewing machine. A clean cut is the foundation of a clean block, ensuring your quilting project is a success from start to finish.
FAQ: Frequently Asked Questions about the Flying Geese Block – Pattern
What is the best size for a Flying Geese Block – Pattern?
The most common sizes are 2×4 inches and 4×8 inches (finished). These sizes are popular because they fit easily into standard 12-inch quilt blocks and are manageable for both beginners and experts.
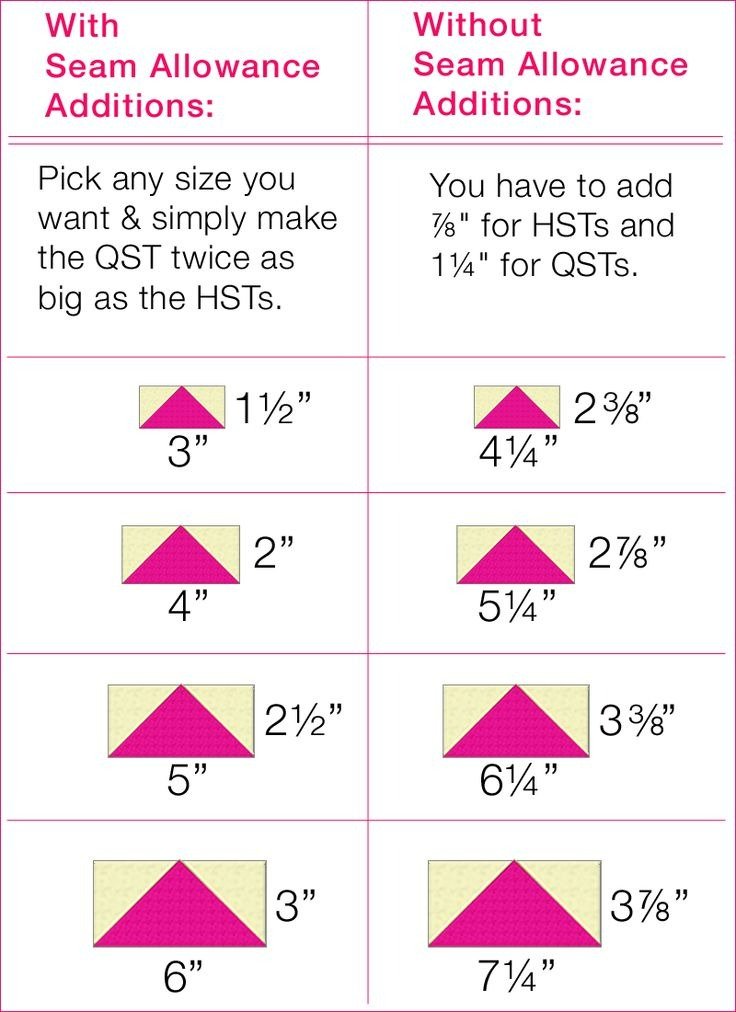
How do I calculate the fabric needed for a Flying Geese Block – Pattern?
For the traditional method, your large rectangle should be 1/2 inch wider and 1/2 inch taller than your desired finished size. The two small squares should be the same size as the finished height of the block plus 1/2 inch for seam allowances.
Can I use the Flying Geese Block – Pattern for borders?
Absolutely! In fact, it is one of the most popular quilt border patterns. It creates a “moving” frame around your quilt center, often referred to as a “border of geese.”
Why are my points getting cut off?
This usually happens because the seam allowance is too wide. When you join the Flying Geese Block – Pattern to another piece, ensure your needle passes exactly through the peak of the triangle.
What is the “No-Waste” method?
It is a technique where you sew four Flying Geese Block – Pattern units at once using one large square and four small squares. It is efficient and prevents the waste of small fabric triangles.
Is the Flying Geese Block – Pattern suitable for beginners?
Yes, it is a foundational skill. While it requires accurate sewing, it is a great way for beginners to practice their points and learn the importance of a consistent seam allowance.
Conclusion
Mastering the Flying Geese Block – Pattern opens up a world of creative possibilities for any quilter. We have covered everything from the basic anatomy of the block to the highly efficient no-waste construction method, as well as creative ways to incorporate these units into modern designs.
By focusing on precision piecing, proper pressing, and careful fabric selection, you can create stunning quilts that showcase your technical skills and artistic vision. Whether you use them in stars, borders, or as standalone motifs, these “geese” will undoubtedly bring your textile projects to life.