Bunny coasters – Pattern are the perfect way to blend functionality with seasonal charm, offering a delightful touch to any coffee table or dining setup. Whether you are an experienced crafter or a beginner looking for a weekend project, creating your own handmade decor provides a sense of accomplishment that store-bought items simply cannot match. This guide is designed to walk you through everything you need to know about crafting these adorable accessories, ensuring your home stays protected from water rings while looking absolutely festive.
The beauty of a Bunny coasters – Pattern lies in its versatility, as you can customize the colors, yarn weights, and ear shapes to match your specific style. From soft pastels for a traditional Easter theme to modern neutrals for year-round use, these crochet coasters serve as conversation starters and thoughtful gifts for friends and family. Using high-quality cotton yarn ensures that your coasters are not only cute but also highly absorbent and durable enough to withstand daily use.
When you dive into the world of DIY crochet projects, you’ll find that the Bunny coasters – Pattern is one of the most rewarding patterns to master because of its quick completion time. It allows you to practice essential techniques like the magic ring, increasing stitches, and shaping small details without the commitment of a large blanket or garment. By the end of this article, you will have a comprehensive understanding of the materials, steps, and finishing touches required to create a professional-looking set of rabbit-themed coasters.
1 Understanding the Bunny coasters – Pattern Basics
To start your journey, you first need to understand the structure of the Bunny coasters – Pattern. This term refers to the specific set of instructions—usually involving crochet or knitting—that dictates how to form the circular body of the coaster and the distinctive long ears of a rabbit. Most patterns rely on a series of double crochet or single crochet rounds to create a flat, sturdy disc.
The Bunny coasters – Pattern is often categorized by its difficulty level, which is typically “easy” or “beginner-friendly.” This makes it an ideal entry point for those learning to read stitch charts or follow written abbreviations. Because the project is small, any mistakes are easy to spot and even easier to fix without having to unravel hours of work.
When searching for the right crochet pattern, you should look for one that specifies the gauge and hook size. Even though coasters don’t need to “fit” a person, the tension in a Bunny coasters – Pattern is vital to ensure the surface stays flat and doesn’t curl up at the edges. A flat coaster is essential for keeping your mugs stable and preventing spills.
Another key aspect of the Bunny coasters – Pattern is the choice of fiber. Most experts recommend 100% cotton yarn because cotton is heat-resistant and absorbs the condensation from cold drinks. Acrylic yarn can sometimes melt under high heat or simply allow liquid to bead off onto the table, defeating the purpose of a protective coaster.
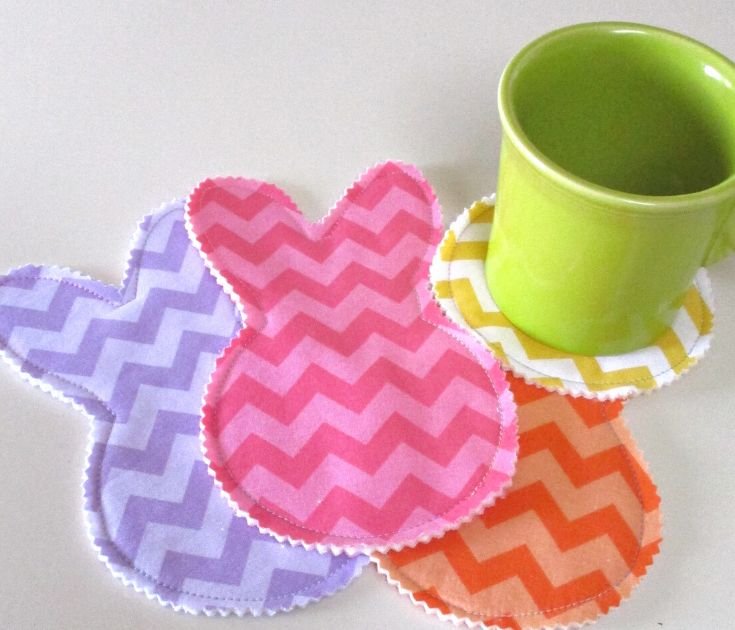
Visualizing the Bunny coasters – Pattern before you begin helps in planning your color palette. You might choose a variegated yarn for a whimsical look or a solid “bunny” color like white, grey, or tan for a more realistic aesthetic. Some patterns also include instructions for adding a small pom-pom tail or embroidered facial features to give each piece its own personality.
Finally, the Bunny coasters – Pattern usually concludes with a “border” or “edging” phase. This is where you transform a simple circle into a bunny by adding the ears directly onto the rim or sewing them on afterward. Mastering this transition is what separates a generic circle from a high-quality handmade bunny coaster that looks professional and polished.
2 Essential Materials for Your Bunny coasters – Pattern
Before you pick up your hook, gathering the right tools is the second most important step in successfully executing a Bunny coasters – Pattern. You will need a crochet hook that matches your yarn weight; typically, a 3.5mm (E) or 4.0mm (G) hook works best with medium-weight cotton. Having the correct hook size ensures your stitches are tight enough to be absorbent but loose enough to lie flat.
In addition to your primary yarn, you will need a few scraps of pink or black yarn if you plan on adding a nose or eyes to your Bunny coasters – Pattern. Small details like these can be added using a tapestry needle, which is also essential for weaving in your ends securely. A clean finish is the hallmark of a great hand-crafted gift.
Stitch markers are another “must-have” when working through a Bunny coasters – Pattern. Since crochet often involves working in continuous rounds, it is very easy to lose track of where a new row begins. Placing a marker in the first stitch of each round will save you the frustration of constant counting and help you maintain the geometric symmetry of the bunny’s face.
Don’t forget a sharp pair of scissors and perhaps some stiffening spray if you want your Bunny coasters – Pattern results to be extra rigid. While not always necessary, some crafters prefer their coasters to feel more like “mats” than soft fabric. Stiffening can help the bunny ears stand upright or stay in a specific position rather than flopping over.
If you are following a Bunny coasters – Pattern that includes a 3D element, such as a fluffy tail, you might want a small fork or a pom-pom maker. These tools help create uniform, dense pom-poms that won’t fall apart after a few washes. Remember, since these are kitchen accessories, they will likely need to be laundered occasionally, so choose materials that are machine washable.
Lastly, having a printed or digital copy of the Bunny coasters – Pattern nearby is crucial for success. Many crafters find it helpful to use a row counter app or a simple pen and paper to tick off each completed round. This organization prevents the common mistake of having one coaster larger than the rest of the set, ensuring a uniform collection of bunny decor.
3 Step-by-Step Execution of the Bunny coasters – Pattern
The actual construction of the Bunny coasters – Pattern usually begins with a magic circle (or magic ring). This technique allows you to pull the center of the coaster tight, leaving no hole in the middle where moisture could leak through. From this center point, you will work outward in increasing circles, adding a specific number of stitches to each round to keep the fabric flat.
As you progress through the Bunny coasters – Pattern, you will notice the diameter increasing. For a standard mug, you generally want the base of the coaster to be between 3.5 and 4 inches wide. If your tension is naturally tight, you may need to add an extra round of single crochet to achieve the desired size before starting the ear section.
The ears are the most defining feature of the Bunny coasters – Pattern. These are typically created by chaining a specific length and then working back down the chain with a variety of stitch heights—such as slip stitches, half-double crochets, and double crochets—to create a tapered, natural bunny ear shape. Symmetry is key here, so ensure both ears are spaced evenly apart.
Once the ears are attached, the Bunny coasters – Pattern instructions will likely guide you through the “finishing” stage. This involves “fastening off” your yarn and using your tapestry needle to hide the yarn tails within the stitches. This step is vital for product durability, as it prevents the coaster from unravelling during use or washing.
For those who want extra detail, the Bunny coasters – Pattern can be enhanced with surface slip stitches to define the inner ear or a different color of yarn to create a “blush” effect on the cheeks. These customization options are what make the pattern so popular on platforms like Pinterest and Etsy, as they allow for endless creative expression.
After completing your first coaster, it is a good idea to “block” your work. This involves lightly steaming the cotton or wetting it and pinning it into a perfect circle to dry. Blocking makes the Bunny coasters – Pattern look much more professional and ensures that the ears lay exactly how you want them to, giving your table setting a high-end feel.
4 Tips for Marketing Your Bunny coasters – Pattern Creations
If you plan on selling the items made from your Bunny coasters – Pattern, photography is your best friend. Natural lighting highlights the texture of the crochet stitches and makes the colors pop. Try “staging” the coasters with a cute mug and some cookies to help potential buyers visualize how the handmade bunny decor will look in their own homes.
Pricing is another critical factor when utilizing a Bunny coasters – Pattern for business. You should account for the cost of your materials (yarn, labels, packaging) as well as the time it takes you to complete each piece. Since coasters are small, selling them in sets of four or six often provides better value for the customer and a better profit margin for the maker.
To improve your SEO for handmade goods, use descriptive keywords when listing your items online. Instead of just “bunny coaster,” try terms like “Farmhouse Bunny coasters – Pattern,” “Easter Table Decor,” or “Boho Nursery Accessories.” This helps your work appear in more specific searches, connecting you with customers looking for a unique aesthetic.
Social media platforms like Instagram and TikTok are perfect for showing the “behind-the-scenes” of working on a Bunny coasters – Pattern. Short videos of the “magic ring” process or the final assembly of the ears can be very engaging. Using trending audio and relevant hashtags like #CrochetAddict or #SpringDecor can increase the visibility of your creative projects.
Consider offering the Bunny coasters – Pattern itself as a digital download if you have designed a unique variation. Selling patterns is a great way to generate passive income in the crafting community. Ensure your instructions are clear, include high-resolution photos, and perhaps even a video link for the trickier parts of the construction.
Finally, always encourage customer feedback. If someone buys a set made from your Bunny coasters – Pattern, ask them to share a photo of it in use. User-generated content and positive reviews act as social proof, building trust with new customers and establishing you as a skilled artisan in the home decor niche.
FAQ – Frequently Asked Questions
What is the best yarn for a Bunny coasters – Pattern?
The best choice is 100% cotton yarn. Cotton is durable, heat-resistant, and highly absorbent, which is essential for protecting surfaces from drink condensation.
How long does it take to finish one Bunny coasters – Pattern?
For an intermediate crocheter, one coaster typically takes between 20 to 40 minutes. It is a great “quick win” project for those with limited time.
Can I wash the coasters made from this pattern?
Yes, if you use cotton yarn, they are usually machine washable. It is recommended to wash them in a mesh laundry bag on a gentle cycle and lay them flat to dry to maintain their shape.
Is the Bunny coasters – Pattern suitable for absolute beginners?
Absolutely! It uses basic stitches like the magic ring, single crochet, and double crochet. It’s an excellent project for practicing increases and shaping.
What size crochet hook should I use?
Most patterns suggest a 3.5mm or 4.0mm hook, but you should always check the yarn label or the specific pattern requirements to ensure the correct gauge.
Can I sell items I make using a Bunny coasters – Pattern?
Generally, yes, as long as the pattern designer allows for commercial use of the finished products. Always check the “terms of use” included with the pattern you purchase or download.
Conclusion
In this article, we have explored the wonderful world of the Bunny coasters – Pattern, covering everything from the foundational stitches to the final marketing strategies. We discussed why cotton yarn is the superior choice for absorbency, how to achieve perfect symmetry with bunny ears, and the importance of blocking your finished work for a professional look. Creating these coasters is not just about home protection; it’s about bringing a touch of handmade joy into your daily routine or gifting that joy to others.
We hope this guide has inspired you to pick up your hook and start your own set of rabbit-themed accessories. Whether for Easter or as a permanent fixture in a whimsical kitchen, the Bunny coasters – Pattern is a timeless project that never goes out of style.