Crochet skull earrings – Pattern projects have become a sensation in the DIY fashion world, blending a touch of gothic charm with the delicate artistry of needlework. Whether you are preparing for a themed party or simply love the “memento mori” aesthetic, crafting your own jewelry allows for a level of customization that store-bought items simply cannot match. This guide is designed to help you navigate the process of creating stunning, lightweight accessories that make a bold statement.
The beauty of a Crochet skull earrings – Pattern lies in its versatility and the minimal resources required to get started. Unlike larger projects like blankets or sweaters, these earrings are quick to finish, making them perfect for last-minute gifts or a fast weekend craft. By mastering a few basic stitches and focusing on tension control, you can produce professional-looking pieces that look intricate and high-end.
To ensure your Crochet skull earrings – Pattern results in a crisp, recognizable shape, choosing the right materials is the first step toward success. Using high-quality mercerized cotton thread and a very small steel hook is essential for achieving the structural integrity needed for jewelry. In the following sections, we will break down the essential components, techniques, and styling tips to ensure your handmade creations are both durable and stylish.
1. Understanding the Essentials of a Crochet skull earrings – Pattern
Starting a Crochet skull earrings – Pattern requires a specific set of tools that differ from your standard yarn projects. You will typically need size 10 or 20 crochet thread, which provides the necessary firmness to keep the skull’s “face” from drooping. A steel crochet hook, usually ranging from 1.25mm to 1.50mm, is the best choice for working with these fine fibers.
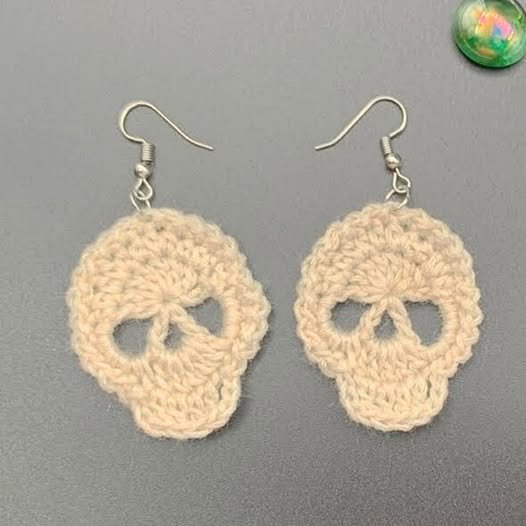
The term Crochet skull earrings – Pattern refers to the step-by-step instructions used to create a miniature skull shape using stitches like the double crochet and the treble crochet. These patterns often utilize “negative space” or gaps created by chain stitches to form the eye sockets and nasal cavity. Understanding how to read these charts or written instructions is vital for a clean finish.
Consistency is the most important factor when following a Crochet skull earrings – Pattern. Because these items are worn as a pair, you must ensure that your tension remains identical for both pieces. If one skull is stitched tighter than the other, the earrings will look asymmetrical, which is a common hurdle for beginners in micro-crochet.
In a standard Crochet skull earrings – Pattern, the construction usually begins at the top of the cranium and works downward toward the jaw. Some designers prefer working in the round, while others use a row-based approach to create a flatter, more two-dimensional profile. Both methods yield beautiful results depending on the level of “puffiness” you desire.
When we talk about the Pattern aspect, we are looking at the mathematical arrangement of stitches. For example, a series of clustered stitches might form the forehead, while a sudden decrease in stitch count creates the indentation for the cheekbones. Learning to visualize these shapes before you hook them will significantly improve your speed.
Finally, a Crochet skull earrings – Pattern isn’t complete without the finishing hardware. You will need jump rings, earring hooks (fishhooks or studs), and needle-nose pliers. Adding a small drop of fabric stiffener or clear-drying glue to the finished crochet piece is a professional trick to ensure the skulls stay flat against your neck.
2. Step-by-Step Execution of the Skull Design
To begin your Crochet skull earrings – Pattern, start by creating a magic ring or a small chain loop to form the top of the head. This serves as the foundation where you will increase your stitches to create a rounded, dome-like appearance. Focus on keeping your stitches snug so the stuffing (if any) or the air gaps don’t cause the shape to warp.
The most iconic part of any Crochet skull earrings – Pattern is the eye sockets. These are usually created by working a series of chains and skipping several stitches from the previous row. This “lace” technique creates a hauntingly beautiful hollow look that defines the skull’s character without needing extra embroidery.
As you move into the middle section of the Crochet skull earrings – Pattern, you will transition to the nasal cavity. This is often a single, centered gap or a small “V” shape created by specific decreases. Precision here is key, as even one misplaced stitch can make the skull look slightly off-center or tilted.
The jawline is the final structural hurdle in a Crochet skull earrings – Pattern. This section usually involves shorter stitches like single crochets or slip stitches to mimic the narrower width of the human chin. Some patterns include “teeth” by using picot stitches or small clusters along the bottom edge for added detail.
Once the stitching of your Crochet skull earrings – Pattern is finished, you must weave in your ends very carefully. Since the project is so small, there isn’t much room to hide yarn tails. Using a fine embroidery needle to thread the ends back through the densest part of the stitches will keep your work looking clean and professional.
After the crochet work is done, it is time to block your pieces. Pinning the skulls to a foam board and lightly steaming them or applying a stiffening agent ensures that your Crochet skull earrings – Pattern retains its spooky silhouette. This step is what separates amateur crafts from boutique-quality handmade jewelry.
3. Customizing Colors and Textures
While a traditional Crochet skull earrings – Pattern is often worked in white or cream to mimic bone, don’t be afraid to experiment with color. Neons, glow-in-the-dark threads, or even variegated yarns can give your skulls a “Sugar Skull” or “Dia de los Muertos” vibe. Color choice can completely change the mood of the accessory.
Incorporate beads or sequins into your Crochet skull earrings – Pattern for a bit of sparkle. You can thread small seed beads onto your yarn before you start crocheting and slide them into place to serve as “eyes.” This adds a tactile element and a weight that helps the earrings hang straight.
The choice of thread material in your Crochet skull earrings – Pattern also affects the final texture. Metallic threads add a festive, jewelry-like sheen but can be more slippery to work with. Bamboo or silk threads offer a softer, more luxurious feel but may require more stiffening agent to maintain their shape over time.
For those who want a more “grunge” look, tea-staining your finished Crochet skull earrings – Pattern is an excellent technique. By soaking the finished white cotton skulls in a strong brew of black tea, you can give them an antiqued, ivory-like finish that looks centuries old. This adds a layer of depth to the gothic aesthetic.
Mixing media is another way to elevate a Crochet skull earrings – Pattern. You can hang small charms, like tiny roses or silver crosses, from the bottom of the jawbone. This turns a simple crochet project into a complex piece of wearable art that tells a story and catches the eye of everyone you meet.
Don’t forget the importance of the earring hardware color. Gold-toned hooks paired with a black Crochet skull earrings – Pattern look elegant and sophisticated, while silver or gunmetal hooks paired with white thread emphasize the classic macabre look. Matching your metal to the thread “temperature” creates a cohesive design.
4. SEO Tips and Marketing Your Crochet Jewelry
If you plan to sell items made from a Crochet skull earrings – Pattern, high-quality photography is your best friend. Use a macro lens to capture the tiny stitch details and the hollow eye sockets. Natural lighting and a simple, contrasting background will make the texture of the crochet pop on screen.
When listing your items online, use the term Crochet skull earrings – Pattern in your titles and descriptions. Explain the benefits of the item, such as it being lightweight and nickel-free (if you use hypoallergenic hooks). Keywords like “handmade gothic jewelry” and “boho skull accessories” will help the right audience find your work.
Providing a downloadable Crochet skull earrings – Pattern for other crafters is a great way to build a community. Ensure your pattern is easy to read, includes a stitch key, and offers troubleshooting tips for common mistakes. Clear, step-by-step photos within the pattern itself are highly valued by the crochet community.
Social media platforms like Pinterest and Instagram are perfect for showcasing a Crochet skull earrings – Pattern. Short-form videos showing the “process” of a skull being hooked can go viral among DIY enthusiasts. Use hashtags like #MicroCrochet and #SkullStyle to increase your reach to potential customers and fellow makers.
Consider offering your Crochet skull earrings – Pattern in different sizes. By simply changing the thread weight and hook size, the same pattern can become a keychain, a pendant, or a window ornament. This “scaling” technique allows you to maximize the value of a single design across multiple product categories.
Finally, always encourage customer feedback. When people see that others have successfully used your Crochet skull earrings – Pattern to create beautiful items, they are more likely to trust your expertise. Word-of-mouth and positive reviews are the strongest drivers for growth in the handmade artisan market.
FAQ – Frequently Asked Questions
What is the best thread for a Crochet skull earrings – Pattern?
Mercerized cotton thread (size 10 or 20) is the gold standard. It has a slight sheen, doesn’t fray easily, and holds its shape much better than standard wool or acrylic yarns.
How long does it take to finish one pair?
Depending on your skill level, a single earring usually takes between 20 to 45 minutes. It is a perfect “waiting room” project because it is so portable.
Do I need to be an expert to follow this pattern?
While helpful, you don’t need to be an expert. If you know how to do a chain, single crochet, and double crochet, you can follow most skull patterns with a little patience.
How do I keep the earrings from curling?
Using a fabric stiffener or a mixture of water and white glue is the best method. Pin the earrings into the desired shape on a flat surface while they dry.
Can I wash my crochet earrings?
Yes, but do so gently. Hand wash with a tiny bit of mild soap, rinse, and then re-apply your stiffening agent to ensure they regain their shape.
What hooks are best for sensitive ears?
Always look for surgical stainless steel, niobium, or titanium earring hooks. Since you are making these yourself, you have the power to ensure they are 100% hypoallergenic.
Conclusion
Creating jewelry using a Crochet skull earrings – Pattern is an incredibly rewarding way to express your creativity and technical skill. Throughout this article, we have explored the essential tools needed, the step-by-step logic of constructing a miniature skull, and the various ways you can customize your designs with color and hardware.
We also touched on the importance of SEO and marketing if you decide to share your talent with the world. By focusing on tension and high-quality materials, you can create pieces that are as durable as they are beautiful.