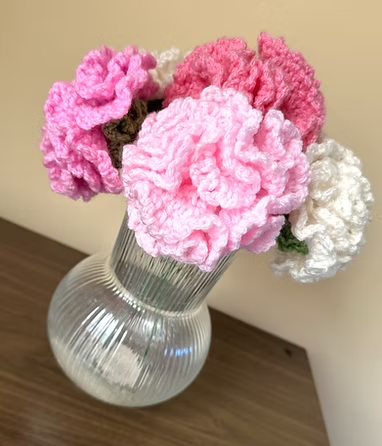
Carnation Flower Crochet – Pattern is one of the most rewarding projects you can undertake if you want to bring a touch of everlasting nature into your home. These ruffled, multi-layered blooms are famous for their intricate texture and symbolic meanings of love and distinction. Creating a Carnation Flower Crochet – Pattern allows you to experiment with vibrant colors and various yarn weights, turning a simple ball of thread into a stunning floral masterpiece that never wilts. Whether you are looking to create a single stem for a bud vase or a full crochet bouquet, the carnation stands out as a versatile choice for crafters of all skill levels.
Working on a Carnation Flower Crochet – Pattern is an excellent way to practice specific techniques like the hyperbolic crochet method, which creates those signature wavy petals. Because the carnation is naturally dense and ruffled, the stitch pattern usually involves rapid increases, making it a fun and fast-paced project. Many enthusiasts find that a handmade carnation makes for a thoughtful DIY gift, especially for Mother’s Day or anniversaries, as it represents deep affection and admiration. By mastering this floral crochet design, you gain the ability to customize your decor with personal touches that store-bought flowers simply cannot match.
In this guide, we will explore the essential steps to perfecting your Carnation Flower Crochet – Pattern, ensuring your finished product looks professional and realistic. We will cover everything from selecting the right crochet hook size to understanding how different yarn fibers affect the drape and “fluff” of the petals. If you have been searching for a way to use up your yarn scraps, this is the perfect opportunity to create a colorful garden. Let’s dive into the technical details and creative secrets that make the crochet carnation a timeless favorite in the fiber arts community.
1. Understanding the Carnation Flower Crochet – Pattern Basics
The foundation of any successful Carnation Flower Crochet – Pattern lies in understanding the anatomy of the flower. Unlike flat flowers, the carnation is built on a series of concentric circles or a tight spiral that expands rapidly. To achieve the iconic ruffled look, you will typically work multiple double crochet stitches into a single stitch from the previous row. This mathematical expansion is what gives the crochet flower its volume and realistic depth.
Choosing the right materials is the next vital step for your Carnation Flower Crochet – Pattern. For a delicate, realistic appearance, a mercerized cotton yarn is often recommended because it provides excellent stitch definition and a slight sheen. However, if you prefer a soft, vintage feel, a fine acrylic blend can also work wonders. The goal is to ensure the yarn weight matches your hook size to prevent the stuffing or the base from showing through the dense petals.
The magic ring (or magic circle) is the most common starting point for this crochet project. By starting with a magic ring, you can pull the center tight, ensuring there is no visible hole in the middle of your carnation bloom. If you are a beginner, practicing this technique is essential before starting your Carnation Flower Crochet – Pattern, as it provides a professional finish that standard chain loops cannot replicate.
Tension plays a huge role in how your Carnation Flower Crochet – Pattern turns out. If your tension is too tight, the ruffles might become stiff and lose their organic flow; if it is too loose, the flower may look messy. Finding a middle ground allows the crochet petals to bounce and hold their shape. Remember that the crochet carnation is forgiving, as the ruffles naturally hide minor inconsistencies in your stitch work.
One of the most exciting parts of the Carnation Flower Crochet – Pattern is the color selection. Real carnations come in solid colors, bicolors, and even “picotee” styles where the edges are a different shade. You can mimic this by using a variegated yarn or by changing colors on the final round of the crochet pattern. This simple trick adds an extra layer of sophistication to your handcrafted floral arrangement.
Finally, don’t forget the structural elements like the calyx and stem. A proper Carnation Flower Crochet – Pattern usually includes a small green cone-shaped piece at the base. This piece, known as the calyx, transitions the flower head to the floral wire or crochet stem. Using a slip stitch to join these parts ensures a sturdy construction that allows your flower to stand tall in a vase or remain secure on a brooch pin.
2. Essential Stitches for Your Carnation Flower Crochet – Pattern
To execute a high-quality Carnation Flower Crochet – Pattern, you must be comfortable with the double crochet (dc) and treble crochet (tr) stitches. These taller stitches provide the height necessary to create deep ruffles. Most patterns will ask you to place three or four stitches into every single loop, which creates the “ruffle effect” known as hyperbolic ruffling. This technique is the secret sauce behind the realistic crochet flower look.
Another key component is the chain stitch (ch), which is used to create gaps and decorative edges. In many variations of the Carnation Flower Crochet – Pattern, a series of small chain loops (like a picot stitch) are worked into the final row. This gives the edges of the petals that “toothed” or serrated look that is so characteristic of real carnations. It is a slow process but adds immense visual texture to your work.
The increase stitch is the most frequent action you will perform in a Carnation Flower Crochet – Pattern. Unlike a standard sweater or hat where increases are gradual, floral crochet often requires exponential increases. This means your stitch count will grow very quickly. Keeping track of your rounds with a stitch marker is highly recommended so you don’t lose your place in the sea of ruffles.
For the base of the flower, you will likely use the single crochet (sc) stitch. This creates a dense, firm foundation that can support the weight of the heavy ruffled top. In a well-designed Carnation Flower Crochet – Pattern, the transition from the tight base to the wide petals is what defines the flower’s silhouette. Mastering the sc increase will help you create a sturdy “cup” for the flower to sit in.
Don’t overlook the importance of the slip stitch (sl st) for finishing and shaping. When you reach the end of your Carnation Flower Crochet – Pattern, a slip stitch helps to seamlessly close the rounds. You can also use slip stitches to move your yarn to a different position on the flower without adding height, which is useful for 3D crochet modeling and attaching leaves later on.
Advanced crafters might incorporate the front post double crochet (fpdc) to add even more dimension to the Carnation Flower Crochet – Pattern. By working around the post of the stitch rather than into the top loops, you can create ridges that look like the natural folds of a flower. This level of detail turns a simple crochet pattern into a piece of fiber art that people will want to touch and admire up close.
3. Customizing and Scaling Your Carnation Flower Crochet – Pattern
One of the best things about a Carnation Flower Crochet – Pattern is its scalability. By simply changing your hook size and yarn thickness, you can create anything from a tiny carnation earring to a giant decorative pillow element. A lace weight thread with a 1.25mm hook produces a delicate, jewelry-grade bloom, while a bulky yarn can turn the same pattern into a bold statement piece for home decor.
Colorwork is where your Carnation Flower Crochet – Pattern truly comes to life. To achieve a realistic “flecked” look, try using the tapestry crochet technique or simply carry two strands of thin thread together. Using a gradient yarn can also simulate the way sunlight hits a flower, with darker tones at the center fading into lighter shades at the petal tips. This adds a professional ombre effect to your work.
Adding a wire stem is a game-changer for those using the Carnation Flower Crochet – Pattern for bouquets. You can wrap a florist wire with green yarn or use a crochet I-cord to cover it. This allows you to bend the flower into natural positions. If you are making a crochet boutonniere, a shorter, sturdier wire is better, whereas a long stem is ideal for a crochet centerpiece.
You can also modify the “fullness” of your Carnation Flower Crochet – Pattern by adjusting the number of rows. If you want a “mini carnation,” stop after the second row of ruffles. For a “giant carnation,” add an extra row of triple crochet increases. This flexibility makes the crochet design adaptable for various uses, such as hair clips, gift toppers, or even wedding decorations.
Incorporating different leaf patterns can also enhance your Carnation Flower Crochet – Pattern. Carnations have long, slender, slightly blue-green leaves. Crocheting these separately and attaching them to the stem with a yarn needle adds a level of botanical accuracy. Using a wire insert in the leaves allows you to curve them, mimicking the graceful droop of a real plant.
Finally, consider the “finish” of your Carnation Flower Crochet – Pattern. Some makers use a light spray of fabric stiffener or hairspray to help the ruffles hold their shape over time. Others prefer the natural softness of the yarn. If you are creating a crochet heirloom, choosing a high-quality pima cotton will ensure your carnation stays beautiful and pill-free for years to come.
4. Troubleshooting and Finishing Your Carnation Flower Crochet – Pattern
A common issue when working on a Carnation Flower Crochet – Pattern is the “curling” effect, which is actually intentional. However, if the flower becomes too heavy and sags, it might be because the yarn choice was too heavy for the hook size. To fix this, try dropping down a hook size to create a tighter, more supportive structure. A firm tension is usually better than a loose one for floral work.
If your ruffles look uneven, check your stitch count per loop. The beauty of the Carnation Flower Crochet – Pattern is its symmetry. If you put 3 stitches in one loop and 5 in another, the flower will look lopsided. Using a row counter or a digital app can help you maintain consistency, especially when the stitch counts reach into the hundreds in the outer rows.
Joining the petals to the calyx can be tricky for beginners. In a high-quality Carnation Flower Crochet – Pattern, you will often use a weaving technique with a blunt-tipped needle. Ensure you pull the yarn through both layers to lock them together. This prevents the “head” of the flower from wobbling, which is a common complaint in amigurumi flowers and floral stems.
Hiding the yarn tails is essential for a clean look. Instead of just cutting the thread, weave the ends back through the densest part of the crochet ruffles. Because the Carnation Flower Crochet – Pattern is so textured, it is very easy to hide your ends. Use a seamless join technique when starting new colors to ensure there are no visible knots on the surface of your petals.
If you find the Carnation Flower Crochet – Pattern is taking too long, consider using a half-double crochet (hdc) for the middle rows. This stitch is faster to produce than a double crochet but still offers enough height to create a decent ruffle. It’s a great crochet hack for when you need to produce a large quantity of flowers for an event or a large-scale yarn bombing project.
The final step in your Carnation Flower Crochet – Pattern journey is “blocking” or shaping. You don’t always need water for this; often, you can just “fluff” the petals with your fingers. Arrange the ruffles so they spiral outward from the center. This manual shaping is what gives the crochet carnation its final touch of realism, making it look like a freshly picked bloom from a crochet garden.
FAQ – Frequently Asked Questions
1. What is the best yarn for a Carnation Flower Crochet – Pattern?
The best yarn is usually a size 10 crochet thread or a fingering weight cotton. Cotton holds its shape well and shows the petal details clearly. You can use acrylic, but it may result in a “fuzzier” flower.
2. How long does it take to finish one crochet carnation?
Depending on your speed and the complexity of the Carnation Flower Crochet – Pattern, it typically takes between 45 minutes to 1.5 hours. The outer rows take the longest because of the high number of increases.
3. Is this pattern suitable for beginners?
Yes! While it looks complex, the Carnation Flower Crochet – Pattern mostly uses basic stitches. The challenge is the high stitch count, but it is a great way for beginners to practice rhythm and consistency.
4. Can I wash my crochet carnations?
If you use cotton or synthetic yarn, yes. It is best to hand wash them in cool water and reshape them while damp. Avoid machine washing if you have used floral wire, as it may rust or bend out of shape.
5. How do I make the edges look variegated?
To get a “tipped” look, change your yarn color only for the final row of the pattern. You can also use a fabric marker or specialized dye to gently tint the edges of the petals after you have finished crocheting.
6. Can I turn this into a brooch or hair accessory?
Absolutely. Simply skip the long stem and sew a felt circle to the back of the calyx. You can then glue or sew a brooch pin or hair clip to the felt. It makes for a very sturdy and stylish accessory.
Conclusion
Mastering the Carnation Flower Crochet – Pattern is a wonderful journey into the world of botanical crochet. Throughout this article, we have explored the foundational stitches, the importance of yarn selection, and the techniques needed to create those beautiful, realistic ruffles. We learned how to scale the pattern for different uses and how to troubleshoot common issues like tension and sagging.
Whether you are creating a everlasting bouquet for your home or a small gift for a friend, the carnation is a design that offers endless creative possibilities.