The Crochet Granny Bag Pattern is one of those timeless projects that seamlessly blends vintage charm with modern functionality. Whether you are a seasoned crafter or a beginner looking for your first big project, creating a granny square bag offers a satisfying way to play with colors and textures. This Crochet Granny Bag Pattern is designed to be versatile, allowing you to use up your yarn stash while producing a high-quality, durable accessory that never goes out of style.
In the world of fiber arts, the Crochet Granny Bag Pattern stands out because of its modular nature. Instead of working in long, daunting rows, you focus on individual squares that eventually come together to form a beautiful silhouette. This method makes the crochet project portable and manageable, as you can hook a few squares while commuting or relaxing, knowing they will soon become a stylish handmade tote.
When you choose to follow a Crochet Granny Bag Pattern, you are participating in a long-standing tradition of sustainable fashion. By selecting your own materials, such as mercerized cotton or recycled acrylic, you ensure that your crochet accessory is both eco-friendly and built to last. This article will guide you through the essentials of mastering this pattern, from selecting the right crochet hook to the final assembly of your masterpiece.
1. Understanding the Core Elements of the Crochet Granny Bag Pattern
The foundation of any successful Crochet Granny Bag Pattern lies in the classic granny square. This iconic motif is typically worked in rounds, starting from a center ring and expanding outward using double crochet clusters. Understanding how to maintain consistent tension is vital for ensuring that all your squares are identical in size before you begin the joining process.
To start your Crochet Granny Bag Pattern, you must first select a yarn weight that suits your vision. Most designers recommend a worsted weight (4) yarn because it provides the structural integrity needed for a bag to hold its shape. If the yarn is too thin, the bag may stretch excessively when filled; if it is too thick, the bag might become unnecessarily heavy.
The crochet hook size is another critical factor in this Crochet Granny Bag Pattern. Usually, a 4.0mm or 5.0mm hook is the “sweet spot” for achieving a fabric that is tight enough to keep items inside but flexible enough to look like traditional crochet. Always check your gauge before diving into the full project to avoid any sizing surprises.
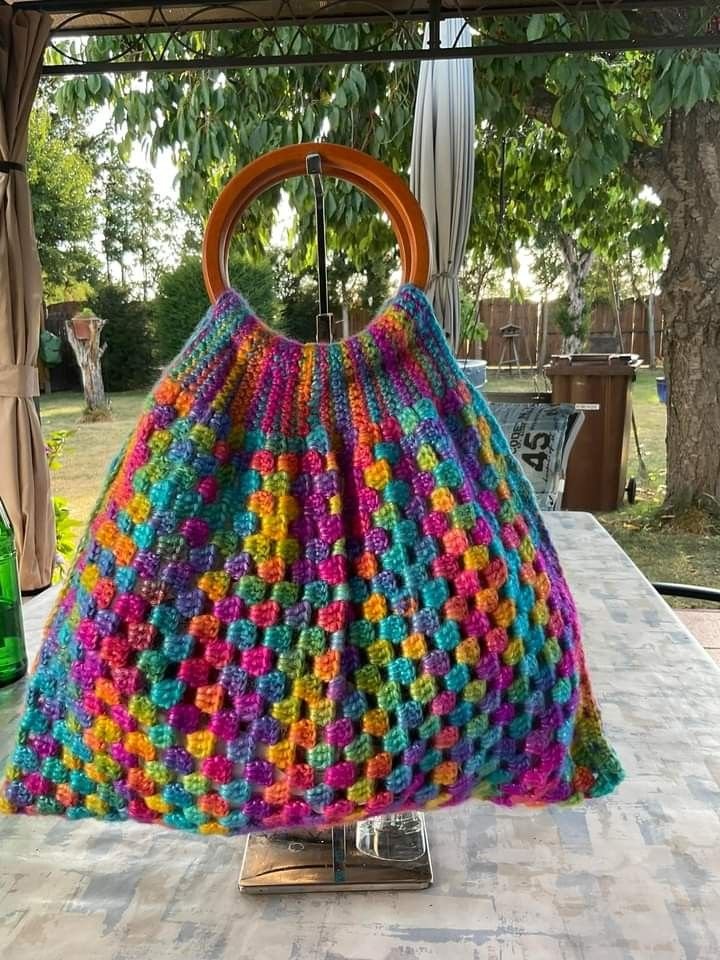
Color selection is where the Crochet Granny Bag Pattern truly shines. You can opt for a monochromatic look for a sophisticated vibe or a multi-colored bohemian style. Using a neutral border color to join the squares can help unify a chaotic palette, giving the final bag a professional and polished appearance.
In this Crochet Granny Bag Pattern, the number of squares you create will determine the final shape of the bag. A standard tote bag might require 13 to 24 squares, depending on the desired dimensions. Planning your layout on a flat surface before joining helps you visualize the color distribution and ensures a balanced design.
Lastly, do not overlook the importance of weaving in ends as you go. Because a Crochet Granny Bag Pattern involves many color changes and individual motifs, leaving all the yarn tails until the end can be overwhelming. Completing this task incrementally makes the assembly phase much more enjoyable and less tedious.
2. Essential Materials and Stitches for Your Crochet Project
To execute a high-quality Crochet Granny Bag Pattern, you will need a few basic supplies beyond just yarn and a hook. A pair of sharp embroidery scissors, a tapestry needle for sewing pieces together, and several stitch markers are indispensable. These tools ensure that your handmade bag is finished with precision and care.
The primary stitch used in a Crochet Granny Bag Pattern is the double crochet (dc). Groups of three double crochets, often called “shells” or “clusters,” are separated by chain spaces to create the signature openwork look. Mastery of the slip stitch (sl st) is also required for joining rounds and connecting the squares seamlessly.
For the corners of your squares in the Crochet Granny Bag Pattern, you will typically use a combination of chains to create the turn. This creates the square shape from a circular start. If you want a more solid fabric with fewer holes, you can modify the pattern by using half-double crochets (hdc) instead of double crochets.
Durability is key when following a Crochet Granny Bag Pattern, especially for the straps. Many crocheters prefer the single crochet (sc) stitch for handles because it creates a dense, sturdy fabric that resists stretching. You can also reinforce the straps by crocheting over a piece of nylon cord or cotton webbing.
Adding a fabric lining is a pro tip for anyone using a Crochet Granny Bag Pattern. While not strictly a crochet technique, sewing a simple cotton liner inside prevents the crochet fabric from sagging and keeps smaller items from falling through the gaps. This step elevates your DIY bag to a retail-quality accessory.
Blocking your squares is the “secret sauce” of a perfect Crochet Granny Bag Pattern. By pinning your finished squares to a blocking board and lightly steaming them, you ensure they are perfectly square and flat. This makes the joining process significantly easier and results in a much cleaner, more professional-looking finished product.
3. Step-by-Step Assembly and Joining Techniques
Once you have crocheted all the motifs required by your Crochet Granny Bag Pattern, it is time for assembly. There are several ways to join squares, including the invisible seam, the whip stitch, or the join-as-you-go (JAYG) method. Each technique offers a different aesthetic, from a completely flat finish to a decorative raised ridge.
The whip stitch is the most beginner-friendly method for a Crochet Granny Bag Pattern. Using a tapestry needle and a length of matching yarn, you simply sew through the back loops of the stitches. This creates a sturdy bond that is nearly invisible on the right side of the crochet bag, maintaining the flow of the design.
For those who want a more textured look in their Crochet Granny Bag Pattern, the single crochet join is excellent. By placing the squares wrong sides together and single crocheting through both layers, you create a prominent border. This adds a “framed” effect to each square, which looks stunning on boho-style bags.
Layout is crucial when assembling the Crochet Granny Bag Pattern. The most common construction involves a “V” shape or a rectangular grid that is then folded. Paying close attention to the stitch count on the edges of each square ensures that the corners line up perfectly, preventing any lopsidedness in the final tote.
After the body of the bag is joined, the Crochet Granny Bag Pattern usually calls for a few rounds of edging around the top opening. This helps stabilize the structure and provides a clean base for attaching the handles. A mix of decreases at the valley points and clusters at the peaks creates a smooth, level top edge.
The final step in the assembly of your Crochet Granny Bag Pattern is the attachment of the straps. Whether you choose long shoulder straps or short hand-held grips, make sure they are centered and securely fastened. Double-stitching the attachment points with a yarn needle will ensure the bag can handle the weight of your daily essentials.
4. Customizing Your Bag for a Unique Aesthetic
The beauty of a Crochet Granny Bag Pattern is how easily it can be customized to fit your personal style. You can experiment with different square designs, such as sunburst squares, daisy motifs, or even solid textured squares. Mixing and matching different motifs within the same bag pattern creates a unique, eclectic look.
Adjusting the size of your Crochet Granny Bag Pattern is as simple as adding or removing rounds from each square. If you want a small crochet clutch, make fewer, smaller squares. For a large market bag, increase the number of rounds per square or add more squares to the overall layout to increase the volume.
Embellishments can take your Crochet Granny Bag Pattern to the next level. Consider adding tassels, fringes, or even wooden beads to the drawstrings or handles. These small details add a touch of personality and make your handmade creation stand out as a one-of-a-kind piece of wearable art.
You can also play with the “mood” of the Crochet Granny Bag Pattern through yarn choice. Using raffia yarn will give you a perfect summer beach bag, while wool blends in earthy tones create a cozy autumnal accessory. The versatility of the granny square makes it suitable for every season and occasion.
For a more modern twist on the Crochet Granny Bag Pattern, try using a single large granny square for each side of the bag instead of many small ones. This creates a bold, graphic look that is very popular in contemporary crochet fashion. It also significantly reduces the amount of joining and finishing work required.
Finally, don’t be afraid to experiment with the functional aspects of the Crochet Granny Bag Pattern. You could add a zipper closure, magnetic snaps, or even internal pockets. By combining traditional crochet techniques with modern hardware, you create a functional bag that is as practical as it is beautiful.
FAQ – Frequently Asked Questions
1. What is the best yarn for a Crochet Granny Bag Pattern?
Cotton yarn is generally the best choice for a crochet bag because it has very little stretch and is extremely durable. This ensures that your bag maintains its shape even when carrying heavy items.
2. How many squares do I need for a standard bag?
Most Crochet Granny Bag Patterns require between 13 and 24 squares. A common construction uses 13 squares: 3 for each side, 3 for the other side, 2 for the bottom, and several for the sides/depth.
3. Is this pattern suitable for beginners?
Yes! The granny square is one of the first things many people learn in crochet. As long as you can do a chain, a double crochet, and a slip stitch, you can successfully complete this bag pattern.
4. How do I stop my crochet bag from stretching?
To prevent stretching, use a smaller hook to create tighter stitches, choose non-stretching yarn like cotton or hemp, and always add a fabric lining to support the weight of the contents.
5. Can I wash my finished crochet bag?
If you used cotton or synthetic yarn, most crochet bags can be hand-washed or laundered on a delicate cycle. However, if you added a lining or leather handles, you should spot-clean the bag to avoid damage.
6. How long does it take to finish a Crochet Granny Bag Pattern?
This depends on your speed and the complexity of the squares. On average, an intermediate crocheter can complete a full granny square bag in about 10 to 15 hours of active work.
Conclusion
In this article, we explored the wonderful world of the Crochet Granny Bag Pattern, covering everything from the essential stitches and materials to advanced assembly techniques and customization tips. We learned that the granny square is not just a vintage relic but a powerful building block for creating modern, durable, and stylish handbags. By focusing on tension, yarn choice, and proper finishing methods like blocking and lining, you can create a professional-grade accessory that showcases your creativity.
We hope this guide inspires you to pick up your hook and start your own crochet journey. Whether you are making a gift for a friend or a treat for yourself, the process of watching individual squares transform into a functional piece of art is truly rewarding.