Jelly Roll Strip Cushion Cover- Pattern projects are the ultimate secret weapon for home decorators and quilting enthusiasts who want to add a splash of color to their living space without spending weeks on a single project. If you have ever walked into a fabric store and been mesmerized by those perfectly coordinated, rolled-up bundles of fabric, you have encountered the magic of the jelly roll. These pre-cut strips take the guesswork out of color coordination and the tedious labor out of cutting, making the creation of a stunning cushion cover both accessible and incredibly satisfying for makers of all skill levels.
The beauty of using a Jelly Roll Strip Cushion Cover- Pattern lies in its inherent versatility and the professional finish it provides. Because the strips are typically cut to a uniform width (usually 2.5 inches), the resulting geometric design looks intricate and high-end, even if you are relatively new to sewing. This specific DIY quilting project allows you to play with gradients, rainbows, or monochromatic themes, ensuring that your handmade home decor perfectly matches your existing furniture while providing that cozy, “shabby chic” or modern farmhouse aesthetic that is so popular in interior design today.
When you dive into a Jelly Roll Strip Cushion Cover- Pattern, you are not just making a pillow; you are engaging in a sustainable and creative form of textile art. This article will guide you through the essential terminology, the step-by-step logic of the strip-piecing technique, and how to ensure your finished accent pillow stands the test of time. By focusing on quality quilting cotton and precise seam allowances, you can transform a simple pile of fabric strips into a functional masterpiece that serves as a conversation starter in any room of your house.
1 Understanding the Jelly Roll Strip Cushion Cover- Pattern Basics
The core of this project revolves around the Jelly Roll Strip Cushion Cover- Pattern, which is a specialized design blueprint optimized for 2.5-inch fabric strips. A jelly roll is a factory-cut bundle of fabric containing 40 to 42 strips, usually measuring 2.5 inches wide by 44 inches long, curated from a specific fabric collection. Using these pre-cuts ensures that every color and print in your cushion cover harmonizes perfectly without you having to hunt through various bolts of cloth.
The strip-piecing method is the primary technique used in this sewing pattern. Instead of cutting individual squares or triangles, you sew long strips together side-by-side to create a “stratographic” fabric sheet. This sheet is then sub-cut or folded to create the front panel of your decorative pillowcase. This method is significantly faster than traditional piecing and reduces the margin for error in your quilt blocks.
For a standard 18-inch or 20-inch throw pillow, you only need a fraction of a full bundle, making this an excellent scrap-buster project if you have leftover strips from a larger quilt. The Jelly Roll Strip Cushion Cover- Pattern typically calls for about 8 to 10 strips depending on the desired density and size of your finished product. Understanding the dimensions of your fabric strips is the first step toward a successful build.
Another critical element is the seam allowance, which in the world of quilting is almost always a strict 1/4 inch. Because the strips are narrow, a slight deviation in your sewing line can cause the entire cushion cover to shrink or become warped. Consistency is the hallmark of a professional-looking Jelly Roll Strip Cushion Cover- Pattern, so maintaining a straight line is paramount for the final assembly.
The backing fabric and closure style are also defined within the pattern specifications. Most modern designs opt for an envelope closure, which eliminates the need for zippers and makes the cover easy to remove for washing. If you prefer a more tailored look, you might choose an invisible zipper, but the envelope style remains the favorite for those focusing on the jelly roll aesthetic.
Finally, choosing the right batting or stabilizer is what gives your Jelly Roll Strip Cushion Cover- Pattern its structure. Adding a layer of thin cotton batting and performing some simple straight-line quilting (often called “stitch in the ditch” or “echo quilting”) will give the cushion a professional, quilted texture. This extra step prevents the strips from shifting over time and adds a luxurious weight to the home accessory.
2 Preparing Your Materials and Workspace
Before you begin stitching your Jelly Roll Strip Cushion Cover- Pattern, preparation is key to ensuring the fabric alignment is perfect. Start by unrolling your jelly roll bundle and pressing the strips with a hot iron. Pre-cuts often have “pinked” edges (zigzag cuts) to prevent fraying, and sometimes they can be slightly distorted from being rolled tightly; pressing them flat ensures your measurements stay true throughout the process.
Organization is a vital part of the quilting process. Lay out your strips on a flat surface or a design wall to determine the color sequence. Since the Jelly Roll Strip Cushion Cover- Pattern relies on visual rhythm, you might want to arrange them from darkest to lightest or alternate between busy patterns and solid colors. This visual planning prevents “clashing” and ensures a balanced focal point for your sofa or bed.
You will also need a few specialized quilting tools to make the job easier. A rotary cutter, a self-healing cutting mat, and a clear acrylic ruler are essential for trimming the edges of your strip set. These tools allow for much higher precision than standard scissors, which is crucial when you are trying to match up the edges of your quilted cushion cover perfectly.
Thread choice is an often-overlooked aspect of the Jelly Roll Strip Cushion Cover- Pattern. It is recommended to use a high-quality 50-weight cotton thread in a neutral color like grey or tan. These colors tend to blend into the seams of various fabric shades, making the stitching “invisible.” Durable thread is necessary because throw pillows often endure more wear and tear than display quilts.
If you are following a specific Jelly Roll Strip Cushion Cover- Pattern that includes an inner lining, have your muslin or scrap fabric ready. Lining the front panel helps hide the raw seams on the inside and provides a smoother surface for the pillow insert to slide against. It also adds an extra layer of durability, ensuring your handcrafted cover lasts for years of daily use.
Lastly, ensure your sewing machine is fitted with a quarter-inch foot. This specialized foot has a guide that helps you maintain that perfect seam width required by the Jelly Roll Strip Cushion Cover- Pattern. If you don’t have one, you can place a piece of painter’s tape on your machine’s needle plate as a visual guide to keep your fabric strips running straight and true.
3 Step-by-Step Construction of the Strip Panel
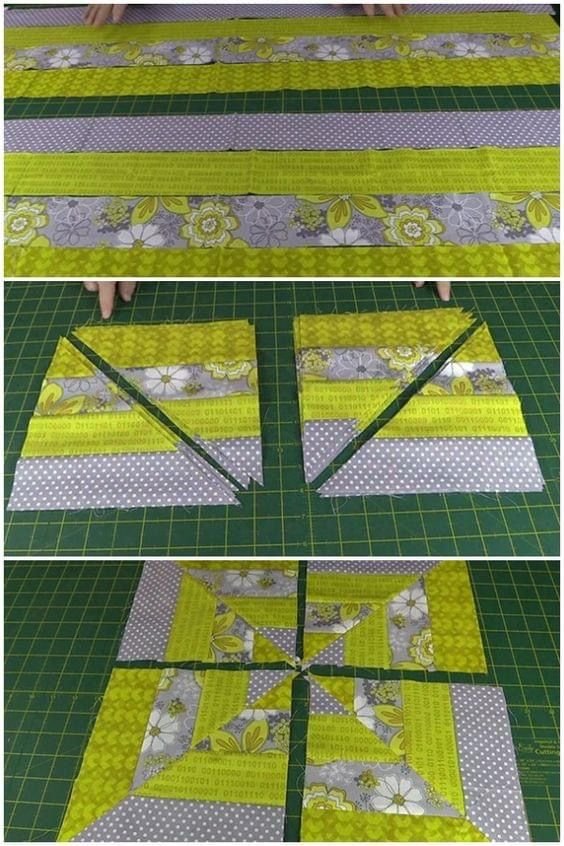
The actual construction of the Jelly Roll Strip Cushion Cover- Pattern begins with the “sew and flip” method. Take your first two strips, place them right sides together, and sew along the long edge. Open them up and press the seam to one side (usually toward the darker fabric). Repeat this process, adding one strip at a time until you have a pieced fabric panel that is slightly larger than your intended pillow form.
To prevent the fabric from “bowing” or curving—a common issue when sewing long strips—it is best to alternate the direction of your sewing. For the first pair, sew from top to bottom. For the next strip, sew from bottom to top. This counteracts the natural “feed dog push” of the sewing machine and keeps your Jelly Roll Strip Cushion Cover- Pattern square and flat rather than banana-shaped.
Once your panel is assembled, it is time for the squaring up phase. Use your acrylic ruler to trim the panel to the exact size of your cushion insert (or 1/2 inch larger for seam allowances). For example, if you have an 18-inch insert, trim your finished jelly roll panel to 18.5 inches. Squaring up is the most satisfying part of the Jelly Roll Strip Cushion Cover- Pattern, as it reveals the clean, crisp lines of your work.
If your pattern calls for quilting, now is the time to “baste” your panel to a piece of batting. You can use spray baste or safety pins to hold the layers together. Quilt along the seams of the strips to highlight the linear design. This step adds that classic “quilt” look and feel to your DIY cushion cover, providing a tactile quality that store-bought pillows simply cannot replicate.
Creating the back of the Jelly Roll Strip Cushion Cover- Pattern is the next milestone. For an envelope back, you will need two pieces of fabric that overlap by about 4 to 5 inches. Hem one edge of each piece. These two panels will eventually be layered with your front piece to create the pocket for the pillow filler. Using a coordinating fabric for the back adds a nice professional touch to the finished product.
The final assembly involves placing the quilted front panel face up and layering the two back panels face down on top of it, ensuring the hemmed edges overlap in the center. Pin or clip around the entire perimeter and sew with a 1/2 inch seam allowance. Clip the corners of your Jelly Roll Strip Cushion Cover- Pattern to reduce bulk, turn it right side out through the envelope slit, and press the edges for a sharp finish.
4 Customizing and Caring for Your Quilted Cover
One of the best things about the Jelly Roll Strip Cushion Cover- Pattern is how easy it is to customize. You can experiment with diagonal strips by sewing your panel and then cutting it at a 45-degree angle. This creates a “chevron” or “herringbone” effect that looks incredibly complex but uses the same basic strip-piecing logic. Customization allows you to turn a basic sewing project into a unique piece of functional art.
Embellishments can also elevate your Jelly Roll Strip Cushion Cover- Pattern. Consider adding piping around the edges for a high-end look, or incorporate a few strips of lace or velvet between the cotton strips for varied texture. These small details transform a simple beginner project into a sophisticated designer-style cushion that can be sold at craft fairs or given as a thoughtful, high-quality gift.
Since these covers are made of 100% quilting cotton, they are generally easy to care for. However, because of the multiple seams in a Jelly Roll Strip Cushion Cover- Pattern, it is best to wash them on a gentle cycle in cold water. Using a “color catcher” sheet during the first wash is a pro-tip to prevent the dark colors of the jelly roll from bleeding into the lighter ones.
To keep your quilted pillow looking fresh, avoid high-heat drying, which can shrink the cotton and distort the quilting stitches. Instead, lay the cover flat to dry or tumble dry on low. If the cover becomes wrinkled, a quick steam iron will bring back the crispness of the strip design. Proper maintenance ensures the longevity of your hand-sewn home decor.
For those who love seasonal decorating, the Jelly Roll Strip Cushion Cover- Pattern is the perfect way to swap out “looks.” You can have a set of covers for Christmas using red and green holiday strips, and another set for spring using pastels and florals. Because they are flat when empty, they take up very little storage space compared to buying entirely new decorative pillows for every season.
Finally, don’t be afraid to mix and match different patterns. You can combine a Jelly Roll Strip Cushion Cover- Pattern on one pillow with a solid-colored pillow or a large-scale print on another. The repetitive lines of the strip-pieced cover act as a visual anchor, making them a staple in the “layered pillow” look seen in professional interior design photography.
FAQ – Frequently Asked Questions
How many strips do I need for one Jelly Roll Strip Cushion Cover- Pattern?
Usually, 8 to 10 strips are sufficient for an 18-inch square cushion. This means one standard jelly roll bundle can yield 4 to 5 separate cushion covers, making it a very cost-effective way to decorate.
Can I use scraps instead of a pre-cut jelly roll?
Absolutely! While the Jelly Roll Strip Cushion Cover- Pattern is designed for 2.5-inch strips, you can cut your own strips from leftover fabric. Just ensure they are all the same width to maintain the symmetry of the geometric design.
What is the best closure for a quilted cushion?
The envelope closure is the most popular because it requires no hardware and is very durable. However, a zippered closure provides a more “finished” look and is often preferred for high-end boutique cushions.
Do I have to quilt the front panel?
While it is not strictly mandatory, quilting the panel to a layer of batting is highly recommended. It adds structure to the fabric strips, prevents sagging, and gives the Jelly Roll Strip Cushion Cover- Pattern its signature quilted texture.
Is this project suitable for a beginner?
Yes, this is an ideal beginner quilting project. Since you are sewing straight lines and using pre-cut fabric, it helps new sewists practice seam consistency and fabric handling without the frustration of complex shapes.
Conclusion
In conclusion, mastering the Jelly Roll Strip Cushion Cover- Pattern is a rewarding journey that combines efficiency with artistic expression. We have explored the importance of selecting a coordinated jelly roll bundle, the precision required in the strip-piecing technique, and the steps to assemble a durable, professional-grade quilted pillowcase.
By focusing on consistent seam allowances and proper squaring up, you can create stunning home accents that rival expensive retail versions. This project is not just about sewing; it’s about bringing warmth, color, and a personal touch to your living environment through the timeless art of quilting.