Starting your sewing journey with a Simple shopping bag – Pattern is one of the most practical and eco-friendly ways to develop your craft while producing something you will use every single day. In an era where reducing plastic waste is more critical than ever, learning to create your own reusable totes allows you to customize your accessories to fit your personal style and functional needs. By following a well-structured Simple shopping bag – Pattern, you can transform a basic piece of fabric into a durable, heavy-duty carrier that withstands the weight of groceries, books, or gym gear with ease.
The beauty of a Simple shopping bag – Pattern lies in its geometric simplicity, making it the ideal “first project” for beginners who are just getting comfortable with a sewing machine. This project focuses on the two core concepts of DIY fashion: the Simple shopping bag, which is the physical, finished tote designed for utility and sustainability, and the Pattern, which acts as the essential blueprint or template used to guide your cuts and stitches. Mastering these two elements ensures that every bag you make is uniform in size, professional in appearance, and structurally sound enough to last for years of consistent use.
Throughout this comprehensive guide, we will dive deep into the world of textile construction, focusing on how a Simple shopping bag – Pattern can be adapted for various fabric types and skill levels. We will explore the best materials to ensure longevity, the technical steps required to assemble the body and handles, and the finishing touches that prevent fraying and wear. By the time you reach the end of this tutorial, you will have the confidence to print or draft your own Simple shopping bag – Pattern and start a small production line of beautiful, personalized totes for yourself or as thoughtful, handmade gifts for friends and family.
2. Choosing the Right Textiles for Your Simple shopping bag
Selecting the appropriate fabric is the first major step in successfully executing a Simple shopping bag – Pattern. For a bag that needs to carry heavy items, you should look for heavyweight cotton canvas, duck cloth, or even repurposed denim. These materials provide the necessary tensile strength to ensure that your Simple shopping bag doesn’t stretch or tear under the pressure of a full load of groceries, providing a reliable alternative to disposable options.
If you are following a Simple shopping bag – Pattern for a more lightweight, foldable version, consider using linen or a medium-weight cotton calico. These fabrics are much easier to manipulate under a standard domestic sewing machine and allow the finished Simple shopping bag to be tucked away into a purse or pocket when not in use. Regardless of the weight, always look for natural fibers that are easy to wash and maintain over time.
Before you lay down your Simple shopping bag – Pattern on the fabric, it is essential to pre-wash and iron your material. Natural fibers like cotton are prone to shrinking during their first encounter with water. If you sew the bag first and wash it later, the seams might pucker or the dimensions of your Simple shopping bag could change significantly, ruining the precise fit you worked so hard to achieve with your template.
In addition to the main body fabric, your Simple shopping bag – Pattern may require interfacing if you want a bag that stands up on its own. A fusible fleece or a stiff sew-in stabilizer can be applied to the wrong side of the fabric. This gives the Simple shopping bag a structured, professional look that mimics high-end retail totes, making it much easier to load items into the bag when it’s sitting on a checkout counter.
The handles are another area where material choice is paramount for a successful Simple shopping bag – Pattern. You can use the same fabric as the bag body, or you can opt for heavy-duty cotton webbing or nylon straps. Webbing is often preferred for a Simple shopping bag because it is incredibly strong and doesn’t require the extra steps of folding and topstitching that fabric handles do, saving you time during the assembly process.
Finally, consider the aesthetic appeal of your Simple shopping bag – Pattern by choosing prints and colors that reflect your personality. While neutral tones are timeless, a Simple shopping bag in a vibrant floral or a bold geometric print makes a fashion statement. Using a high-contrast thread for topstitching can also add a “designer” touch to your project, highlighting the clean lines dictated by your professional Pattern and showing off your growing sewing skills.
2. Mastering the Technical Blueprint of a Simple shopping bag – Pattern
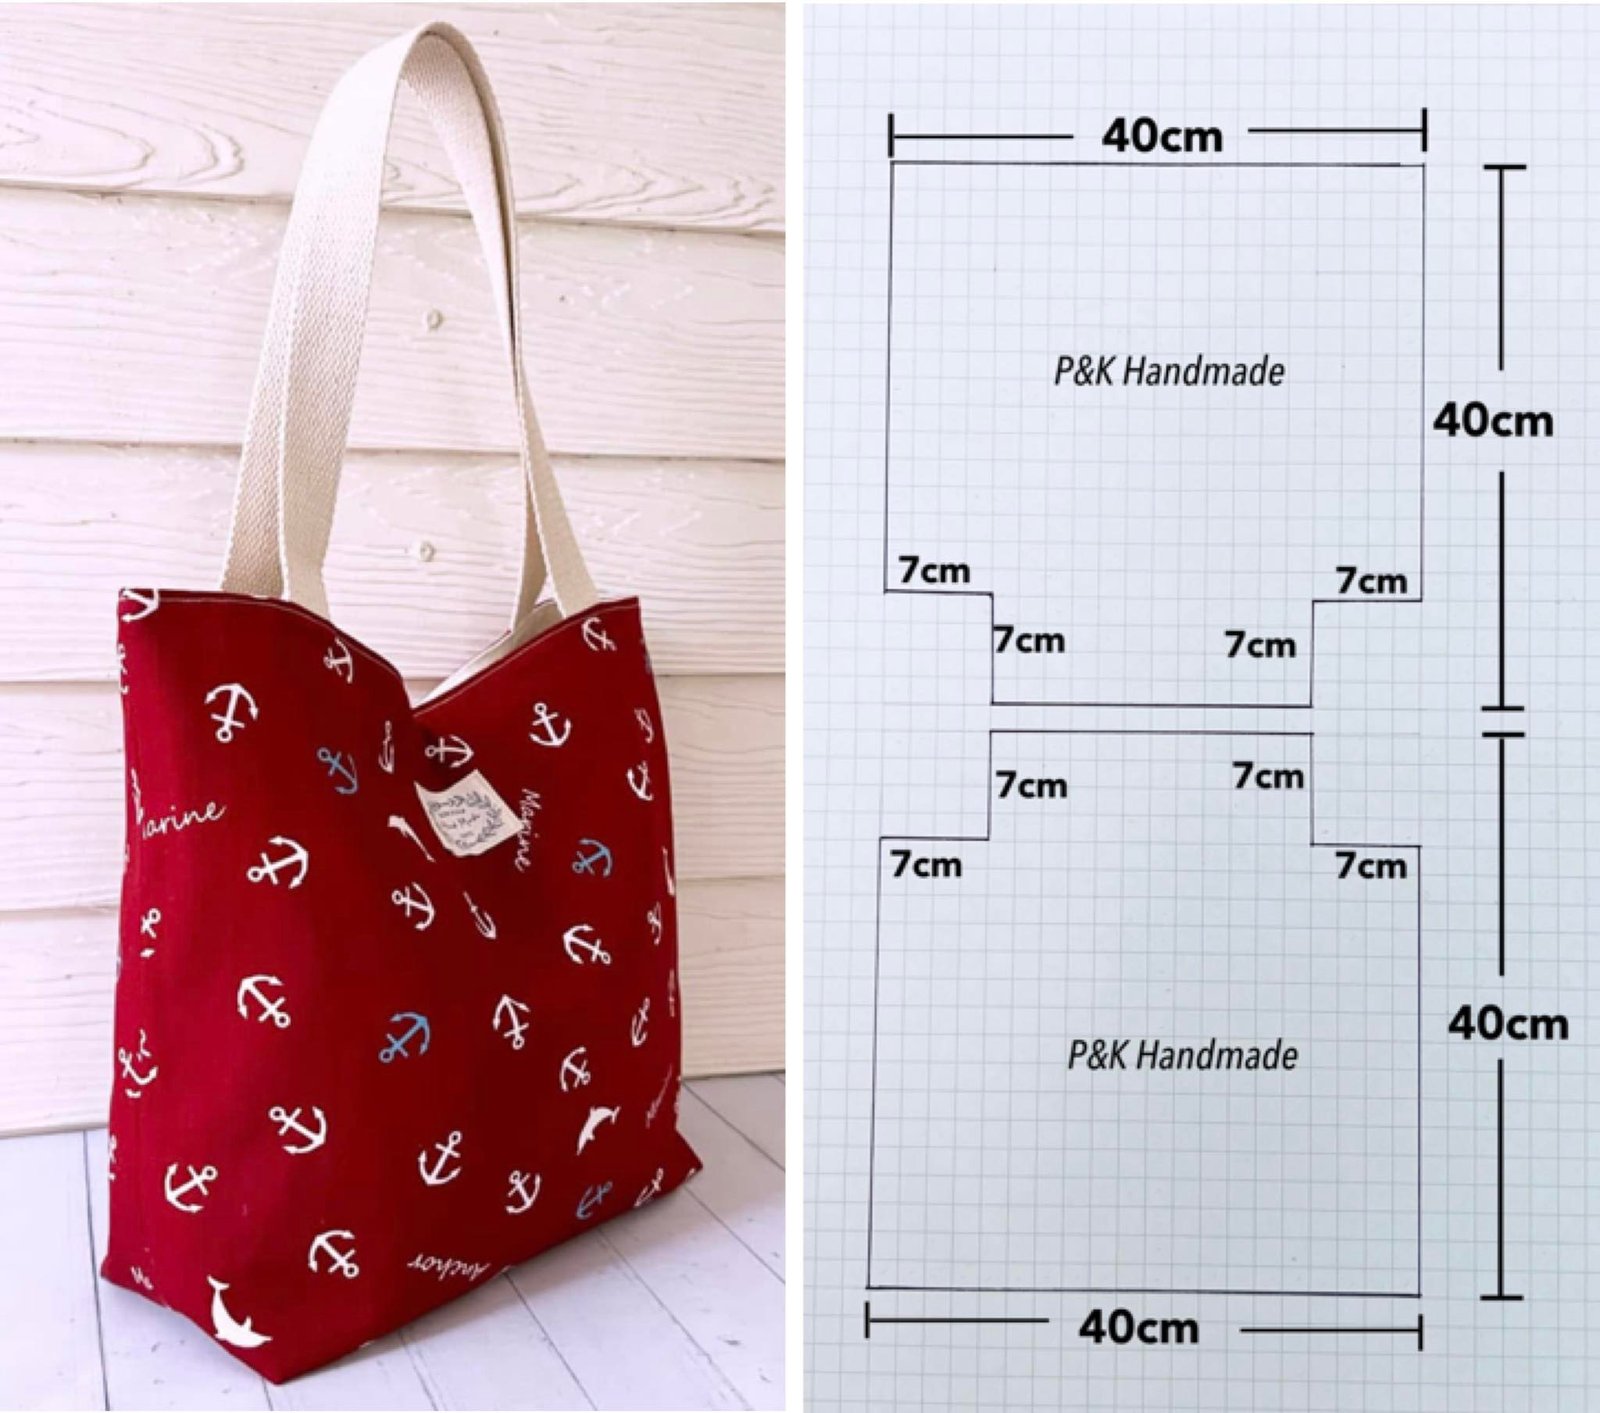
Understanding how to read and draft a Simple shopping bag – Pattern is a foundational skill in the world of sewing. A standard pattern for a tote usually consists of a large rectangle for the body and two long, narrow strips for the handles. The Pattern will also indicate where to fold the fabric to create the bottom of the bag, which is often done on a fold to minimize the number of seams and increase the overall strength of the Simple shopping bag.
One of the most important markings on any Simple shopping bag – Pattern is the seam allowance. This is the distance between the edge of the fabric and the line of stitching, usually measuring 5/8 of an inch or 1 centimeter. Following the seam allowance suggested by the Pattern is vital because it ensures the finished Simple shopping bag matches the intended dimensions and that there is enough “meat” in the fabric to prevent the seams from pulling apart.
If you want your bag to have depth rather than being flat, your Simple shopping bag – Pattern should include instructions for boxed corners. This involves pinching the bottom corners of the bag and sewing across them perpendicularly to the side seams. This simple geometric trick transforms a 2D fabric envelope into a 3D Simple shopping bag that can sit upright and hold bulky items like cereal boxes or milk cartons more effectively.
When preparing to cut, always pay attention to the grain line indicated on your Simple shopping bag – Pattern. Fabric has a “warp” and a “weft,” and cutting “on the grain” means aligning your pattern pieces parallel to the finished edges of the fabric roll. This prevents the Simple shopping bag from twisting or becoming misshapen after a few uses, ensuring the structural integrity remains intact even when carrying heavy loads.
For those who want to add extra functionality, you can modify your Simple shopping bag – Pattern to include interior or exterior pockets. Simply cut additional squares of fabric and sew them onto the main body pieces before you join the sides. This customization makes your Simple shopping bag much more organized, providing a dedicated spot for your keys, phone, or shopping list so they don’t get lost at the bottom of the tote.
Lastly, a high-quality Simple shopping bag – Pattern will offer guidance on reinforcing stress points. The areas where the handles attach to the bag body are under the most pressure. A good Pattern will instruct you to sew a “box-X” stitch (a square with a cross inside) at these junctions. This technique distributes the weight more evenly across the fabric fibers, ensuring your Simple shopping bag won’t fail you even during the heaviest shopping trips.
3. Step-by-Step Construction of the Simple shopping bag
To begin the physical assembly of your Simple shopping bag – Pattern, start by finishing the edges of your fabric pieces using a zigzag stitch or a serger. This prevents the raw edges from fraying over time, which is especially important for a Simple shopping bag that will be handled and washed frequently. Once the edges are secure, you can proceed with the main construction according to the guidelines provided in your Pattern.
The first major seam in a Simple shopping bag – Pattern is usually the side seams. Place your fabric pieces with right sides together and pin them carefully along the edges. Using a straight stitch on your sewing machine, sew down the sides, making sure to backstitch at the beginning and end. This creates the basic pouch shape that forms the core of your Simple shopping bag, setting the stage for the more detailed work to follow.
Next, you will address the top hem of the Simple shopping bag – Pattern. Fold the top edge of the bag down by about half an inch, press it with an iron, and then fold it down another inch. This “double-fold hem” hides the raw edges completely and provides a sturdy foundation for the handles. In a professional Simple shopping bag, this hem is usually the thickest part of the construction, offering a clean and polished look to the opening.
Handle attachment is a critical phase in the Simple shopping bag – Pattern workflow. Tuck the ends of your straps under the top hem before you sew the hem in place. Ensure that the handles are not twisted and are spaced evenly from the side seams, as indicated by the marks on your Simple shopping bag – Pattern. Pinning them securely is essential to prevent shifting while you navigate the multiple layers of fabric under the presser foot.
Once the handles are pinned, sew two rows of stitching around the entire top circumference of the Simple shopping bag. The first row should be close to the bottom fold of the hem, and the second row should be near the top edge. This “topstitching” not only looks beautiful but also locks the handles into place, fulfilling the durability requirements of the Simple shopping bag – Pattern and giving the bag its final, functional form.
If your Simple shopping bag – Pattern included boxed corners, this is the time to complete them. Turn the bag inside out, flatten the corner so the side seam aligns with the bottom crease, and sew across the triangle you’ve created. After trimming the excess fabric, turn your Simple shopping bag right side out. You will be amazed at how a few simple steps from your Pattern have resulted in a professional-grade, three-dimensional shopping tote.
4. Maintenance and Creative Variations for Your Fabric Totes
The longevity of a Simple shopping bag depends heavily on how you care for it once the sewing is done. Because you followed a high-quality Simple shopping bag – Pattern and used durable fabrics, your bag is likely machine washable. It is a good habit to wash your bags every few weeks to remove any food residue or bacteria, ensuring that your Simple shopping bag remains a clean and safe environment for your groceries.
One of the best things about owning a Simple shopping bag – Pattern is the ability to create themed bags for different purposes. You can make a waterproof version by using laminated cotton or oilcloth, which is perfect for carrying frozen items or beach gear. By simply changing the fabric type while keeping the same Simple shopping bag – Pattern, you can expand your collection to cover every possible scenario in your daily life.
For those who enjoy a bit of artistry, your Simple shopping bag can serve as a blank canvas for fabric painting, screen printing, or applique. Before you sew the side seams of the Simple shopping bag – Pattern, you can apply your designs to the flat fabric panels. This is much easier than trying to paint on a finished bag and allows you to create truly unique pieces that reflect your artistic vision and style.
If you find that your Simple shopping bag is getting too heavy to carry by hand, you can easily modify the Simple shopping bag – Pattern to have longer straps. By increasing the length of the handle pieces in your Pattern, you can create a “shoulder tote” that allows for hands-free shopping. This small adjustment significantly improves the ergonomics of the bag, making it more comfortable for long walks or commutes.
Gift-giving is another area where the Simple shopping bag – Pattern shines. Instead of using disposable wrapping paper, you can sew a Simple shopping bag to hold your gift. The recipient gets two gifts in one: the item inside and a beautiful, handmade reusable bag they can use forever. You can even use the Simple shopping bag – Pattern to make mini-totes for party favors or wine bottles, showing off your versatility and craftiness.
Finally, remember that the more you practice with your Simple shopping bag – Pattern, the faster and more efficient you will become. Many experienced sewists can whip up a Simple shopping bag in under thirty minutes. By refining your technique and experimenting with different finishes, you turn a simple utility item into a testament to your sewing journey, proving that a Simple shopping bag – Pattern is a timeless tool in any maker’s library.
Frequently Asked Questions (FAQ)
What is the best fabric for a Simple shopping bag?
The most recommended fabric is cotton canvas or duck cloth because of its durability and ease of sewing. However, you can also use repurposed materials like old curtains or tablecloths, provided they are not too stretchy. The Simple shopping bag – Pattern works best with stable, non-stretch woven fabrics.
Do I really need a Pattern to make a shopping bag?
While you can technically wing it with a few rectangles, using a Simple shopping bag – Pattern ensures that your handles are perfectly centered, your seams are straight, and your boxed corners are symmetrical. A Pattern takes the guesswork out of the process and leads to a much more professional-looking result.
How do I reinforce the handles so they don’t rip?
The most effective way to reinforce handles in a Simple shopping bag – Pattern is to use the “Box-X” stitch at the attachment points. Additionally, ensure that your handles are sewn into the top hem layers rather than just onto the surface of the fabric, which provides multiple layers of support.
Can I make this bag without a sewing machine?
Yes, you can follow a Simple shopping bag – Pattern using hand-sewing techniques like the backstitch. However, keep in mind that hand-sewing a large bag will take considerably more time and requires very tight, consistent stitches to ensure the Simple shopping bag can carry heavy weights.
What size should a standard Simple shopping bag be?
A typical Simple shopping bag – Pattern usually results in a bag that is approximately 15 inches wide and 16 inches tall. This size is comparable to a standard plastic grocery bag but with much more volume and strength. You can easily scale your Pattern up or down depending on your specific needs.
How do I stop the edges inside the bag from fraying?
If you don’t have a serger, you can use a zigzag stitch on the raw edges or try French seams. A French seam is a technique where you sew the seam twice to encase the raw edges completely, making the inside of your Simple shopping bag look just as neat as the outside.
Conclusion
In conclusion, mastering the Simple shopping bag – Pattern is an empowering skill that merges creative expression with environmental responsibility. We have explored the vital importance of selecting heavy-duty fabrics, the technical nuances of reading a Pattern, and the step-by-step assembly required to create a sturdy, long-lasting Simple shopping bag.
From reinforcing handles with the box-X stitch to creating depth with boxed corners, these techniques form the backbone of successful sewing. By producing your own reusable totes, you are not only saving money but also contributing to a more sustainable world, one stitch at a time.