The creation of a Lap bedspread using strips – Pattern is one of the most rewarding projects for both beginner quilters and seasoned textile artists looking for a functional yet beautiful home accessory. A lap bedspread is specifically designed to cover the legs and lap while sitting in a chair or resting on a sofa, making it smaller than a full-sized quilt but large enough to provide significant warmth and comfort. By utilizing a Lap bedspread using strips – Pattern, you can transform various fabric remnants or newly coordinated jelly rolls into a cohesive piece of art that serves a practical purpose in your daily life.
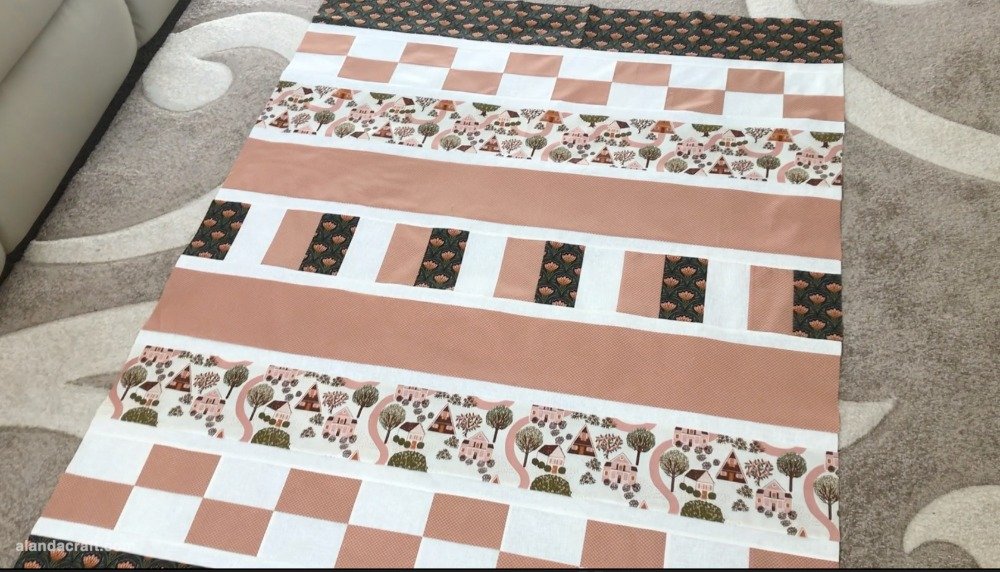
The core appeal of a Lap bedspread using strips – Pattern lies in its geometric simplicity and the speed with which it can be assembled compared to complex block-based designs. When we talk about a Lap bedspread using strips, we are referring to a quilted coverlet constructed primarily from long, narrow lengths of fabric sewn edge-to-edge. This method, often called “strip piecing,” allows for a stunning visual flow of colors and patterns, creating a rhythmic aesthetic that can range from modern and minimalist to rustic and scrappy, depending on your fabric choices.
Understanding the technical side of the Lap bedspread using strips – Pattern is essential for achieving a professional finish that lasts through years of use and washing. The Pattern serves as your architectural blueprint, providing the specific dimensions for each strip, the required seam allowances, and the final layout configuration. In this comprehensive guide, we will explore the nuances of selecting the right materials, mastering the cutting process, and executing the assembly of your Lap bedspread using strips – Pattern to ensure your finished project is both durable and aesthetically pleasing.
2. Choosing the Right Materials for Your Lap bedspread using strips – Pattern
Selecting high-quality textiles is the first step in ensuring your Lap bedspread using strips – Pattern results in a comfortable and long-lasting product. Most quilters prefer 100% cotton because it is easy to handle, breathes well, and holds its shape after multiple washes. When following a Lap bedspread using strips – Pattern, you can choose to use “Jelly Rolls,” which are pre-cut 2.5-inch strips, or you can cut your own custom widths from yardage to create a more personalized look.
The internal layer, or batting, is another crucial component of the Lap bedspread using strips – Pattern. For a lap-sized project, a low-loft cotton or bamboo batting is often ideal because it provides warmth without being overly bulky or stiff. This allows the Lap bedspread using strips to drape naturally over your legs while you read or watch television. If you prefer a heavier feel, a wool batting can provide extra insulation for colder climates.
Color theory plays a massive role in how your Lap bedspread using strips – Pattern will eventually look in your living space. You might choose a monochromatic palette for a sophisticated look or a vibrant “scrappy” approach to use up leftover fabric from previous projects. The Pattern usually suggests a specific number of dark, medium, and light strips to ensure there is enough contrast to make the design pop and avoid a muddy appearance.
Backing fabric is equally important, as it is the part of the Lap bedspread using strips that will touch your skin most often. Flannel or high-quality cotton lawn are excellent choices for the back of a Lap bedspread using strips – Pattern project because of their softness. Make sure the backing is at least 4 inches wider and longer than your finished top to allow for the shifting that occurs during the quilting process.
Thread selection shouldn’t be overlooked when working on a Lap bedspread using strips – Pattern. A 50-weight cotton thread is the industry standard for piecing because it is strong but thin enough to not add bulk to your seams. Since a Lap bedspread using strips involves many long, parallel seams, using a high-quality thread prevents puckering and ensures that the long strips remain perfectly aligned throughout the construction.
Finally, consider the tools you will need to execute the Lap bedspread using strips – Pattern accurately. A rotary cutter, a self-healing mat, and a long acrylic ruler are non-negotiable for getting the straight edges required for strip piecing. Precision in the cutting phase is what makes the assembly of a Lap bedspread using strips a joy rather than a struggle, allowing the pieces to fit together like a perfect puzzle.
2. Preparing and Cutting Fabric According to the Pattern
Before you make your first cut for the Lap bedspread using strips – Pattern, it is highly recommended to starch and press your fabric. Starching gives the fabric a bit of “body,” which prevents the long strips from stretching or distorting as you handle them. Since a Lap bedspread using strips relies on long, straight lines, keeping the fabric stable is the secret to preventing the finished quilt from looking wavy or bowed.
When you begin cutting for your Lap bedspread using strips – Pattern, always square up your fabric edge first. Align the fold of the fabric with a horizontal line on your cutting mat and use your ruler to trim a clean vertical edge. This ensures that every strip you cut for your Lap bedspread using strips is perfectly rectangular and consistent in width from top to bottom, which is vital for the overall symmetry of the piece.
The Pattern will dictate the exact width of your strips, commonly ranging from 1.5 inches to 4.5 inches. If you are using a variety of widths, organize them into piles according to your Lap bedspread using strips – Pattern instructions. Labeling these piles can save a significant amount of time and prevent mistakes during the sewing phase, especially if you are working with many similar shades of the same color.
One of the most efficient techniques used in a Lap bedspread using strips – Pattern is “sub-cutting.” This involves sewing several long strips together first and then cutting them crosswise into smaller units. This method is a hallmark of the Lap bedspread using strips style because it creates complex-looking designs with a fraction of the effort required for traditional piecing, making the project much more accessible.
Accuracy in your seam allowance is the most important factor when following the Lap bedspread using strips – Pattern. Most quilting designs are based on a 1/4-inch seam. If your seams are even slightly off, the error will multiply across the dozens of strips in your Lap bedspread using strips, resulting in a quilt that is much smaller or larger than intended. Use a specialized quilting foot on your sewing machine to maintain consistency.
Once all your pieces are cut according to the Lap bedspread using strips – Pattern, lay them out on a flat surface or a design wall. This “dry run” allows you to visualize the final Lap bedspread using strips and make adjustments to the color placement before anything is permanently joined. Seeing the Pattern come to life at this stage is incredibly motivating and helps catch any errors in the sequence early on.
3. Sewing and Assembling the Lap bedspread using strips – Pattern
The assembly of a Lap bedspread using strips – Pattern often begins with sewing the strips together in pairs. By sewing two strips together at a time rather than adding one strip to a growing pile, you minimize the risk of the fabric warping. This “chain piecing” technique is an efficient way to manage a Lap bedspread using strips project, as it saves thread and keeps your workflow moving at a steady, rhythmic pace.
To prevent the “banana effect”—where the quilt top bows to one side—it is essential to alternate the direction in which you sew your seams. When working on your Lap bedspread using strips – Pattern, sew the first two strips from top to bottom, and the next pair from bottom to top. This counteracts the natural push of the sewing machine’s feed dogs, ensuring your Lap bedspread using strips remains perfectly rectangular and flat.
Pressing is the next vital step in the Lap bedspread using strips – Pattern workflow. Always press your seams to one side, usually toward the darker fabric, to prevent the seam allowance from showing through the front. In a Lap bedspread using strips, consistent pressing makes the nesting of seams much easier if your Pattern requires you to join different strip sets together later in the process.
As you progress through the Lap bedspread using strips – Pattern, you will eventually have several large panels or “strata.” Joining these large sections requires careful pinning. Even if you are an experienced sewer, pinning the intersections in your Lap bedspread using strips ensures that the horizontal lines stay perfectly aligned across the entire width of the bedspread, which is the hallmark of a high-quality handmade item.
Once the top of the Lap bedspread using strips – Pattern is finished, it is time for the “quilting sandwich.” Lay your backing fabric face down, place the batting on top, and finally lay your finished Lap bedspread using strips top face up. Secure these three layers using safety pins or basting spray. This keeps the layers from shifting while you add the decorative quilting stitches that hold everything together.
The final touch to your Lap bedspread using strips – Pattern is the binding. The binding is a narrow strip of fabric that wraps around the raw edges of the quilt, providing a clean and durable finish. For a Lap bedspread using strips, a double-fold binding is usually preferred for its longevity. Once the binding is hand-stitched or machine-sewn into place, your beautiful and cozy creation is officially complete and ready for use.
4. Maintenance and Styling Your Finished Lap Bedspread
Caring for your Lap bedspread using strips – Pattern is relatively simple but requires some attention to detail to preserve the fabric and stitching. It is best to wash your Lap bedspread using strips in cold water on a delicate cycle using a mild, bleach-free detergent. To prevent color bleeding, especially if you used high-contrast fabrics in your Pattern, you can toss a “color catcher” sheet into the machine during the first few washes.
Drying your Lap bedspread using strips – Pattern can be done in a dryer on low heat, but many quilters prefer to air dry their work to minimize wear and tear. If you like the “crinkled” vintage look common in traditional quilts, machine drying will enhance that texture. However, if you prefer your Lap bedspread using strips to look crisp and modern, laying it flat to dry and giving it a light press with an iron will maintain its smooth appearance.
Styling a Lap bedspread using strips – Pattern is a joy because of its versatile size. In the bedroom, it can be folded neatly at the foot of the bed to add a layer of texture and color. In the living room, a Lap bedspread using strips draped over the arm of a leather chair or tucked into a wicker basket provides a sense of warmth and “hygge” that makes a house feel like a home.
Because the Lap bedspread using strips – Pattern is so portable, it also makes for a fantastic travel companion. Whether you are on a long car ride or a flight, having a handmade Lap bedspread using strips provides a sense of familiarity and comfort that store-bought blankets simply cannot match. Its compact size means it doesn’t take up much room, yet it offers significant warmth whenever needed.
If you find that you enjoy the process of making a Lap bedspread using strips – Pattern, consider creating seasonal versions. You could make a bright, floral Lap bedspread using strips for the spring and summer months, and a deeper, flannel-backed version for the autumn and winter. Using the same Pattern with different fabric choices allows you to master the technique while keeping your home decor fresh and exciting.
Lastly, a Lap bedspread using strips – Pattern makes for an unforgettable gift. Whether for a housewarming, a new baby, or a grandparent, a handmade Lap bedspread using strips is a “hug in fabric form.” Including a small label on the back with the date and the name of the maker turns the Lap bedspread using strips – Pattern project into a cherished heirloom that can be passed down through generations.
Frequently Asked Questions (FAQ)
What is the ideal size for a lap bedspread?
While sizes vary, most people following a Lap bedspread using strips – Pattern aim for dimensions around 45″ x 60″ or 50″ x 65″. This size is large enough to cover an adult from the waist down while sitting, but small enough to be portable and easy to quilt on a standard home sewing machine.
Can I use different widths of strips in one pattern?
Yes! While many Lap bedspread using strips – Pattern instructions call for uniform widths, using varied widths (such as a mix of 2″, 3″, and 5″ strips) can create a dynamic, modern look. Just ensure that your total measurements align with your intended final size.
How many strips do I need for a standard lap quilt?
If you are using standard 2.5-inch strips (Jelly Roll style), you will typically need about 35 to 40 strips to complete a Lap bedspread using strips – Pattern. This usually results in a quilt top that is approximately 40″ x 60″ after accounting for seam allowances.
Do I need to pre-wash my fabric for this project?
Pre-washing is a personal preference. However, for a Lap bedspread using strips – Pattern, pre-washing prevents future shrinkage and bleeding. If you choose not to pre-wash, using a color catcher during the first laundry cycle of your finished Lap bedspread using strips is highly recommended.
What is the best way to quilt the layers together?
For a Lap bedspread using strips, “stitch-in-the-ditch” or simple straight-line quilting parallel to the strips is very popular and beginner-friendly. It emphasizes the linear nature of the Lap bedspread using strips – Pattern and provides a clean, professional finish without the need for a longarm machine.
Can I use fabrics other than cotton?
While cotton is the standard for a Lap bedspread using strips – Pattern, you can use linen, flannel, or even Minky for the backing. Just be aware that stretchier fabrics require more pinning and a slower sewing speed to prevent the Lap bedspread using strips from becoming distorted.
Conclusion
In summary, creating a Lap bedspread using strips – Pattern is an accessible and deeply satisfying project that combines artistic expression with practical utility.
We have explored the importance of selecting high-quality materials, the precision required in the cutting phase, and the systematic approach to assembly that ensures a flat and beautiful result. By following a structured Pattern, you can master the art of the Lap bedspread using strips, creating a cozy accessory that adds character to any room. Whether you are making it for yourself or as a thoughtful gift, the time invested in sewing these strips together results in a durable piece of craftsmanship that celebrates the beauty of textile art.