This Crochet pencil case, super easy- Pattern is the ultimate project for anyone looking to combine functionality with the meditative art of yarn work. Whether you are a seasoned crafter or a complete beginner picking up a hook for the first time, creating a handmade accessory for your stationery is incredibly rewarding. A Crochet pencil case, super easy- Pattern allows you to move away from generic plastic storage and instead embrace a textured, durable, and colorful home for your favorite pens and pencils.
The beauty of following a Crochet pencil case, super easy- Pattern lies in its versatility and the minimal supplies required to get started. By focusing on a super easy design, we eliminate the stress of complex shaping or intricate lace stitches, focusing instead on solid, sturdy construction that will stand the test of time in a backpack or desk drawer. Throughout this guide, we will break down the essential steps to ensure your Crochet pencil case looks professional while remaining a joyful, stress-free crafting experience.
In the following sections, we will explore the specific components of the Crochet pencil case, super easy- Pattern. We will define why the Crochet pencil case is such a popular search term for organized crafters and how the term super easy implies a project that relies on basic stitches like the single crochet or half-double crochet. Finally, we will look at how the Pattern serves as your roadmap, providing the stitch counts and structural layout necessary to turn a simple ball of yarn into a beautiful, finished product.
1. Understanding the Crochet pencil case, super easy- Pattern Basics
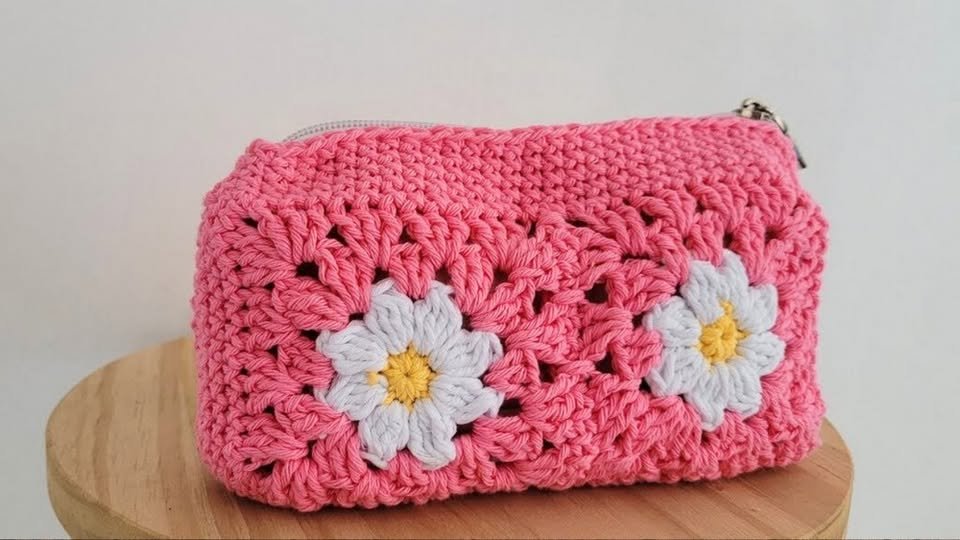
When we talk about a Crochet pencil case, we are referring to a small, portable pouch designed specifically to hold writing instruments. Unlike a standard bag, a Crochet pencil case needs to be long enough to accommodate standard pens but slim enough not to take up too much space. Using cotton yarn is often recommended for this specific project because it offers better stitch definition and less “stretch” than acrylic, ensuring your pens don’t poke through the fabric.
The term super easy in our Crochet pencil case, super easy- Pattern refers to the level of technical difficulty involved in the construction. Typically, a super easy project involves working in simple rows or rounds without the need for increasing or decreasing stitches. This makes it the perfect “Netflix project,” where you can work on your Crochet pencil case while relaxing, without having to constantly count every single loop on your hook.
A Pattern is essentially the set of instructions that guides you from the first slip knot to the final fastening off. For a Crochet pencil case, super easy- Pattern, the layout usually consists of a rectangle that is folded and seamed, or a continuous tube worked in the round. Having a reliable Pattern ensures that your dimensions are consistent and that the finished case is the correct size to fit a standard 7-inch pencil comfortably.
To begin your Crochet pencil case, super easy- Pattern, you will first need to master the foundation chain. The length of this chain determines the width or height of your pouch, depending on which direction you choose to work. In a super easy design, we often suggest a chain of about 35 to 40 stitches if working lengthwise, or 15 to 20 stitches if working from the bottom up in a circular fashion.
Another key aspect of the Crochet pencil case, super easy- Pattern is choosing the right hook size. For most medium-weight yarns, a 4.0mm or 5.0mm hook works best to create a tight “fabric.” A tight tension is vital for a Crochet pencil case because you want to prevent the sharp points of your pencils from slipping through the gaps between your stitches, which is a common issue in looser designs.
Finally, the Crochet pencil case, super easy- Pattern should include instructions for a closure. Most super easy patterns utilize a simple button loop or a standard zipper. Adding a zipper might sound intimidating, but in a Crochet pencil case, it can be easily hand-sewn into the opening. Alternatively, a button closure keeps the project strictly yarn-based and maintains that charming, “homemade” aesthetic that many crafters love.
2. Selecting Your Materials for a Super Easy Experience
Before you dive into the Crochet pencil case, super easy- Pattern, selecting the right yarn is the most important decision you will make. For a Crochet pencil case, durability is key. I highly recommend mercerized cotton because it is strong, has a slight sheen, and doesn’t pill over time. This ensures that your Crochet pencil case stays looking brand new even after months of being tossed into a school bag or purse.
The color palette you choose for your Crochet pencil case, super easy- Pattern can completely change the vibe of the project. Solid colors are great for beginners because it is much easier to see your stitches and where to insert the hook. However, if you want something more dynamic, variegated yarns can create a beautiful “striped” effect without you ever having to manually change colors, keeping the process super easy and fun.
In addition to yarn, your Crochet pencil case, super easy- Pattern toolkit should include a tapestry needle. This needle is used to weave in your ends and sew up the sides of your pouch. A blunt-tipped needle is preferred so you don’t split the yarn fibers while finishing your Crochet pencil case. These small details are what turn a simple piece of crochet into a high-quality, long-lasting accessory.
The Pattern you follow might also suggest using a stitch marker. Even in a super easy design, it is very easy to lose track of the beginning of a row if you are working in a spiral. A stitch marker helps you identify exactly where one round ends and the next begins, ensuring your Crochet pencil case doesn’t end up lopsided or uneven at the edges.
Don’t forget the closure hardware when preparing for your Crochet pencil case, super easy- Pattern. If you choose a button, look for one that is at least 20mm in diameter so it is easy to handle. If you prefer a zipper, make sure it matches the length of the opening in your Crochet pencil case. Having these items ready before you start prevents interruptions once you get into the rhythm of your crochet.
Lastly, consider the “lining” of your Crochet pencil case. While a super easy pattern doesn’t strictly require a fabric lining, adding one can make the case even more robust. You can use a scrap of old fabric to line the inside of your Crochet pencil case, which adds a professional touch and extra protection against ink leaks from pens that might accidentally lose their caps.
3. Step-by-Step Execution of the Pattern
The first step in our Crochet pencil case, super easy- Pattern is creating the foundation. If you are following the rectangular method, you will crochet a piece that is roughly 8 inches by 7 inches. This super easy approach allows you to simply fold the rectangle in half and sew the sides, creating an instant pocket for your tools. It is the fastest way to complete a Crochet pencil case without needing advanced skills.
Once your foundation is set, you will proceed with the main body of the Crochet pencil case, super easy- Pattern. I recommend using the Half Double Crochet (HDC) stitch. This stitch is slightly taller than a single crochet but denser than a double crochet, providing the perfect balance of speed and coverage. It makes the project move along quickly while ensuring the Crochet pencil case remains thick enough to protect its contents.
Consistency is the secret to a great Crochet pencil case, super easy- Pattern. Try to keep your tension even throughout the entire piece. If you notice your edges are starting to curve or look “wavy,” you may be accidentally adding or skipping stitches at the ends of the rows. Following the Pattern stitch count strictly at the end of every row will help you maintain a perfectly straight edge for your Crochet pencil case.
After you reach the desired height, the Crochet pencil case, super easy- Pattern usually calls for a finishing round. This often involves a round of single crochet or “crab stitch” (reverse single crochet) around the opening. This gives the Crochet pencil case a reinforced top edge that won’t stretch out over time, keeping your pencils securely tucked inside even if the case is held upside down.
If your Crochet pencil case, super easy- Pattern includes a flap, you will continue working on only half of the stitches for a few more rows. This flap will fold over the top of the opening. To keep it super easy, you can create a “buttonhole” by simply chaining two or three stitches and skipping the same number of stitches in the middle of a row, creating a natural gap for your button to pass through.
The final assembly phase of the Crochet pencil case, super easy- Pattern involves the tapestry needle. Use a “mattress stitch” to join the side seams of your Crochet pencil case. This stitch is nearly invisible and creates a very strong bond. Once the seams are closed and the button is sewn on, you have successfully transformed your yarn into a functional Crochet pencil case using a simple and effective method.
4. Tips for Customizing and Caring for Your Crochet Pencil Case
One of the best things about a Crochet pencil case, super easy- Pattern is how easy it is to customize. You can add “surface crochet” to create initials or stripes after the main body is finished. This allows you to personalize the Crochet pencil case for students, artists, or as a thoughtful gift. Even though the base pattern is super easy, these little additions make the final product look incredibly sophisticated.
If you find that your Crochet pencil case is a bit too soft, you can “block” your finished work. Blocking involves pinning the Crochet pencil case to a flat surface, lightly misting it with water, and letting it dry. This helps set the stitches into their final shape and ensures that the Crochet pencil case, super easy- Pattern dimensions are exactly what you intended them to be, giving it a high-end store-bought look.
Maintenance is straightforward for a Crochet pencil case made of cotton. You can usually hand wash it in cool water with a bit of mild detergent. Since a Crochet pencil case often comes into contact with graphite or ink, being able to wash it is a huge advantage over leather or plastic cases. Just make sure to reshape the case while it is damp and lay it flat to dry to preserve the Pattern integrity.
For those who want to take their Crochet pencil case, super easy- Pattern to the next level, consider experimenting with “tapestry crochet.” This involves carrying a second color of yarn along the back of your stitches to create simple geometric patterns. While it sounds complex, it is still quite super easy once you get the hang of switching colors, and it adds a wonderful visual weight to your Crochet pencil case.
Organizing your supplies within the Crochet pencil case is also a joy. Because the fabric has a bit of “give,” you can often fit more than you expect. You might find that your Crochet pencil case, super easy- Pattern results in a pouch that can also hold crochet hooks, makeup brushes, or small tech cables, making it a multi-purpose tool for your daily life.
Finally, remember that the most important part of the Crochet pencil case, super easy- Pattern is the enjoyment of the process. Crochet is a skill that improves with every stitch. By completing this super easy project, you are building the muscle memory and confidence needed for more complex garments or blankets in the future. Your Crochet pencil case is a testament to your creativity and your ability to create something useful from scratch.
Frequently Asked Questions (FAQ)
What is the best yarn for a Crochet pencil case, super easy- Pattern?
The best yarn is definitely cotton or a cotton-linen blend. These fibers don’t stretch as much as wool or acrylic, which is important for holding heavy or sharp items like pencils. Cotton also allows for the Crochet pencil case to be washed easily if it gets dirty.
How many stitches should I start with for a standard Crochet pencil case?
For a standard size, a foundation chain of about 35-40 stitches (if working the long way) or 20 stitches (if working a shorter tube) is usually perfect. Always check your Pattern as hook size and yarn weight will influence the final dimensions of your Crochet pencil case.
Is this Crochet pencil case, super easy- Pattern suitable for children to learn?
Absolutely! Because this is a super easy project, it’s a great first project for kids. It teaches the basics of chains and rows, and they end up with a Crochet pencil case they can actually use at school, which provides a great sense of accomplishment.
Can I add a zipper to my Crochet pencil case?
Yes, adding a zipper is a great way to secure your Crochet pencil case. You can buy a standard 7-inch zipper and hand-sew it using a backstitch along the inside edge of the opening. It makes the Crochet pencil case, super easy- Pattern look very professional.
How do I prevent my pencils from poking through the stitches?
The key is to use a smaller hook than recommended on the yarn label. This creates a tighter tension. Using a super easy stitch like the single crochet also results in a denser fabric for your Crochet pencil case, minimizing any holes or gaps.
How long does it take to finish the Crochet pencil case, super easy- Pattern?
Most people can finish this Crochet pencil case in just one or two evenings. It is a quick project, making it ideal for last-minute gifts or a fast weekend craft session.
Conclusion
In this article, we have explored the wonderful world of creating a Crochet pencil case, super easy- Pattern. We’ve discussed why cotton yarn is the superior choice for durability, how to master the basic stitches to keep the project super easy, and the importance of following a structured Pattern to achieve the perfect size.
From the initial foundation chain to the final assembly of your Crochet pencil case, you now have the knowledge to create a beautiful, functional accessory that reflects your personal style.