Creating a Granny Square Cat Crochet- Pattern is one of the most delightful ways to combine the timeless art of traditional needlework with our modern obsession with feline companions. For many crafters, the Granny Square Cat Crochet represents a perfect entry point into amigurumi or shaped fiber art because it utilizes the familiar geometry of the classic square. This specific Pattern allows you to transform simple blocks of color into a charming, soulful toy or decorative piece that captures the quirky essence of a cat while maintaining that cozy, vintage aesthetic we all love.
The beauty of the Granny Square Cat Crochet- Pattern lies in its incredible versatility and the room it leaves for personal expression and artistic flair. Whether you are an expert at the hook or a curious beginner, following a well-structured Granny Square Cat Crochet guide ensures that your finished project has both structural integrity and a soft, huggable texture. By understanding the foundational elements of the Pattern, you can experiment with different yarn weights, variegated colorways, and facial expressions to create a whole clowder of unique yarn cats for your home.
In this comprehensive guide, we are going to dive deep into every technical and creative aspect of the Granny Square Cat Crochet- Pattern to help you succeed. We will explore how the Granny Square Cat Crochet terminology applies to the physical construction of the feline body, and how a detailed Pattern acts as your indispensable roadmap through every stitch and assembly phase. From selecting the perfect hypoallergenic yarn to mastering the invisible join, this article is designed to be the ultimate resource for anyone looking to master this specific style of feline-themed crochet.
1. Understanding the Essentials of Granny Square Cat Crochet
To begin your journey with a Granny Square Cat Crochet- Pattern, you must first understand the anatomy of the square itself and how it scales. The Granny Square Cat Crochet is essentially a collection of “clusters” (usually three double crochets) worked into spaces created by chain stitches, forming a growing geometric shape. When you follow a specific Pattern, you aren’t just making a flat coaster; you are creating the modular building blocks that will eventually be folded, stuffed, and seamed into a three-dimensional animal.
Choosing the right hook size is paramount for a successful Granny Square Cat Crochet project, as it dictates the tension of your fabric. If your hook is too large, the holes in your Pattern will be too wide, allowing the polyester stuffing to peek through or even fall out over time. Most crafters prefer a slightly smaller hook than recommended on the yarn label to ensure the Granny Square Cat Crochet remains dense, durable, and professional in appearance, especially if it is intended to be a toy for children or pets.
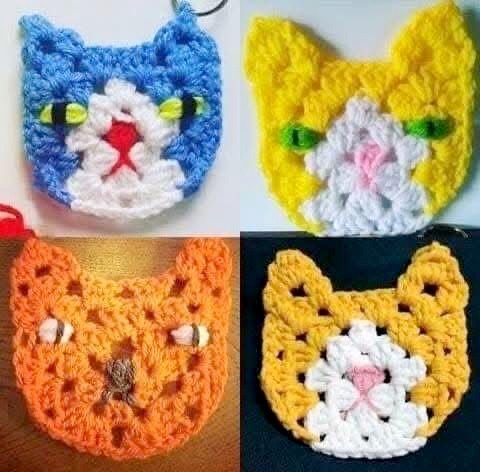
The color palette you choose for your Granny Square Cat Crochet- Pattern can completely change the “personality” of the finished feline. Using a single solid color provides a modern, minimalist look, while using scrap yarn for each round of the Granny Square Cat Crochet creates a whimsical, bohemian calico effect. A high-quality Pattern will often suggest color changes at specific rounds to highlight the cat’s “tuxedo” markings or “socks,” giving you a clear visual guide to follow throughout the process.
Material selection is another vital pillar of the Granny Square Cat Crochet- Pattern workflow, especially regarding fiber content and elasticity. Cotton yarn is excellent for a Granny Square Cat Crochet because it provides fantastic stitch definition, making the Pattern details really pop and helping the cat hold its shape. On the other hand, acrylic blends offer a softer, fuzzier finish that mimics real fur, making the final Granny Square Cat Crochet piece feel much more cuddly and warm to the touch.
As you work through the early rounds of your Granny Square Cat Crochet- Pattern, pay close attention to the “magic ring” or “chain-4” start. This center point determines how tightly the Granny Square Cat Crochet begins, and a tight center is crucial for preventing a hole in the middle of your cat’s face or body. Following the Pattern instructions for the first three rounds carefully sets the stage for the rest of the construction, ensuring that the square remains perfectly flat and symmetrical before the assembly begins.
Finally, blocking your finished squares is a professional secret that elevates any Granny Square Cat Crochet- Pattern from amateur to artisanal. By pinning your Granny Square Cat Crochet pieces to a foam board and lightly steaming them, you ensure that every edge is straight and every corner is a perfect 90-degree angle. This makes the seaming process in the Pattern much more manageable, as the stitches will line up perfectly, resulting in a cleaner, more polished cat silhouette that looks store-bought.
2. Breaking Down the Technical Components of the Pattern
The Pattern is more than just a set of instructions; it is the mathematical blueprint that defines the dimensions and proportions of your cat. In a Granny Square Cat Crochet- Pattern, the designer has already calculated how many squares are needed for the head, body, and limbs to ensure the cat doesn’t look lopsided. Each Granny Square Cat Crochet serves a purpose, and the Pattern tells you exactly where to place your increases and decreases to transition from a flat shape into a rounded, lifelike form.
One of the most important terms you will encounter in a Granny Square Cat Crochet- Pattern is the “gauge swatch.” While many skip this step, it is vital for ensuring your Granny Square Cat Crochet ends up the correct size; otherwise, you might end up with a kitten-sized cat or a giant lion accidentally. By checking your gauge against the Pattern, you can adjust your hook size up or down to match the designer’s tension, guaranteeing that your finished Granny Square Cat Crochet matches the intended aesthetic.
The Pattern will also specify the types of stitches used, ranging from the basic double crochet to more complex “popcorn” or “puff” stitches. These textured stitches are often used in a Granny Square Cat Crochet- Pattern to represent the cat’s paws or the texture of its ears. Mastering these variations within the Granny Square Cat Crochet framework allows you to add depth and tactile interest to your project, making it a much more engaging piece of art for whoever receives it.
Assembly instructions are the heart of any Granny Square Cat Crochet- Pattern, as they explain how to join the pieces using techniques like the mattress stitch or slip stitch join. The way you join your Granny Square Cat Crochet blocks will determine if the seams are invisible or if they form a decorative ridge on the cat’s back. A good Pattern will provide clear diagrams or photos showing exactly which loops to sew together, ensuring the structural integrity of the Granny Square Cat Crochet during heavy use.
Safety eyes and embroidery details are usually the final steps outlined in the Granny Square Cat Crochet- Pattern. The placement of the eyes can change the cat’s expression from curious to sleepy, so the Pattern often provides specific round numbers for the most balanced look. When working on a Granny Square Cat Crochet, using embroidery thread for the nose and whiskers is a safer alternative to plastic parts if the toy is for a baby, and a detailed Pattern will offer tips on how to weave in those ends securely.
Lastly, a high-quality Granny Square Cat Crochet- Pattern will include a “materials list” that accounts for every gram of yarn and every bit of stuffing needed. This prevents the frustration of running out of yarn halfway through a Granny Square Cat Crochet leg or tail. By following the Pattern requirements for yardage, you can ensure that all your yarn comes from the same dye lot, maintaining color consistency across the entire Granny Square Cat Crochet body for a flawless, high-end finish.
3. Advanced Customization for your Granny Square Cat Crochet
Once you are comfortable with the basic Granny Square Cat Crochet- Pattern, you can begin to “hack” the design to create different breeds or styles. For instance, by adding more rounds to certain Granny Square Cat Crochet blocks, you can create a long-haired Persian effect or a stout British Shorthair. The flexibility of the Pattern allows you to manipulate the height and width of the feline by simply adding or subtracting rows from the original Granny Square Cat Crochet template.
Incorporating different yarn textures is another way to push the boundaries of the Granny Square Cat Crochet- Pattern. Imagine using a mohair or boucle yarn for the “chest” Granny Square Cat Crochet and a smooth mercerized cotton for the face; this contrast creates a stunning multi-dimensional look. While the Pattern provides the structural bones, your choice of fiber transforms the Granny Square Cat Crochet into a sensory experience that mimics the different fur types found in nature.
Changing the scale of the Granny Square Cat Crochet- Pattern is as easy as swapping your yarn weight. If you use a bulky chenille yarn with a 6mm hook, your Granny Square Cat Crochet will become a large, squishy floor pillow perfect for a nursery. Conversely, using lace-weight thread and a tiny 1mm hook with the same Pattern will result in a miniature Granny Square Cat Crochet charm that can be worn as jewelry or used as a keychain for a cat lover.
The “Tail” of the cat is often a separate section in the Granny Square Cat Crochet- Pattern that allows for great creativity. You can make a long, whip-like tail using a simple spiral of stitches or a bushy, thick tail by repeating certain rounds of the Granny Square Cat Crochet logic. The Pattern serves as your guide for attachment, ensuring the tail is centered and sturdy enough to stand up to being wagged or pulled by enthusiastic little hands.
Ear placement is a subtle art that the Granny Square Cat Crochet- Pattern helps you master through precise stitch counting. Placing the ears higher on the Granny Square Cat Crochet head creates a startled or alert look, while wider placement gives the cat a more relaxed, “derpy” appearance. By sticking to the Pattern grid, you can ensure symmetry, but don’t be afraid to tilt them slightly to give your Granny Square Cat Crochet a bit of a “tilted-head” personality.
Finally, consider adding accessories like a tiny crocheted collar or a bell, which are often included as bonus sections in a premium Granny Square Cat Crochet- Pattern. These small additions make the Granny Square Cat Crochet feel complete and offer a great way to use up those tiny scraps of yarn left over from the main body. Following the Pattern for these extras ensures they are perfectly scaled to your cat, rounding out the project with professional-level detail and care.
4. Troubleshooting and Finishing Your Crochet Masterpiece
Common issues in a Granny Square Cat Crochet- Pattern usually involve the squares “curling” at the edges. This often happens if your tension is too tight or if you missed a chain stitch in the corners of your Granny Square Cat Crochet. To fix this, the Pattern might suggest adding an extra chain in the corners or simply relaxing your grip on the yarn, ensuring the Granny Square Cat Crochet lays flat and doesn’t pull the cat’s features out of alignment once stuffed.
Stuffing is an art form that significantly impacts the final look of your Granny Square Cat Crochet- Pattern. If you under-stuff, the Granny Square Cat Crochet will look wrinkled and sad; if you over-stuff, the stitches will stretch and show the white polyfill inside. The Pattern usually recommends stuffing firmly but gradually, using small clumps of fiberfill to fill the corners of the Granny Square Cat Crochet first before moving to the center for a smooth, even finish.
Weaving in ends is often the least favorite part of the Granny Square Cat Crochet- Pattern, but it is vital for longevity. Because a Granny Square Cat Crochet involves many color changes, you will have several “tails” to hide. Use a darning needle to weave the yarn through the back of the Pattern stitches for at least two inches, changing directions to lock the thread in place and prevent your Granny Square Cat Crochet from unraveling after its first wash.
If you find that your Granny Square Cat Crochet- Pattern is looking a bit lopsided after assembly, don’t panic. You can often “sculpt” the Granny Square Cat Crochet by using a long strand of matching yarn to pull certain areas together from the inside. This technique, often mentioned in advanced Pattern tips, allows you to define the neck or the bridge of the nose, giving your Granny Square Cat Crochet a much more realistic and professional three-dimensional shape.
Maintaining your Granny Square Cat Crochet is easy if you chose the right materials during the Pattern setup. If you used acrylic or cotton, you can usually spot-clean the Granny Square Cat Crochet with a damp cloth and mild soap. Following the Pattern care instructions ensures that the colors remain vibrant and the stuffing doesn’t bunch up, keeping your Granny Square Cat Crochet looking fresh and beautiful for years to come as a cherished keepsake.
Sharing your finished Granny Square Cat Crochet- Pattern with the community is the final rewarding step. Many designers love to see “projects” on sites like Ravelry or Instagram, where you can show off your unique color choices for the Granny Square Cat Crochet. By posting your results, you help other crafters visualize what the Pattern looks like in different yarns, contributing to the global community of Granny Square Cat Crochet enthusiasts and inspiring others to pick up their hooks.
Frequently Asked Questions (FAQ)
What is the best yarn for a Granny Square Cat Crochet?
The best yarn is usually a DK weight cotton or acrylic blend. Cotton provides the best stitch definition for the Pattern, while acrylic offers softness. Avoid very dark yarns (like solid black) if you are a beginner, as it can be difficult to see the stitches in your Granny Square Cat Crochet clusters.
Can a beginner finish a Granny Square Cat Crochet- Pattern?
Yes! If you know how to make a basic granny square, you can complete this Pattern. The most challenging part is the assembly, but if you take it slow and follow the Granny Square Cat Crochet joining instructions, you will have a successful result.
How do I make the cat bigger or smaller?
To change the size, simply change your yarn weight and hook size. Use bulky yarn for a large Granny Square Cat Crochet or embroidery thread for a miniature one. The Pattern remains the same; only the physical scale of the stitches changes.
Do I need to block the squares before sewing?
While not strictly mandatory, blocking your Granny Square Cat Crochet pieces makes a huge difference. It ensures the squares are the exact same size, making it much easier to follow the Pattern‘s seaming instructions and resulting in a much neater cat.
What kind of stuffing should I use?
Use high-quality polyester fiberfill. It is washable, hypoallergenic, and holds its bounce over time. When stuffing your Granny Square Cat Crochet, use small amounts at a time to avoid lumps and to ensure the Pattern shape is filled out evenly.
Is this pattern safe for pets?
If making a toy for a real cat, avoid plastic safety eyes. Instead, use the Pattern to guide you in embroidering the features with yarn. This ensures there are no small parts that could be swallowed, making the Granny Square Cat Crochet a safe and fun kicker toy.
Conclusion
In this article, we have explored the wonderful world of the Granny Square Cat Crochet- Pattern, covering everything from the foundational stitches to advanced customization and troubleshooting.
We learned how the Granny Square Cat Crochet serves as a modular base for feline art and how a well-written Pattern is the key to achieving professional, symmetrical, and adorable results. Whether you are crafting for yourself or a loved one, this project is a perfect marriage of tradition and creativity.