The Kaleidoscope Quilt Blocks – Pattern represents one of the most mesmerizing and visually dynamic techniques in the world of traditional quilting. Much like the childhood toy that shares its name, these blocks use the clever placement of triangles and mirrored prints to create the illusion of circular motion and infinite reflection within a flat fabric surface. When you embark on a journey to master the Kaleidoscope Quilt Blocks – Pattern, you are not just sewing pieces of fabric together; you are engaging in a sophisticated game of geometry and color theory that results in a breathtaking secondary design once all the blocks are assembled into a full quilt top.
Exploring the history and mechanics of the Kaleidoscope Quilt Blocks – Pattern reveals why this style has remained a favorite for generations. The secret lies in the “fussy cutting” of fabric or the strategic use of 45-degree or 60-degree triangles that radiate from a central point. By following a precise Kaleidoscope Quilt Blocks – Pattern, quilters can transform a single, busy floral print or a bold geometric textile into a series of kaleidoscopic explosions that look incredibly complex. The beauty of the pattern is its ability to make the viewer’s eye dance across the quilt, searching for where one block ends and the next begins.
In this comprehensive guide, we will dive deep into the essential elements of creating your own Kaleidoscope Quilt Blocks – Pattern. We will focus on the two main pillars of this project: the Kaleidoscope Quilt Blocks, which are the individual units of the quilt composed of multiple wedges, and the Pattern, which provides the mathematical template and cutting instructions needed to achieve perfect symmetry. Whether you are a beginner looking for a new challenge or an experienced quilter aiming to refine your precision piecing, this detailed breakdown will provide the insights necessary to create a vibrant, professional-grade masterpiece.
1. Understanding the Geometry Behind Kaleidoscope Quilt Blocks – Pattern
The fundamental structure of Kaleidoscope Quilt Blocks – Pattern relies on the division of a square or hexagon into equal wedge-shaped segments. Most traditional designs utilize eight triangles that meet in the center, creating an octagonal star-like effect. Understanding the geometry is the first step because if your angles are off by even a fraction of a millimeter, the center of the Kaleidoscope Quilt Blocks will become bulky or won’t lay flat, a common frustration for many quilters.
When you look at a professional Kaleidoscope Quilt Blocks – Pattern, you will notice a heavy emphasis on the “grainline” of the fabric. Because these blocks involve many diagonal cuts, the edges of your triangles are often on the bias, which means they can stretch easily. A high-quality pattern will instruct you on how to handle these delicate pieces without distorting the shape, ensuring that each of your Kaleidoscope Quilt Blocks remains perfectly square and uniform throughout the assembly process.
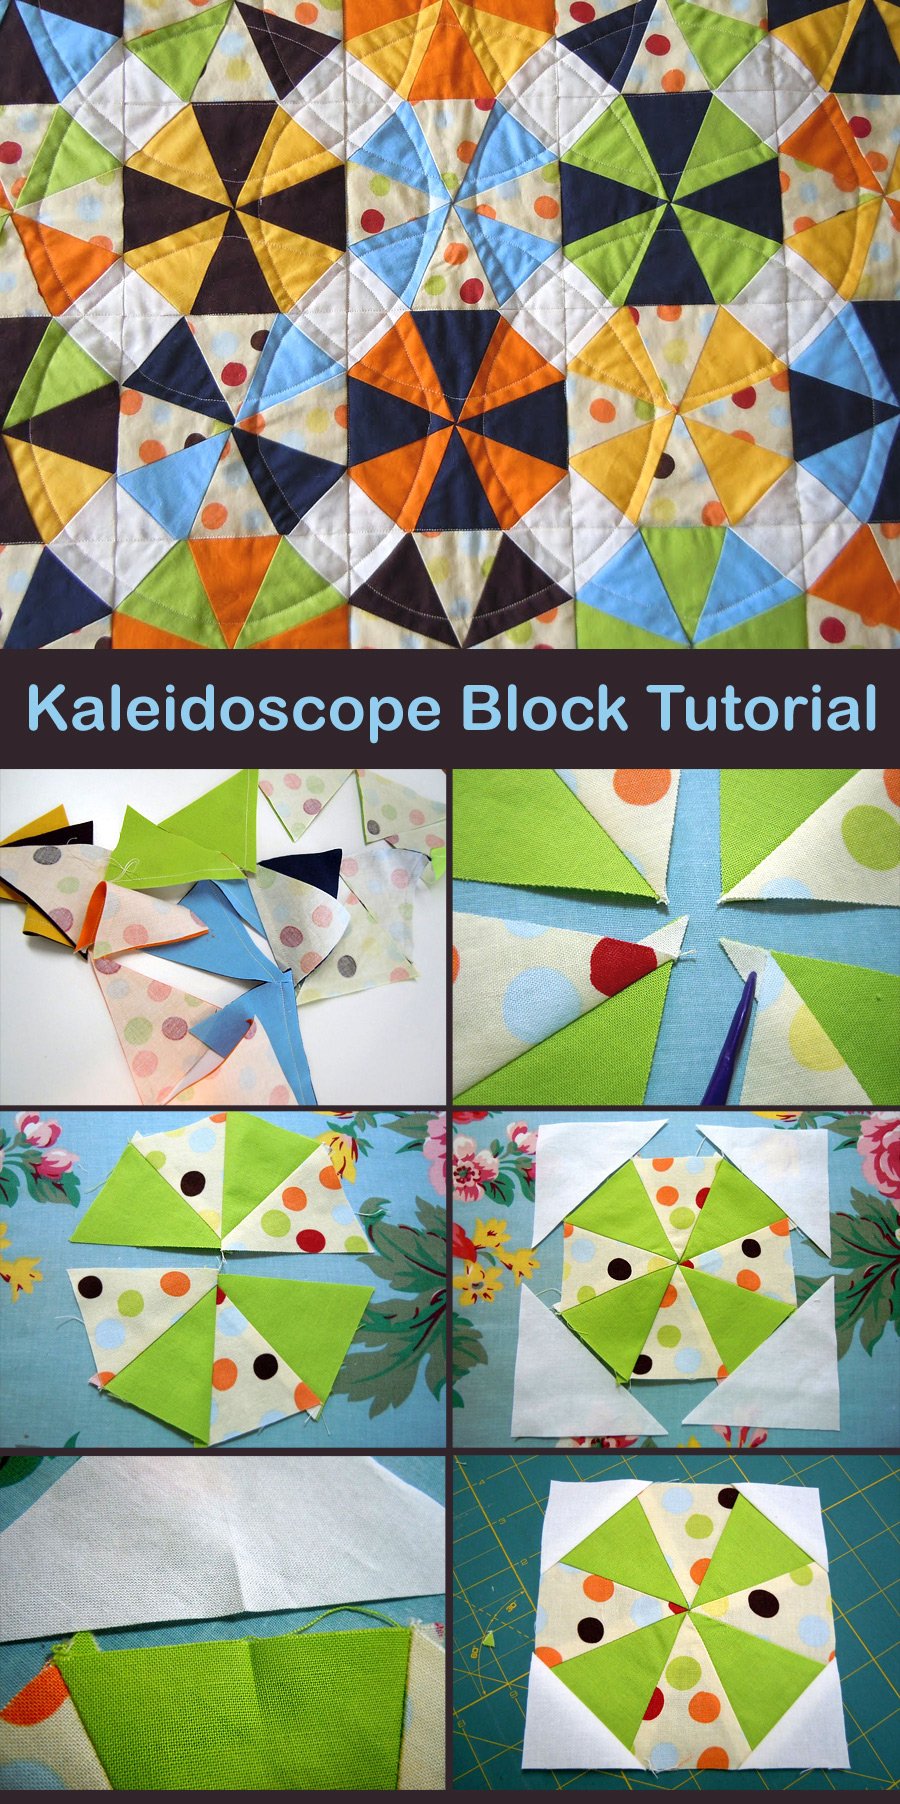
The “kaleidoscope” effect is achieved through a technique called “stack and whack” or symmetry pinning. In a Kaleidoscope Quilt Blocks – Pattern, you often layer multiple repeats of a fabric print exactly on top of one another before cutting. This ensures that every triangle in a single block is cut from the exact same part of the floral or geometric design. When these identical wedges are sewn together, they form a mirrored image that creates the iconic “kaleidoscope” look within the Kaleidoscope Quilt Blocks.
Choosing the right angle for your Kaleidoscope Quilt Blocks – Pattern is vital for the final aesthetic. A 45-degree triangle will result in an eight-point star, while a 60-degree triangle creates a hexagonal six-point star. Each variation requires a slightly different approach to the pattern and different mathematical calculations for the border and background fabrics. Beginners are often encouraged to start with the 45-degree version as it integrates more easily into standard square-grid quilt layouts.
Precision cutting is the backbone of the Kaleidoscope Quilt Blocks – Pattern. Using a specialized acrylic ruler designed specifically for kaleidoscope designs can make the process much faster and more accurate. These tools allow you to see the fabric print through the ruler, helping you align the pattern repeats perfectly. Without the right tools, achieving the symmetrical perfection required for high-end Kaleidoscope Quilt Blocks can be incredibly difficult and prone to error.
Lastly, the background or “corner” fabrics play a huge role in the Kaleidoscope Quilt Blocks – Pattern. These are the pieces that fill in the space around your kaleidoscope star to turn it into a manageable square block. By choosing a solid or a subtle tone-on-tone fabric for these sections, you allow the complex, busy design of the Kaleidoscope Quilt Blocks to take center stage without visual clutter, following the balanced composition principles of the pattern.
2. Fabric Selection and Fussy Cutting for the Best Pattern Results
Fabric choice is arguably the most exciting part of starting a Kaleidoscope Quilt Blocks – Pattern. Unlike other quilts where small prints are preferred, the kaleidoscope technique thrives on large, bold, and even “ugly” prints. A fabric that looks chaotic on the bolt often creates the most stunning Kaleidoscope Quilt Blocks because of the intricate details that emerge when the motifs are mirrored and repeated around a central axis.
To get the most out of your Kaleidoscope Quilt Blocks – Pattern, look for fabrics with a large “repeat.” A repeat is the distance between one point in the design and the next time that exact same point appears. Fabrics with a 12-inch to 24-inch repeat offer the most variety for your Kaleidoscope Quilt Blocks, allowing you to create several different-looking blocks from just a few yards of a single textile, which is a hallmark of a great pattern.
Fussy cutting is the intentional selection of a specific motif within the fabric to be the center of your Kaleidoscope Quilt Blocks – Pattern. For example, if you are using a fabric with large roses, you might want the center of every triangle to be the exact same rose petal. This level of detail requires more fabric than a standard quilt, so always buy an extra yard or two when following a Kaleidoscope Quilt Blocks – Pattern to account for the “waste” generated during the fussy cutting process.
Color contrast is another essential consideration in the Kaleidoscope Quilt Blocks – Pattern. If the colors in your fabric are too similar, the kaleidoscope effect will be lost, and the block will look like a messy blur. Selecting a fabric with a mix of light, medium, and dark values ensures that the “shutter” effect of the Kaleidoscope Quilt Blocks is sharp and defined. This contrast is what gives the pattern its depth and makes the finished quilt look three-dimensional.
Many modern quilters use a set of mirrors to preview their Kaleidoscope Quilt Blocks – Pattern before they ever make a single cut. By placing two small mirrors at an angle on the fabric, you can see a reflection of what the finished block will look like. This “windowing” technique allows you to move the mirrors across the fabric until you find the most beautiful explosion of color, ensuring that every one of your Kaleidoscope Quilt Blocks is a winner.
Finally, don’t be afraid to experiment with borders within the Kaleidoscope Quilt Blocks – Pattern. Sometimes adding a thin “flange” or a narrow inner border to the individual wedges can add an extra layer of complexity to the Kaleidoscope Quilt Blocks. While this adds more seams and requires more precision, it can turn a simple pattern into a gallery-worthy piece of art that showcases your advanced sewing and design skills.
3. Mastering the Assembly and Piecing of Kaleidoscope Quilt Blocks
Once the pieces are cut according to the Kaleidoscope Quilt Blocks – Pattern, the assembly begins with the most critical step: pinning. Because you are dealing with many points meeting in a single center, “point perfection” is the goal. In the pattern, you will often be instructed to use a “stabbing” pin technique, where a pin is placed exactly through the intersection of the seam allowance to ensure that the centers of your Kaleidoscope Quilt Blocks align perfectly.
Sewing a consistent 1/4-inch seam is non-negotiable when working on a Kaleidoscope Quilt Blocks – Pattern. If your seams vary even slightly, the cumulative error across eight or more triangles will result in a block that ripples or has a “mountain” in the center. Many quilters use a specialized patchwork foot on their sewing machine to maintain the exactness required by the Kaleidoscope Quilt Blocks – Pattern, ensuring the finished Kaleidoscope Quilt Blocks are flat and square.
Pressing is just as important as sewing in the Kaleidoscope Quilt Blocks – Pattern. To avoid a bulky center where all the points meet, you should press your seams open or in a “twirling” fashion. Twirling the seams involves popping a few stitches in the seam allowance at the very center, allowing the seams to lay in a circular pattern. This reduces the thickness and makes it much easier to quilt over the Kaleidoscope Quilt Blocks later on without breaking a needle.
As you assemble the units of your Kaleidoscope Quilt Blocks – Pattern, it is helpful to work in halves. Sew two triangles together to make a quarter, then sew two quarters to make a half. By checking the measurements of your halves against the pattern instructions, you can catch any size discrepancies early. This modular approach to building Kaleidoscope Quilt Blocks prevents the final assembly from becoming unmanageable and keeps the geometry under control.
Starch is a secret weapon for anyone tackling a Kaleidoscope Quilt Blocks – Pattern. Spraying your fabric with a heavy starch before cutting helps to stabilize the bias edges, preventing them from stretching as you sew. This extra stiffness makes the fabric behave more like paper, allowing for the extreme precision that Kaleidoscope Quilt Blocks demand. Just be sure to follow the pattern advice on when to apply starch to avoid shrinking the fabric mid-project.
Lastly, always do a “test block” when starting a new Kaleidoscope Quilt Blocks – Pattern. Use scrap fabric with a similar weight to see how the angles come together and how your machine handles the center bulk. This trial run allows you to calibrate your seam allowance and your pressing technique before you cut into your “good” fabric, ensuring that every final Kaleidoscope Quilt Blocks you produce is of the highest possible quality.
4. Design Variations and Layouts for a Kaleidoscope Pattern
The beauty of the Kaleidoscope Quilt Blocks – Pattern is that the blocks can be arranged in dozens of ways to create completely different quilts. One popular layout is the “straight set,” where blocks are placed side-by-side with simple sashing. This highlights the individual artistry of each of the Kaleidoscope Quilt Blocks, making each star look like a framed specimen. It is a clean, classic way to follow the pattern while showcasing your fabric choices.
For a more modern and energetic look, you can use a “secondary pattern” layout. By choosing specific colors for the corners of your Kaleidoscope Quilt Blocks – Pattern, you can create a secondary design that appears where four blocks meet. This “quilt within a quilt” effect is one of the most sophisticated aspects of the Kaleidoscope Quilt Blocks, turning a standard grid into a complex web of interlocking circles and stars that defy the original pattern boundaries.
Negative space can also be utilized effectively with a Kaleidoscope Quilt Blocks – Pattern. By placing the blocks randomly across a solid background or “floating” them with wide borders, you give the eye a place to rest. This minimalist approach draws even more attention to the intricate detail of the Kaleidoscope Quilt Blocks, making them feel like modern, abstract bursts of color rather than traditional quilt motifs, which is a great way to update a classic pattern.
Changing the scale of the Kaleidoscope Quilt Blocks – Pattern can yield dramatic results. You might choose to make one giant kaleidoscope block that covers the entire center of the quilt, known as a “medallion” quilt. Alternatively, making dozens of tiny, 4-inch Kaleidoscope Quilt Blocks creates a mosaic-like effect that is incredibly detailed. The pattern remains the same mathematically, but the visual impact changes completely based on the size of the wedges.
Don’t forget about the “broken kaleidoscope” variation of the Kaleidoscope Quilt Blocks – Pattern. This involves deliberately misaligning the fabric repeats to create a more chaotic, “shards of glass” look. While it moves away from the perfect symmetry of the traditional Kaleidoscope Quilt Blocks, it can be a stunning way to use the pattern for an art quilt or a more contemporary, improvisational project that still relies on the fundamental geometry of the block.
Finally, the quilting itself should complement the Kaleidoscope Quilt Blocks – Pattern. Echo quilting, where you stitch lines that follow the shape of the triangles, can emphasize the radiating motion of the block. Alternatively, feathers or swirls can provide a soft contrast to the sharp angles of the Kaleidoscope Quilt Blocks. No matter which layout you choose, finishing your pattern with thoughtful quilting will tie the entire design together, creating a professional and cohesive heirloom.
Frequently Asked Questions (FAQ)
What is the best fabric for Kaleidoscope Quilt Blocks – Pattern?
Large-scale prints with plenty of movement and multiple colors work best. Look for florals, paisley, or abstract designs with a repeat of at least 12 inches. These fabrics provide the most dramatic transformations when cut and mirrored into Kaleidoscope Quilt Blocks.
Is this pattern suitable for beginners?
It is considered an intermediate pattern. While the sewing is mostly straight lines, the need for extreme precision in cutting and pinning the centers of the Kaleidoscope Quilt Blocks can be challenging for those who are brand new to quilting.
How much fabric do I need for a Kaleidoscope Quilt Blocks – Pattern?
Generally, you will need significantly more fabric than a standard quilt—often 25% to 40% more. This is because you must find and cut identical repeats across the yardage to ensure the Kaleidoscope Quilt Blocks have their signature symmetrical look.
Do I need a special ruler for this pattern?
While not strictly required, a kaleidoscope ruler (like a 45-degree wedge ruler) makes the process much faster and reduces the risk of cutting errors. Most Kaleidoscope Quilt Blocks – Pattern instructions will recommend a specific tool for the best results.
How do I stop the center of the block from being too thick?
The best way to handle the center of Kaleidoscope Quilt Blocks is to press the seams open or “spin” them. This distributes the bulk of the fabric layers, allowing the center to lay flat and making it easier to quilt over later.
Can I make these blocks without fussy cutting?
Yes, you can! If you don’t fussy cut, your Kaleidoscope Quilt Blocks will have a more “scrappy” and random look. While they won’t have the mirrored symmetry of a traditional Kaleidoscope Quilt Blocks – Pattern, they can still be very beautiful and colorful.
Conclusion
The Kaleidoscope Quilt Blocks – Pattern is a masterclass in how simple geometry can create extraordinary beauty. Throughout this article, we have explored the essential techniques that make these blocks so unique, from the importance of precise 45-degree angles to the art of fussy cutting bold fabric prints.
We’ve discussed how to assemble the Kaleidoscope Quilt Blocks with accuracy and how different layouts can completely change the personality of your quilt. By following a well-structured pattern and practicing patience with your piecing, you can create a textile work of art that captures the light and imagination of everyone who sees it.