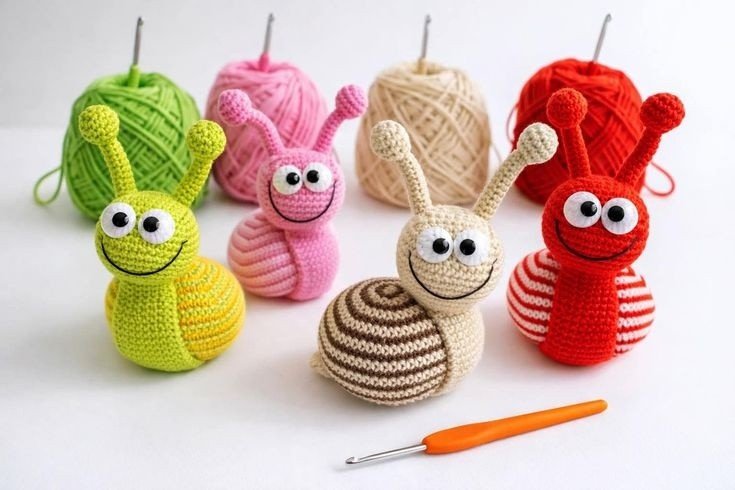
Creating a Crochet Snail Pattern is one of the most delightful projects for any amigurumi enthusiast, offering a perfect blend of simplicity and room for artistic expression. The Crochet Snail Pattern allows you to transform simple yarn into a charming, slow-moving garden friend that brings a smile to anyone who sees it. Whether you are looking to create a gift for a child, a unique desk accessory, or a cute keychain, mastering the Crochet Snail Pattern is a fantastic way to practice your tension and shaping skills while producing something truly adorable.
Working on a Crochet Snail Pattern is highly rewarding because the anatomy of the snail—a spiral shell and a soft body—is inherently conducive to the circular nature of crochet. Most Crochet Snail Pattern designs rely on basic stitches like the single crochet (sc), making them accessible even to those who are relatively new to the craft. By choosing a high-quality Crochet Snail Pattern, you ensure that your final product has the right proportions, a sturdy structure, and that signature whimsical look that makes handmade toys so special.
In this comprehensive guide, we are going to explore everything you need to know about the Crochet Snail Pattern, from the essential materials to the advanced techniques that make your work stand out. Using a Crochet Snail Pattern isn’t just about following instructions; it is about understanding how increases and decreases shape the yarn into three-dimensional forms. By the end of this article, you will feel confident in your ability to tackle any Crochet Snail Pattern and even add your own creative flair to these tiny mollusks.
1 Understanding the Crochet Snail Basics
The foundation of any great Crochet Snail Pattern starts with selecting the right yarn weight and hook size. For amigurumi, most crafters prefer using mercerized cotton or a high-quality acrylic blend because these fibers provide excellent stitch definition and hold their shape well. When you begin a Crochet Snail Pattern, you usually start with a magic ring, which allows you to pull the center tight and avoid any visible holes where stuffing might peek through.
As you follow the Crochet Snail Pattern, you will notice that the shell is the most prominent feature. This part is typically worked in a continuous spiral to avoid a visible seam, a technique often referred to as working in the round. To keep track of your progress in a Crochet Snail Pattern, using a stitch marker is essential, as it helps you identify the beginning of each row without losing your place in the count.
The body of the snail in a Crochet Snail Pattern is often a simple tube-like structure that tapers at one end for the tail and rounds out at the other for the head. It is vital to maintain a tight tension throughout the process. If your stitches are too loose, the polyester fiberfill stuffing will be visible, which can detract from the professional look of your Crochet Snail Pattern project.
Another key element in the Crochet Snail Pattern is the use of safety eyes. These plastic components give your snail a boost of personality, but they must be inserted before you close up the head and finish your stitches. If you are making the Crochet Snail Pattern for a small child, you might consider embroidering the eyes with black thread instead to ensure the toy is completely safe for all ages.
The beauty of a Crochet Snail Pattern lies in its versatility regarding color. You can use a single solid color for a realistic look or experiment with variegated yarn to create a psychedelic, colorful shell that stands out. Many artisans love the Crochet Snail Pattern because it is a “scrap buster,” meaning you can use up those small leftover bits of yarn from previous projects to create a vibrant, eco-friendly toy.
Finally, finishing a Crochet Snail Pattern requires a tapestry needle for sewing the shell onto the body. This step is where the magic happens, as you position the shell to give the snail its characteristic silhouette. A well-executed Crochet Snail Pattern will result in a balanced figure that can stand on its own, making it a perfect decorative piece for bookshelves or windowsills.
2 Mastering the Pattern Techniques
To truly excel at a Crochet Snail Pattern, you must master the invisible decrease. Standard decreases can sometimes leave small bumps or gaps in the fabric, but the invisible version ensures that your Crochet Snail Pattern remains smooth and professional. This technique involves inserting the hook only into the front loops of the next two stitches before completing the single crochet, which is a game-changer for amigurumi.
The shell of a Crochet Snail Pattern often involves a long, stuffed cylinder that is later coiled and sewn into place. To make the spiral look authentic, you can use surface crochet or different color changes to highlight the “whorls” of the shell. When following a detailed Crochet Snail Pattern, pay close attention to the instructions for stuffing as you go, as it is much harder to fill a long, narrow tube once it is nearly finished.
The body of the snail in your Crochet Snail Pattern might also include small “horns” or tentacles. These are often made using a series of chain stitches and slip stitches to create a thin, delicate look. Precision is key here; even though these parts are small, they are the details that define the character of your Crochet Snail Pattern creation and give it a lifelike expression.
If you want to scale your Crochet Snail Pattern, you can simply change your yarn and hook size. Using velvet yarn or chenille yarn with a larger hook will result in a giant, squishy snail that is perfect for cuddling. Conversely, using embroidery floss and a tiny steel hook will turn the same Crochet Snail Pattern into a miniature marvel suitable for a dollhouse or a piece of jewelry.
Advanced crafters might look for a Crochet Snail Pattern that incorporates wire armatures. By inserting a pipe cleaner or floral wire into the body, you can make your snail poseable, allowing it to “peek” around corners or tilt its head. While not always necessary, this addition takes a standard Crochet Snail Pattern and elevates it into a piece of soft sculpture art.
Don’t forget the importance of the final assembly in your Crochet Snail Pattern. Using pins to hold the shell in place before sewing ensures that everything is symmetrical. A common mistake when working on a Crochet Snail Pattern is rushing the sewing phase, but taking your time with a whip stitch or ladder stitch will ensure that the seams are invisible and the snail is durable.
3 Customizing Your Crochet Snail
Customization is what makes your Crochet Snail Pattern unique to you. One popular trend is adding crochet flowers or tiny leaves to the snail’s shell, making it look like it just crawled out of a whimsical forest. When you follow a Crochet Snail Pattern, consider these additions as “DLC” (downloadable content) for your craft—extra bits of joy that showcase your individual style and creativity.
The color palette you choose for your Crochet Snail Pattern can completely change its “vibe.” Earth tones like moss green, terracotta, and sandy beige create a naturalistic snail. On the other hand, using pastel yarns can turn your Crochet Snail Pattern into a nursery-themed decoration. Some crafters even use glitter yarn for the shell to give it a magical, “slime-trail” sparkle that delights children.
Texture also plays a role in how your Crochet Snail Pattern is perceived. You can use the bobble stitch or popcorn stitch on the shell to give it a bumpy, textured appearance. Most Crochet Snail Pattern instructions are flexible enough to allow for these modifications, provided you maintain the overall stitch count so the shell still fits onto the snail’s back properly.
Don’t ignore the face of your snail! While many Crochet Snail Pattern designs are minimalist, adding a small pink blush with a fabric marker or a bit of real makeup can give your snail a “kawaii” or cute appearance. You can also vary the placement of the eyes in your Crochet Snail Pattern; eyes placed higher on the tentacles look more realistic, while eyes placed on the face look more like a cartoon character.
Seasonality is another way to adapt your Crochet Snail Pattern. You could make a “Santa Snail” with a red and white shell for Christmas, or a “Pumpkin Snail” for Halloween. Because the Crochet Snail Pattern is so iconic, people will recognize the shape regardless of the theme you apply to it, making it a versatile tool in your holiday decorating kit.
Lastly, you can turn your Crochet Snail Pattern into a functional item. By adding a small weight (like clean pebbles or plastic pellets) to the bottom of the body, your snail can become a doorstop or a paperweight. The Crochet Snail Pattern is more than just a toy; with a little imagination, it can be a useful and charming addition to any room in your home.
4 Troubleshooting and Success Tips
One of the most common issues when working on a Crochet Snail Pattern is the shell becoming “lumpy.” This usually happens due to uneven stuffing. To avoid this, use small pieces of fiberfill and distribute them evenly as you work through the Crochet Snail Pattern. Using a chopstick or the end of your crochet hook can help push the stuffing into the narrow parts of the snail’s body.
If you find that your Crochet Snail Pattern is leaning to one side, it might be an issue with your stitch alignment. Since crochet naturally leans slightly to the right (for right-handers), your shell might shift as you work. To fix this, you can occasionally add an extra shift stitch or simply adjust the positioning when you sew the shell to the body at the end of the Crochet Snail Pattern.
Maintaining a clean color change is also vital for a professional-looking Crochet Snail Pattern. Always pull the new color through the last two loops of the previous stitch. This ensures that the new row starts with a crisp, clean line. If your Crochet Snail Pattern involves stripes on the shell, this technique will make your work look much more polished and store-bought.
Counting is the secret weapon of the successful crocheter. It is easy to lose track when working in a spiral, so always double-check your stitch count at the end of every round in the Crochet Snail Pattern. One missing or extra stitch might not seem like much, but it can drastically change the curve of the shell or the shape of the head over several rows.
If your yarn is splitting while you work on the Crochet Snail Pattern, it might be time to switch hooks. Some hooks have a pointier “head” that can pierce the yarn fibers. For amigurumi and the Crochet Snail Pattern, a hook with a smoother, more rounded head is often preferred to keep the stitches tight and the yarn intact, ensuring your snail looks neat and fuzz-free.
Finally, remember that practice makes perfect. Your first attempt at a Crochet Snail Pattern might not be perfect, and that is okay! Each snail you make is an opportunity to improve your tension, your sewing, and your creativity. Save your first snail to see how much you improve as you continue to explore the wonderful world of the Crochet Snail Pattern.
FAQ – Frequently Asked Questions
1. What is the best yarn for a Crochet Snail Pattern?
For most amigurumi projects like a snail, a 100% cotton yarn or a cotton-acrylic blend is best. These yarns are less “fuzzy” than wool, meaning they won’t pill as much over time and they provide the structural integrity needed to keep the snail’s shell upright.
2. Can a beginner complete a Crochet Snail Pattern?
Absolutely! The Crochet Snail Pattern is often recommended for beginners because it uses fundamental stitches. The most “difficult” part is sewing the components together, but with a bit of patience, anyone can master it.
3. How long does it take to finish a Crochet Snail Pattern?
Depending on your speed and the size of the snail, a standard Crochet Snail Pattern can take anywhere from 2 to 5 hours. It is a great “weekend project” that provides instant gratification.
4. How do I make my snail stand up on its own?
To ensure your snail doesn’t tip over, make sure the base of the body is flat and the shell is centered. You can also add a small amount of weighted beads (inside a secure pouch) to the bottom of the body for extra stability.
5. Is the Crochet Snail Pattern safe for babies?
Yes, provided you do not use plastic safety eyes. For infants, it is much safer to embroider the eyes and any other facial features using yarn or embroidery thread to prevent any choking hazards.
6. Can I wash my crochet snail?
If you used cotton or acrylic yarn, you can usually hand wash your snail with mild soap and let it air dry. Avoid machine washing, as the agitation can cause the stuffing to shift or the stitches to stretch.
Conclusion
In this article, we have explored the delightful world of the Crochet Snail Pattern, covering everything from the basic materials needed to the intricate techniques of assembly and customization.
We discussed how to choose the right yarn, the importance of tension, and how to troubleshoot common issues like lumpy stuffing or leaning shells. By following a structured Crochet Snail Pattern, you can create a beautiful, handmade item that serves as a toy, a decoration, or a thoughtful gift.