Creating a Crochet hair elastic – Pattern is one of the most rewarding ways to combine practical utility with artistic flair. In the world of DIY accessories, a crochet hair elastic stands out because it offers a gentle, snag-free alternative to traditional rubber bands while allowing you to express your personal style. Whether you are a seasoned crafter or a complete beginner, finding the right pattern is the first step toward building a collection of custom accessories that match every outfit in your wardrobe.
Many people search for a Crochet hair elastic – Pattern because they want to reduce hair breakage caused by tight, industrial elastics. By covering a standard elastic with soft yarn, you create a barrier that protects the hair shaft while maintaining a secure hold. This fusion of fashion and function has made the crochet hair elastic a staple in the “slow fashion” movement, where quality and handmade charm are prioritized over mass-produced items.
Understanding the mechanics of a Crochet hair elastic – Pattern is simpler than it looks, as most designs rely on basic stitches like the single crochet or double crochet. The beauty of this project lies in its versatility; you can use leftover scrap yarn to create vibrant, colorful pieces in less than twenty minutes. In this comprehensive guide, we will explore everything you need to know about crafting your own hair accessories using a professional pattern that ensures durability and aesthetic appeal.
1. Choosing the Best Materials for Your Crochet Hair Elastic – Pattern
The success of your Crochet hair elastic – Pattern depends heavily on the fiber content of the yarn you select. For a long-lasting crochet hair elastic, most experts recommend using 100% mercerized cotton yarn because it has a beautiful sheen and does not pill over time. Cotton is also sturdy enough to withstand the constant stretching that occurs when you wrap the elastic around a ponytail or bun.
When looking at a pattern, you will notice that yarn weight plays a crucial role in the final texture of the accessory. Using a DK weight or sport weight yarn allows for intricate stitch definition without making the hair elastic feel too bulky or heavy. If you prefer a more “scrunchie” look, you might opt for a velvet yarn or a chenille yarn, which adds a luxurious, soft feel to your crochet hair elastic – pattern.
Don’t forget the “engine” of your project: the elastic hair tie itself. It is vital to choose a high-quality, ouchless elastic that doesn’t have a metal joiner, as these can snap under the pressure of the crochet stitches. A seamless elastic ensures that your pattern remains consistent all the way around the circle, providing a professional finish that looks store-bought but feels uniquely handmade.
The crochet hook size is another essential component listed in any Crochet hair elastic – Pattern. Generally, using a slightly smaller hook than what the yarn label suggests, such as a 3.5mm (E) hook, will result in tighter stitches. Tight stitches are preferable for a crochet hair elastic because they prevent the inner rubber band from peeking through when the accessory is stretched to its limit.
Color selection is where your Crochet hair elastic – Pattern truly comes to life. Since these projects require very little material, you can experiment with variegated yarns or ombre effects to create a high-end look. Many crafters enjoy making a crochet hair elastic in neutral tones like beige, slate, or cream for everyday wear, while using bright neons or deep jewels tones for special occasions or gifts.
Lastly, you will need a few basic notions to finish your pattern successfully. A tapestry needle is required for weaving in the ends securely so they don’t pop out during use. A pair of sharp embroidery scissors will help you achieve clean cuts, ensuring your Crochet hair elastic – Pattern results in a polished, gift-ready accessory that any friend or family member would be delighted to receive.
2. Essential Stitches and Techniques for the Crochet Hair Elastic – Pattern
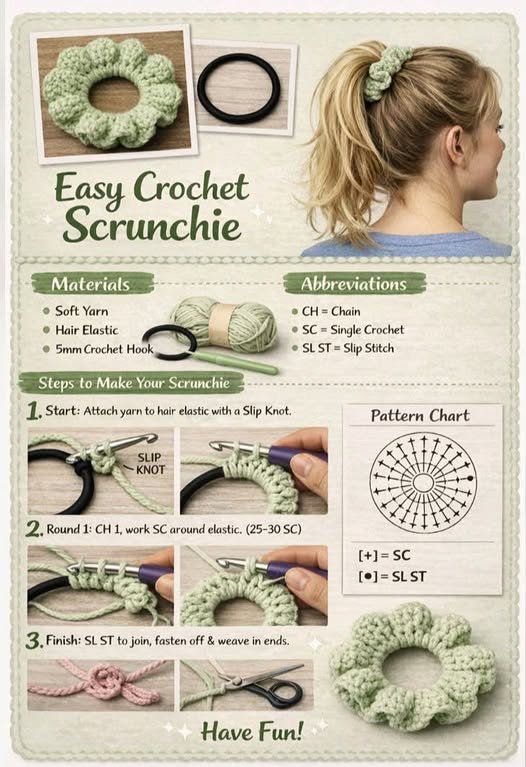
Before diving into the Crochet hair elastic – Pattern, it is helpful to master the slip knot and the slip stitch. These techniques allow you to join your yarn to the elastic band smoothly. Most patterns begin by making a loop on the hook and then performing a single crochet directly around the elastic, which serves as the foundation for the rest of your decorative stitches.
The single crochet (sc) is the workhorse of the crochet hair elastic world. It provides a dense fabric that covers the elastic completely. When following a pattern, you will often be instructed to “crowd” the stitches. This means working more single crochet stitches than you think you need, ensuring that when the elastic stretches, the yarn expands with it rather than showing gaps.
To add volume and ruffles to your Crochet hair elastic – Pattern, you will likely use the double crochet (dc) or treble crochet (tr). By placing three or four double crochet stitches into every single stitch of the previous round, the fabric begins to ripple and wave. This creates that classic crochet scrunchie silhouette that is so popular in modern boho-chic fashion trends and online marketplaces.
Another technique often found in a Crochet hair elastic – Pattern is working in the front loop only (FLO) or back loop only (BLO). This subtle change creates a ribbed texture that adds depth to the crochet hair elastic. Mastering these variations allows you to take a simple pattern and turn it into something that looks complex and sophisticated, even if you are just repeating basic movements.
Consistency in tension is vital when working on a crochet hair elastic. If your tension is too loose, the yarn may sag; if it is too tight, the elastic might lose its ability to stretch. A well-written pattern will guide you through maintaining a balanced flow, ensuring the crochet hair elastic is both functional for holding hair and beautiful as a wrist accessory when not in use.
Finally, finishing the Crochet hair elastic – Pattern requires a seamless join. Instead of a standard slip stitch, many advanced crafters use the invisible join method. This technique makes it impossible to see where the round begins and ends, giving your crochet hair elastic a high-quality, artisanal appearance that distinguishes your work from amateur projects and enhances your brand’s reputation.
3. Step-by-Step Guide to Executing Your Crochet Hair Elastic – Pattern
To start your Crochet hair elastic – Pattern, create a slip knot and place it on your hook. Hold your hair elastic in your non-dominant hand and insert the hook through the center of the ring. Yarn over and pull up a loop, then yarn over and pull through both loops on the hook. You have now made your first single crochet around the elastic, anchoring your yarn for the rest of the project.
Continue working single crochet stitches around the elastic until it is completely covered. As you work, occasionally slide the stitches together to “bunch” them up. This ensures the Crochet hair elastic – Pattern remains opaque even when stretched. For a standard-sized hair tie, you may end up working between 40 and 60 single crochet stitches, depending on your yarn weight and hook size.
Once the foundation round is complete, join with a slip stitch to the first stitch. Now, for the decorative flair of the Crochet hair elastic – Pattern, chain two or three (this counts as your first stitch). In the very same stitch, work two more double crochets. Repeat this “3 dc in each stitch” sequence all the way around the circle to create a lush, ruffled crochet hair elastic.
If you prefer a more minimalist Crochet hair elastic – Pattern, you can skip the ruffles and opt for a shell stitch or a picot border. A picot is created by chaining three and slip-stitching into the first chain, creating a small “point” that looks like lace. This adds a delicate touch to the crochet hair elastic, making it perfect for bridal parties, flower girls, or elegant evening updos.
As you reach the end of your pattern, carefully count your stitches to ensure the ruffles are even. The final slip stitch should be firm. Cut your yarn, leaving a 6-inch tail. The longevity of your crochet hair elastic depends on how well you hide this tail. Use your tapestry needle to weave the tail back through the dense single crochet foundation, going back and forth three times for maximum security.
After finishing your Crochet hair elastic – Pattern, give the accessory a good stretch. This “sets” the stitches and helps the yarn settle into place around the elastic. You now have a custom-made crochet hair elastic that is ready to wear! Repeat this pattern in various colors to create a coordinated set, which also makes for an excellent eco-friendly gift for friends.
4. Maintenance and Customization of Your Crochet Hair Elastic
Caring for your crochet hair elastic is simple, especially if you used cotton yarn. To keep your handmade accessory looking new, it is best to hand wash it in cool water with a mild detergent. Avoid wringing the crochet hair elastic too harshly; instead, pat it dry with a towel and lay it flat. This preserves the integrity of the pattern and ensures the elastic doesn’t lose its snap.
You can easily customize your Crochet hair elastic – Pattern by adding beads or sequins. To do this, thread your beads onto the yarn before you start crocheting. As you work your stitches, slide a bead up to the hook whenever you want to add a bit of sparkle. This “beaded” crochet hair elastic is a fantastic way to elevate a simple pattern into a statement piece of jewelry.
Another popular customization is the use of multi-tonal yarn or “scrap-busting” techniques. By changing colors every round, your Crochet hair elastic – Pattern takes on a vibrant, striped appearance. This is a great way to use up those tiny balls of yarn left over from larger projects like blankets or sweaters, making the crochet hair elastic one of the most sustainable projects in the craft.
For those who want a wider crochet hair elastic, you can add a third round to your pattern. Simply work one single crochet in each stitch of the ruffled round to create a “finished” edge, or add another round of double crochet to make the accessory even larger and more dramatic. The beauty of this pattern is its ability to be scaled up or down based on your preference.
If you are making these for sale, consider adding a custom tag or a “Handmade” label to your crochet hair elastic. Presentation is key when turning a simple pattern into a retail product. Placing the crochet hair elastic on a piece of cardstock not only protects the shape but also provides a professional backdrop that highlights the intricate crochet stitches you worked so hard to create.
In summary, the Crochet hair elastic – Pattern is more than just a craft project; it is an entry point into a world of functional art. By understanding the materials, mastering the stitches, following the steps, and embracing customization, you can create a limitless variety of accessories. This crochet hair elastic will eventually become your favorite go-to project for relaxing afternoons and quick, satisfying results.
FAQ: Frequently Asked Questions about Crochet Hair Elastics
How long does it take to finish a Crochet hair elastic – Pattern?
For most intermediate crocheters, a single crochet hair elastic takes about 15 to 25 minutes. Beginners may take a bit longer as they learn to work around the elastic band, but it is generally considered one of the fastest crochet projects available.
What is the best yarn for a crochet hair elastic?
Mercerized cotton is widely considered the best choice because it is durable, non-stretchy (which provides contrast to the elastic), and has a smooth finish that won’t tangle in your hair. However, velvet yarn is also very popular for a soft, 90s-style scrunchie look.
Can I wash my crochet hair elastic?
Yes! If you used cotton or synthetic yarn, you can wash it. We recommend hand washing and air drying to ensure the elastic inside doesn’t degrade from the high heat of a dryer, which helps your Crochet hair elastic – Pattern last for years.
Does the crochet hair elastic slide out of thin hair?
Actually, a crochet hair elastic often stays in place better than a plain rubber band because the yarn texture provides additional “grip” against the hair strands. If you have very thin hair, use a smaller pattern with fewer ruffles to keep the weight down.
Is this a good project for beginners?
Absolutely. The Crochet hair elastic – Pattern only requires knowledge of the chain, single crochet, and double crochet. It is a low-stakes project that uses very little yarn, making it the perfect “practice” piece for someone new to the craft.
How many stitches should I put around the elastic?
There is no fixed number, but the secret to a good pattern is to cover the elastic completely. You should stitch until you can no longer see the rubber band, then add about 5-10 more stitches to allow for the elastic to be stretched without revealing the core.
Conclusion
In this article, we have explored the delightful world of the Crochet hair elastic – Pattern, covering everything from selecting the perfect cotton yarn to mastering the ruffle technique.
We learned that a crochet hair elastic is not only a stylish accessory but also a practical solution for protecting your hair from damage. By following a structured pattern, using the right hook size, and focusing on tension, anyone can create a professional-grade hair tie that rivals boutique versions.