Creating a Tulip keychain Crochet – Pattern is one of the most rewarding quick projects for both beginners and seasoned crafters looking to add a touch of nature to their daily accessories. These charming little blossoms are not only aesthetically pleasing but also serve as the perfect handmade gift for friends, family, or even as a profitable item for your craft stall. In this comprehensive guide, we will explore everything you need to know about crafting your very own floral accessory using a professional Tulip keychain Crochet – Pattern that ensures a beautiful, durable result every time.
The beauty of working with a Tulip keychain Crochet – Pattern lies in its versatility and the minimal amount of supplies required to get started. You don’t need a massive stash of yarn; in fact, this project is a fantastic “scrap buster” that allows you to use up those small leftovers of cotton or acrylic yarn from larger projects. By following a well-structured Tulip keychain Crochet – Pattern, you can experiment with a rainbow of colors, from classic spring pinks and yellows to moody purples and deep reds, making each piece unique and personal.
As we dive into the specifics of this Tulip keychain Crochet – Pattern, it is important to focus on the small details that make a crochet project stand out. From choosing the right hook size to achieving the perfect tension for a plump, lifelike petal shape, every step contributes to the final charm of your Tulip keychain Crochet – Pattern. Whether you are looking to decorate your keys, enhance your handbag, or create a thoughtful “thank you” gift, mastering this Tulip keychain Crochet – Pattern will provide you with a timeless design that never goes out of style.
1 Understanding the Basics of a Tulip keychain Crochet – Pattern
Before you pick up your hook, it is essential to understand that a Tulip keychain Crochet – Pattern typically relies on basic stitches like the single crochet, half double crochet, and the slip stitch. These fundamental techniques work together to create the bell-like shape of the flower, which is the signature look of any quality Tulip keychain Crochet – Pattern.
Most designers recommend using a mercerized cotton yarn when following a Tulip keychain Crochet – Pattern. This type of yarn provides excellent stitch definition and a slight sheen, which makes the floral details pop and ensures that the keychain remains sturdy even with daily handling and friction against keys.
The structure of a Tulip keychain Crochet – Pattern usually starts with a magic ring, allowing for a seamless bottom to the flower. This technique is crucial because it prevents stuffing from leaking out and gives your Tulip keychain Crochet – Pattern a professional, “store-bought” finish that is highly desirable in the handmade market.
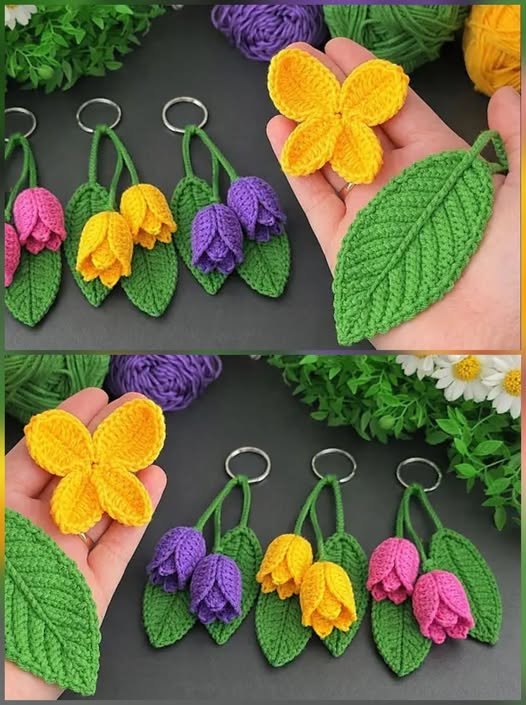
Another key aspect of the Tulip keychain Crochet – Pattern is the “tulip fold” method. After crocheting a simple cylinder or cup shape, the top is pinched and sewn in a specific cross-pattern to create the illusion of four overlapping petals, a hallmark of a clever Tulip keychain Crochet – Pattern.
Don’t forget the green elements! A complete Tulip keychain Crochet – Pattern isn’t finished without a tiny leaf or a green stem. These accents provide a necessary color contrast that makes the vibrant hues of the flower head stand out, completing the botanical look of your Tulip keychain Crochet – Pattern.
Finally, always check your gauge even for small items. While the exact size isn’t vital for a toy, a Tulip keychain Crochet – Pattern works best when the stitches are tight enough to hold the polyester fiberfill stuffing firmly, ensuring your tulip stays plump and keeps its shape over time.
2 Materials and Tools for Your Tulip keychain Crochet – Pattern
To successfully execute a Tulip keychain Crochet – Pattern, you will need a few specific tools that make the process smoother. A 2.5mm or 3.0mm crochet hook is usually the standard choice for this project, as it creates a dense fabric that hides the stuffing inside your Tulip keychain Crochet – Pattern creation.
The yarn choice for your Tulip keychain Crochet – Pattern should ideally be Category 2 (Sport) or Category 3 (DK) weight. Using a yarn that is too thick might result in a bulky flower that feels heavy on a set of keys, while a yarn that is too thin might make the Tulip keychain Crochet – Pattern difficult to see and handle.
You will also need tapestry needles with a blunt tip. These are vital for weaving in ends and performing the final assembly of the petals as dictated by your Tulip keychain Crochet – Pattern. A sharp needle might split the yarn fibers, making the assembly look messy and less durable.
Stitch markers are a lifesaver when working on a Tulip keychain Crochet – Pattern in continuous rounds. Since the rounds are small, it is very easy to lose track of where you started, and a marker ensures you follow the Tulip keychain Crochet – Pattern instructions perfectly without having to recount every single time.
For the “keychain” part of the Tulip keychain Crochet – Pattern, you will need metal lobster clasps or split rings. Attaching these securely is a critical step; you want to ensure the crochet element is fastened tightly so it doesn’t detach while the user is out and about.
Lastly, small amounts of high-quality stuffing are required. A common mistake when finishing a Tulip keychain Crochet – Pattern is overstuffing, which can stretch the stitches and show the white fluff inside. Moderation is key to maintaining the delicate aesthetic of the Tulip keychain Crochet – Pattern.
3 Step-by-Step Instructions for the Tulip keychain Crochet – Pattern
The process begins by creating the base of the flower. Using your chosen yarn and the Tulip keychain Crochet – Pattern, you will likely start with 6 single crochets into a magic circle. This small foundation is the “root” of your blossom and sets the stage for the rest of the Tulip keychain Crochet – Pattern.
In the following rounds of the Tulip keychain Crochet – Pattern, you will perform increases (placing two stitches into one). This expands the circle into a flat base before you transition into straight rounds that build the height of the flower, a standard progression in most Tulip keychain Crochet – Pattern guides.
Once you reach the desired height specified in your Tulip keychain Crochet – Pattern, you will fasten off the yarn, leaving a long tail for sewing. This tail is the “magic wand” that transforms a simple crochet tube into the iconic flower shape described in the Tulip keychain Crochet – Pattern.
To create the petals, you will thread your needle and pull the yarn through the center-top of the tube, alternating sides to create a “+” shape. This technique is the secret sauce of the Tulip keychain Crochet – Pattern, giving the flower its realistic, multi-layered appearance without needing to crochet individual petals.
Next, you will follow the Tulip keychain Crochet – Pattern instructions to create the leaf. This usually involves a chain of 8 to 10 stitches, worked on both sides of the foundation chain to create a pointed, oval shape that perfectly complements the Tulip keychain Crochet – Pattern flower head.
The final assembly involves attaching the leaf to the base or the “stem” chain. Using the Tulip keychain Crochet – Pattern as your blueprint, you will then secure the metal hardware. Double-knotting these connections is highly recommended to ensure the longevity of your Tulip keychain Crochet – Pattern masterpiece.
4 Tips for Customizing Your Tulip keychain Crochet – Pattern
One of the best things about a Tulip keychain Crochet – Pattern is how easy it is to personalize. You can use variegated yarn to create a “parrot tulip” effect, where colors blend seamlessly into one another, adding a sophisticated level of detail to your Tulip keychain Crochet – Pattern without any extra effort.
Adding a small scented bead or a drop of essential oil to the stuffing inside your Tulip keychain Crochet – Pattern can turn a simple accessory into a sensory experience. This is a popular trend for those who use the Tulip keychain Crochet – Pattern to create car diffusers or wardrobe fresheners.
If you want a more “kawaii” or cute look, you can add safety eyes and a small embroidered smile to the side of the flower. This modification of the standard Tulip keychain Crochet – Pattern turns the flower into a little character, which is especially popular with younger audiences and fans of amigurumi.
For a more elegant version of the Tulip keychain Crochet – Pattern, consider adding small seed beads to the edges of the “petals” or the leaf. Crocheting with beads requires a bit more patience, but it elevates the Tulip keychain Crochet – Pattern into a piece of handmade jewelry.
You can also adjust the size of your Tulip keychain Crochet – Pattern by simply changing the yarn weight and hook size. A Tulip keychain Crochet – Pattern worked with lace weight yarn and a 1.0mm hook results in a tiny, delicate charm, while using chunky yarn creates a large, plushy statement piece.
Finally, consider making a “bouquet” keychain. Instead of just one flower, follow the Tulip keychain Crochet – Pattern three times in different colors and attach them all to a single ring. This creates a lush, full look that maximizes the visual impact of your Tulip keychain Crochet – Pattern skills.
FAQ – Frequently Asked Questions
How long does it take to finish a Tulip keychain Crochet – Pattern?
For most intermediate crocheters, a single tulip takes about 30 to 45 minutes. Beginners might take slightly longer as they get used to the “tulip fold” assembly technique.
What is the best yarn for a Tulip keychain Crochet – Pattern?
Cotton yarn is widely considered the best choice because it is durable, doesn’t pill easily, and provides the crisp stitch definition needed for floral shapes.
Can I wash my crochet tulip?
Yes, if you use cotton or acrylic yarn. It is best to hand wash the item in cool water and air dry it to maintain the shape and protect the metal keychain hardware.
Do I need to be an expert to follow a Tulip keychain Crochet – Pattern?
Not at all! This project is beginner-friendly. If you know how to make a chain, a single crochet, and an increase, you can successfully complete this pattern.
How do I prevent the stuffing from showing?
Use a smaller hook than the yarn label recommends. This creates tighter stitches that act as a barrier, keeping the fiberfill hidden inside the flower.
Is it okay to sell items made from this Tulip keychain Crochet – Pattern?
Generally, yes! Most designers encourage crafters to sell their finished physical items, though it is always polite to credit the pattern source.
Conclusion
In this article, we have explored the delightful world of the Tulip keychain Crochet – Pattern, covering everything from the essential materials to the intricate assembly steps. We learned that the secret to a beautiful tulip lies in the combination of the right yarn, a tight gauge, and the clever folding technique that brings the petals to life.
Whether you are making these for yourself or as gifts, the Tulip keychain Crochet – Pattern offers a perfect blend of simplicity and elegance. By mastering this pattern, you now have a go-to project that is both fast to make and universally loved.