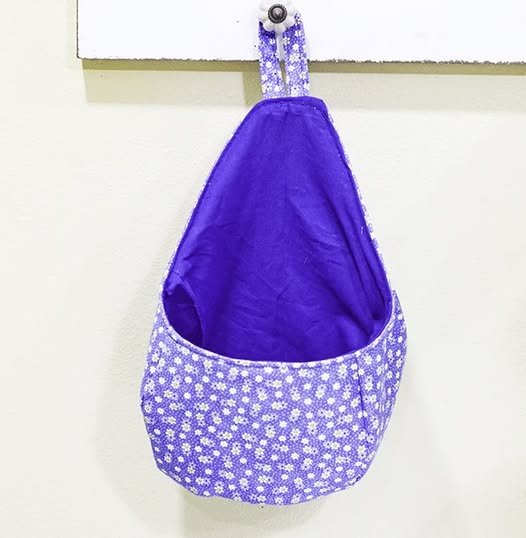
The Hanging Organizer with Round Fabric Bottom – Pattern is one of the most versatile and rewarding sewing projects you can undertake to transform your home storage. Whether you are looking to declutter a nursery, organize your craft room, or simply add a touch of handmade charm to your entryway, this specific design offers a unique blend of structural integrity and aesthetic appeal. By following a well-crafted Hanging Organizer with Round Fabric Bottom – Pattern, you can create a durable solution that holds its shape far better than standard flat-bottomed bags, ensuring your items remain secure and accessible.
In the world of interior design and DIY organization, the Hanging Organizer with Round Fabric Bottom – Pattern stands out because it maximizes vertical space while utilizing a circular geometric base that provides stability. Many enthusiasts prefer this storage pattern because it allows for a “bucket-style” opening that doesn’t collapse on itself, making it much easier to drop items in or take them out with one hand. As we dive into the details of this project, you will find that choosing the right sewing materials and understanding the construction of a circular base are the keys to a professional-looking result.
When you begin searching for the perfect Hanging Organizer with Round Fabric Bottom – Pattern, it is essential to look for instructions that prioritize both form and function. This article will guide you through the intricacies of the design, from selecting heavy-duty interfacing to mastering the curved seam technique. By the end of this guide, you will have a comprehensive understanding of how to execute this DIY home decor project and how to customize it to fit your personal style, ensuring your fabric organizer is as beautiful as it is useful.
1. Selecting the Best Materials for Your Hanging Organizer with Round Fabric Bottom – Pattern
Choosing the right fabric is the foundational step when working with a Hanging Organizer with Round Fabric Bottom – Pattern. For a project that needs to hold weight, duck canvas, denim, or heavyweight upholstery fabric are the top recommendations. These materials provide the necessary “body” to ensure your hanging storage doesn’t sag or stretch out of shape over time.
To ensure your Hanging Organizer with Round Fabric Bottom – Pattern remains upright and open, you must use high-quality fusible interfacing. Specifically, look for Pellon 809 or a similar firm stabilizer. This extra layer is what gives the round fabric bottom its stiff, plate-like quality, allowing the organizer to behave more like a basket than a limp bag.
The hanging mechanism is another critical component of the Hanging Organizer with Round Fabric Bottom – Pattern. You can use cotton webbing, leather straps, or even heavy-duty grommets. Using reinforced stitching, such as a “box-X” stitch, where the strap meets the fabric, is a professional SEO-friendly sewing tip that ensures longevity and safety for heavier items.
Don’t forget the importance of the lining fabric. While the exterior of your Hanging Organizer with Round Fabric Bottom – Pattern should be rugged, the interior is a great place to use a pop of color or a playful print. Using a contrast lining not only makes the project more attractive but also makes it easier to see small items tucked away inside the dark corners of the organizer.
Thread selection is often overlooked but vital for any heavy-duty sewing pattern. I recommend using polyester upholstery thread or a heavy-duty topstitching thread. When sewing through multiple layers of canvas and interfacing required by the Hanging Organizer with Round Fabric Bottom – Pattern, a size 90/14 or 100/16 denim needle will prevent skipped stitches and needle breakage.
Lastly, consider adding decorative hardware to your Hanging Organizer with Round Fabric Bottom – Pattern. Elements like brass rivets or nickel swivel hooks can elevate a simple DIY project into a high-end boutique item. These small details improve the aesthetic value and functionality, making it easier to move the storage pod from a wall hook to a closet rod.
2. Mastering the Circular Base Construction Technique
The most challenging yet rewarding part of the Hanging Organizer with Round Fabric Bottom – Pattern is attaching the side panel to the circular floor. To achieve a smooth, pucker-free finish, you must use precision clipping. After pinning your pieces together, making small snips into the seam allowance of the side panel allows the fabric to spread and mold to the round bottom shape.
When sewing the Hanging Organizer with Round Fabric Bottom – Pattern, slow and steady wins the race. Use a walking foot if your sewing machine has one, as this helps feed the top and bottom layers of fabric evenly. This is especially important when navigating the curved seams of the circular fabric base, where the fabric is prone to shifting and creating unwanted folds.
Proper notching is a secret technique used by professionals when following a Hanging Organizer with Round Fabric Bottom – Pattern. By cutting small “V” shapes into the seam allowance after sewing, you remove excess bulk. This ensures that when you turn the organizer right side out, the bottom edge remains a perfect, crisp circle rather than a lumpy or distorted shape.
For those who want a truly “pro” look for their Hanging Organizer with Round Fabric Bottom – Pattern, consider adding piping around the bottom edge. Adding corded piping defines the circular shape and provides an extra layer of protection against wear and tear on the bottom of the storage unit. It adds a structural “skeleton” that keeps the fabric round bottom rigid.
Ironing is your best friend when executing the Hanging Organizer with Round Fabric Bottom – Pattern. You should press your seams as you go, not just at the end. Using a tailor’s ham can help you press the curved bottom seam accurately, ensuring the interfacing adheres perfectly and the fabric stays taught and professional-looking throughout the assembly process.
The final step in the base construction of your Hanging Organizer with Round Fabric Bottom – Pattern involves a topstitch. Running a line of stitching about 1/8 inch from the bottom edge on the exterior not only looks great but also locks the seam allowance in place inside. This prevents the lining from bunching up and ensures your hanging basket maintains its iconic silhouette.
3. Customizing Dimensions and Scaling Your Pattern
One of the best features of a Hanging Organizer with Round Fabric Bottom – Pattern is its scalability. You can easily adjust the diameter of the circle and the height of the side panel to create a set of graduated organizers. Small versions are perfect for desk supplies, while larger versions can hold towels or even stuffed animals in a child’s room.
When modifying the Hanging Organizer with Round Fabric Bottom – Pattern, remember the mathematical formula for the circumference ($C = 2\pi r$). To ensure your side panel fits perfectly around your round bottom, the length of the fabric rectangle must match the circumference of the circle plus a seam allowance. Precision at this stage prevents frustrating gaps during assembly.
If you are using the Hanging Organizer with Round Fabric Bottom – Pattern for heavy items like tools or large bottles, consider adding internal pockets. You can sew these onto the lining piece before assembling the main body. This adds a layer of organizational complexity that makes the hanging pod even more useful for specialized storage needs.
A popular variation for the Hanging Organizer with Round Fabric Bottom – Pattern is the slanted opening. By cutting the top of the side panel at an angle, you create a “scoop” shape. This makes the organizer look more modern and provides easier access to items stored at the back, which is a common feature in high-end hanging wall pockets.
For those who love the boho-chic style, you can adapt the Hanging Organizer with Round Fabric Bottom – Pattern by using macramé accents or fringe. Simply sew the fringe into the side seam or around the top rim. Mixing textures like burlap and lace can turn a functional utility pattern into a piece of handmade art for your home.
You can also make your Hanging Organizer with Round Fabric Bottom – Pattern reversible. By using two different high-quality fabrics and finishing the top edge with bias tape or a “turn-through” method, you essentially get two designs in one. This is a great SEO strategy for sellers on platforms like Etsy, as “reversible” is a highly searched keyword for handmade goods.
4. Care and Maintenance of Your Fabric Organizer
To keep your creation from the Hanging Organizer with Round Fabric Bottom – Pattern looking new, you must follow proper fabric care. If you used interfacing, it is generally best to spot clean the organizer with a damp cloth and mild detergent. Submerging it in a washing machine can sometimes cause the stabilizer to detach or “bubble,” ruining the structural integrity.
If your Hanging Organizer with Round Fabric Bottom – Pattern becomes wrinkled, use a steam iron with a pressing cloth. High heat can help reset the shape of the round bottom, but be careful not to melt any synthetic fibers or adhesives. Steaming from the inside out is often the most effective way to remove stubborn creases without flattening the 3D shape.
Over time, the hanging loop of your Hanging Organizer with Round Fabric Bottom – Pattern may experience stress. Periodically check the stitching where the strap connects to the body. If you notice any fraying, you can reinforce the area with a zigzag stitch or by adding a metal rivet for extra security, extending the life of your storage solution.
For organizers kept in high-moisture areas like bathrooms or kitchens, consider using a fabric protector spray like Scotchgard. This creates a barrier against water and stains, ensuring that the Hanging Organizer with Round Fabric Bottom – Pattern you worked so hard on doesn’t develop mildew or get ruined by accidental spills of toiletries or oils.
If you find that the round fabric bottom starts to sag after months of holding heavy items, you can insert a removable plastic base. Simply cut a circle from a flexible plastic cutting mat and place it at the bottom. This is a clever DIY hack that complements any Hanging Organizer with Round Fabric Bottom – Pattern and provides industrial-strength support.
Finally, remember that the Hanging Organizer with Round Fabric Bottom – Pattern is a textile product, so it can be refreshed by placing it in a dryer on a “fluff” or “air dry” setting for a few minutes. This helps remove dust and can tighten the fibers of the outer fabric, keeping your handmade organizer looking crisp, clean, and ready to keep your life organized for years to come.
FAQ – Frequently Asked Questions
How do I calculate the fabric size for a round bottom?
To find the length of your side panel, multiply the diameter of your circle by $3.14$ ($\pi$) and add your seam allowance (usually 1 inch total). The height is entirely up to your preference based on what you plan to store.
What is the best interfacing for a stiff hanging organizer?
For the best results with a Hanging Organizer with Round Fabric Bottom – Pattern, use a heavyweight fusible stabilizer like Pellon Peltex or Decor-Bond. This ensures the organizer keeps its “bucket” shape even when empty.
Can I make this project without a sewing machine?
While possible, it is not recommended. The thick layers of canvas and interfacing required for a sturdy Hanging Organizer with Round Fabric Bottom – Pattern are very difficult to penetrate by hand. A machine with a denim needle is the most efficient method.
How do I hang the organizer safely?
You should use a sturdy wall hook or a wooden dowel. Ensure the hanging loop is made of reinforced webbing or thick fabric strips, and always use a “Box-X” stitch pattern to attach the loop to the organizer body.
Is this pattern suitable for beginners?
Yes, it is a fantastic “intermediate-beginner” project. The most difficult part is sewing the curve of the round fabric bottom, but with plenty of pins and a slow sewing speed, most beginners can successfully complete this DIY pattern.
What can I store in a round-bottom organizer?
The Hanging Organizer with Round Fabric Bottom – Pattern is perfect for mail, nursery supplies (diapers/wipes), knitting yarn, kitchen snacks, or bathroom toiletries. The round shape prevents items from getting “lost” in corners.
Conclusion
In this article, we have explored every aspect of creating a high-quality Hanging Organizer with Round Fabric Bottom – Pattern. We discussed the critical importance of selecting heavy-duty fabrics and stabilizers, the technical steps for mastering circular seams, and the various ways you can scale and customize the storage pattern to fit your specific needs.
Additionally, we covered essential care tips to ensure your handcrafted organizer remains a functional part of your home for a long time. This project is more than just a sewing exercise; it is a way to bring order and personalized style to any room.