A Patchwork Egg – Pattern is more than just a simple craft project; it is a celebration of texture, color, and traditional handiwork that brings a touch of vintage charm to modern decor. Whether you are preparing for a festive holiday or simply looking for a creative way to use up your favorite fabric scraps, mastering the art of the Patchwork Egg – Pattern allows you to transform humble materials into stunning decorative keepsakes. In this comprehensive guide, we will explore the intricate details of creating these fabric treasures, focusing on the techniques that make your quilting project stand out with professional flair.
The beauty of a Patchwork Egg – Pattern lies in its versatility and the endless possibilities for customization through fabric selection and stitching styles. By combining different prints, such as florals, dots, and solids, you can create a cohesive yet eclectic look that reflects your personal aesthetic. This project is particularly popular among DIY enthusiasts and seasoned quilters alike because it requires minimal space and materials while offering a high level of creative satisfaction. As we dive into the process, you will see how a well-executed sewing pattern can turn small bits of cloth into a symbolic piece of art.
Understanding the foundational elements of a Patchwork Egg – Pattern is essential for anyone looking to improve their textile art skills or start a new hobby. From selecting the right interfacing to mastering the blind stitch, every step plays a crucial role in the final silhouette of the egg. Throughout this article, we will break down the essential components of the Patchwork Egg – Pattern, providing you with the insights needed to navigate the complexities of curved seam sewing and fiberfill stuffing. Get ready to enhance your crafting repertoire with a project that is as rewarding to make as it is beautiful to display.
1. Understanding the Essentials of a Patchwork Egg – Pattern
The core of a successful project begins with a high-quality Patchwork Egg – Pattern that provides clear dimensions and seam allowances. Using a precise template ensures that each panel of your egg fits perfectly with the next, preventing unsightly puckers or gaps in the finished product.
When working with a Patchwork Egg – Pattern, the choice of fabric is paramount to achieving a professional look. Lightweight quilting cotton is often the preferred choice because it is easy to manipulate around the tight curves of the egg shape without adding excessive bulk.
To give your Patchwork Egg – Pattern its iconic three-dimensional form, you must focus on the grainline of the fabric. Aligning your pattern pieces correctly with the grain helps the fabric stretch evenly, which is vital when you begin the stuffing process later on.
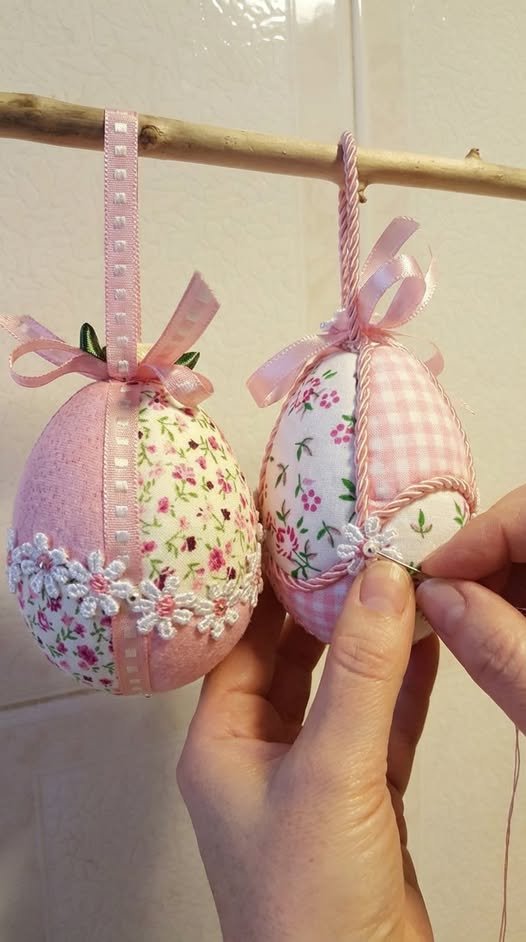
A key term in this craft is fussy cutting, which involves positioning your Patchwork Egg – Pattern over a specific motif on your fabric. This technique allows you to highlight a particular flower or character, making each segment of the egg a unique focal point.
Precision in pinning cannot be overstated when executing a Patchwork Egg – Pattern. Because you are working with convex and concave curves, using fine silk pins helps hold the fabric layers in place without distorting the delicate edges of the cotton.
Finally, a Patchwork Egg – Pattern often incorporates embroidery details to hide the seams or add extra personality. Adding a simple blanket stitch or a few French knots can elevate a basic fabric egg into a sophisticated piece of handmade decor.
2. Preparing Materials and Cutting for Your Pattern
Before you begin cutting into your fabric, you must ensure your Patchwork Egg – Pattern is printed or traced at the correct scale. Any discrepancy in the size of the paper template will be magnified once the pieces are sewn together, affecting the overall symmetry.
Gathering your sewing notions is the next step in bringing your Patchwork Egg – Pattern to life. You will need sharp fabric shears, a reliable marking pen, and high-quality all-purpose thread that matches the dominant colors of your chosen fabric scraps.
Ironing your fabric is a non-negotiable step when working with a Patchwork Egg – Pattern. Any wrinkles in the material can lead to inaccurate cuts, which ultimately compromises the integrity of the seams and the smoothness of the egg’s surface.
The Patchwork Egg – Pattern usually consists of four to six identical segments, depending on the desired roundness. To save time, many crafters layer their fabrics and cut multiple pieces at once, though care must be taken to prevent the fabric layers from shifting.
If you are using very thin fabrics, applying a lightweight fusible interfacing to the back of your Patchwork Egg – Pattern pieces can provide much-needed stability. This prevents the fabric from fraying and helps it hold the weight of the polyester stuffing.
Organization is key during the cutting phase of the Patchwork Egg – Pattern. Keeping your cut pieces paired with their corresponding fabric prints will make the assembly process much faster and reduce the likelihood of sewing the wrong pieces together.
3. Mastering the Assembly and Sewing Techniques
The actual construction of the Patchwork Egg – Pattern starts with sewing the segments in pairs. Using a short stitch length on your sewing machine is recommended, as it creates a stronger bond that can withstand the pressure of being stuffed.
When sewing the curves of the Patchwork Egg – Pattern, it is helpful to go slowly and use the pivot method. By keeping the needle down and slightly lifting the presser foot, you can navigate the sharp turns of the egg shape without creating jagged edges.
Clipping the seam allowances is a vital trick for any Patchwork Egg – Pattern. Making small V-shaped notches along the curves allows the fabric to lay flat once the egg is turned right side out, ensuring a smooth and rounded silhouette.
Once the segments of your Patchwork Egg – Pattern are joined, you will have a small opening left for turning. This is where your patience pays off; carefully pushing the fabric through the hole requires a gentle touch to avoid popping any delicate stitches.
The stuffing phase is where the Patchwork Egg – Pattern truly takes shape. Using small clumps of premium poly-fill, start from the ends and work toward the middle, ensuring the egg is firm but not so overstuffed that the seams begin to pull or tear.
Closing the final gap in your Patchwork Egg – Pattern is best done with a ladder stitch. This “invisible” hand-sewing technique allows you to pull the edges together seamlessly, leaving no trace of how the egg was finished and giving it a professional boutique look.
4. Advanced Customization and Finishing Touches
To make your Patchwork Egg – Pattern even more unique, consider adding a hanging loop made of ribbon or twine. This allows the eggs to be displayed on branches or as part of a garland, increasing their utility in your home’s seasonal styling.
Another popular variation for the Patchwork Egg – Pattern is the use of raw-edge appliqué. Instead of traditional seams, you can layer fabrics and use a decorative zigzag stitch to create a more rustic, “shabby chic” appearance that is very popular in the crafting community.
Incorporating vintage lace or tiny buttons into your Patchwork Egg – Pattern can add a layer of nostalgia. These embellishments should be sewn onto the individual segments before the egg is fully assembled to ensure they are securely attached.
For those who enjoy scented crafts, adding a small pouch of dried lavender inside the Patchwork Egg – Pattern can turn it into a lovely sachet. This makes the egg a sensory experience and a perfect handmade gift for friends and family.
If you are creating a set of eggs, try varying the scale of your Patchwork Egg – Pattern. A collection of large, medium, and small eggs creates visual interest and allows you to experiment with different color palettes across the various sizes.
Finally, protecting your finished Patchwork Egg – Pattern is important if you plan to use it year after year. A light misting of fabric protector can help prevent staining and keep the colors of your patchwork masterpiece vibrant for many seasons to come.
Frequently Asked Questions (FAQ)
What is the best fabric for a Patchwork Egg – Pattern?
The best fabric is 100% cotton, specifically quilting cotton. It has the right balance of flexibility and durability, making it easy to sew into curved shapes without slipping or stretching excessively.
Can I sew a Patchwork Egg – Pattern by hand?
Yes, absolutely! While a machine is faster, hand sewing provides more control over the curves. Many crafters prefer the slow process of hand-stitching as a form of “slow-crafting” meditation.
How do I make the egg perfectly round?
The secret lies in the clipping of the seams and the way you stuff it. Make sure to use small pieces of stuffing and use a blunt tool (like a chopstick) to push the filling into every corner of the pattern segments.
Is this project suitable for beginners?
Yes, it is a great beginner-friendly project. It teaches the fundamentals of curves, seam management, and finishing techniques on a small, manageable scale.
What size should my Patchwork Egg – Pattern be?
Standard decorative eggs are usually between 3 to 5 inches tall. However, you can scale the PDF pattern up or down depending on whether you want a bowl filler or a large centerpiece.
How do I clean my patchwork eggs?
It is best to spot clean them with a damp cloth. Since they are filled with polyester fiberfill, machine washing might cause the egg to lose its shape or the stuffing to clump.
Conclusion
In conclusion, creating a Patchwork Egg – Pattern is a delightful journey into the world of textile design and creative recycling. We have covered everything from selecting the right cotton fabrics and preparing your templates to mastering the tricky curves and finishing with an invisible ladder stitch.
This project not only helps you reduce your fabric scrap pile but also results in a charming piece of home decor that carries the warmth of a handmade item. By following these SEO-optimized tips and techniques, you are well on your way to producing high-quality crafts that look professional and last for years.