Creating your own Bunny-Shaped Goody Bags – Pattern is one of the most delightful ways to add a personalized, handcrafted touch to spring celebrations, birthday parties, or festive holiday gatherings. There is something inherently charming about a small pouch with floppy ears that holds sweet treats, and mastering a Bunny-Shaped Goody Bags – Pattern allows you to create these memories for your loved ones with just a few simple materials. In this guide, we are going to dive deep into the world of fabric and yarn crafts to ensure you can produce professional-looking results every single time you sit down to work.
When you choose a high-quality Bunny-Shaped Goody Bags – Pattern, you are not just following instructions; you are engaging in a creative process that blends utility with whimsical design. These bags are incredibly popular for Easter egg hunts, but they also serve as fantastic party favors for woodland-themed baby showers or school events where a bit of “bunny magic” is needed. Using a Bunny-Shaped Goody Bags – Pattern gives you the structural foundation to make sure the ears stand up straight and the belly of the bunny is spacious enough to hold everything from chocolate eggs to small toys.
The beauty of a modern Bunny-Shaped Goody Bags – Pattern lies in its versatility across different mediums, whether you prefer sewing with cotton fabrics or crocheting with soft pastel yarns. By following a structured Bunny-Shaped Goody Bags – Pattern, you ensure that the proportions are anatomically cute—making sure the face is inviting and the closure is secure so no goodies fall out during transport. Throughout this comprehensive article, we will explore the best materials, the technical execution of the design, and the little details that will make your Bunny-Shaped Goody Bags – Pattern the star of any event.
1. Selecting Materials for Your Bunny-Shaped Goody Bags – Pattern
The first step in bringing your Bunny-Shaped Goody Bags – Pattern to life is choosing a material that is both durable and visually appealing for the intended recipient. If you are sewing your bags, look for 100% cotton fat quarters which offer a wide variety of prints, from classic carrots to subtle floral designs that complement the bunny theme. If you are opting for a yarn-based Bunny-Shaped Goody Bags – Pattern, a soft worsted weight acrylic or cotton blend is ideal because it holds its shape while remaining soft to the touch.
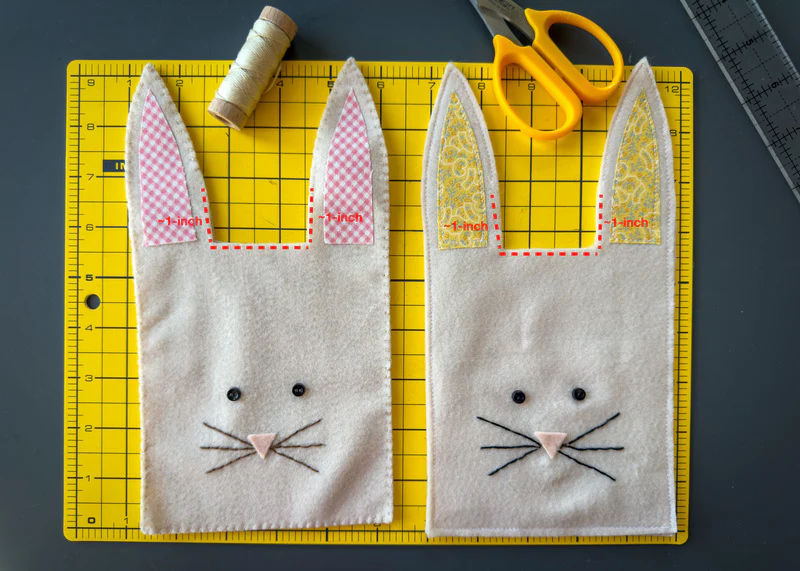
Color selection is a vital component of any Bunny-Shaped Goody Bags – Pattern because it sets the entire mood of the project. Traditionalists often stick to whites, creams, and soft greys to mimic the natural look of a rabbit, while those looking for a modern twist might use vibrant teals or even sparkly metallic threads. When you are looking at your Bunny-Shaped Goody Bags – Pattern, consider using a contrasting fabric for the inner ears to create a “pop” of color that draws the eye and makes the bunny look more dimensional.
Hardware and closures are often overlooked when starting a Bunny-Shaped Goody Bags – Pattern, but they are essential for functionality. Most patterns will call for a drawstring closure, which is easiest for small children to open and close without frustration. You can use satin ribbons, waxed cotton cords, or even braided yarn to pull the top of the bag together. Choosing a high-quality cord ensures that your Bunny-Shaped Goody Bags – Pattern remains functional through many uses and doesn’t fray after the first party.
If you want your Bunny-Shaped Goody Bags – Pattern to have a bit of personality, don’t forget the embellishments like safety eyes or embroidery floss for the nose and whiskers. Safety eyes provide a polished, toy-like appearance, but if the bags are for infants, it is safer to use hand-embroidered features to avoid choking hazards. A pink satin-stitch nose and simple “V” shaped mouth are the hallmark features of a classic Bunny-Shaped Goody Bags – Pattern that everyone recognizes and loves.
Internal lining is a secret trick that takes a standard Bunny-Shaped Goody Bags – Pattern to a boutique level of quality. Lining the bag prevents loose threads from catching on candy wrappers and gives the entire structure more “body” so it stands upright on a table. When you follow a Bunny-Shaped Goody Bags – Pattern that includes lining instructions, you are ensuring that the interior is just as beautiful as the exterior, which reflects great attention to detail.
Lastly, consider the weight of the items you plan to put inside your Bunny-Shaped Goody Bags – Pattern before you finalize your fabric choice. If you are filling them with heavy items like stone-filled eggs or jars of jam, you may need to reinforce the bottom of the Bunny-Shaped Goody Bags – Pattern with a layer of interfacing. This extra step ensures that the bunny doesn’t sag or lose its cute shape when it is fully loaded with treats and gifts.
2. Technical Assembly of the Bunny-Shaped Goody Bags – Pattern
Success with a Bunny-Shaped Goody Bags – Pattern depends heavily on how you handle the “ear” construction, as this is the most defining feature of the design. Most patterns will have you cut four ear pieces (two for the front and two for the back/lining) and sew them together before attaching them to the main body. When working on this part of the Bunny-Shaped Goody Bags – Pattern, using a smaller seam allowance helps maintain the sharp curves of the ears, making them look more realistic and upright.
The “body” of the Bunny-Shaped Goody Bags – Pattern is usually a simple cylinder or a rounded pouch, which is perfect for beginners to practice their straight seams. If you are using a crochet Bunny-Shaped Goody Bags – Pattern, you will likely work in the round to create a seamless finish that looks clean and professional. It is important to maintain a tight tension throughout the body of the bag so that small candies or tiny toys don’t slip through any gaps between the stitches.
Creating the drawstring channel is the next crucial phase of the Bunny-Shaped Goody Bags – Pattern. This usually involves folding down the top edge of the bag and sewing a “casing” where the ribbon will slide through. In a high-quality Bunny-Shaped Goody Bags – Pattern, this casing is placed just below where the ears are attached, allowing the ears to flop naturally above the tied ribbon. Precision here is key, as a crooked casing will make the Bunny-Shaped Goody Bags – Pattern look lopsided when it is gathered.
Once the main structure of your Bunny-Shaped Goody Bags – Pattern is sewn, you must turn the project right-side out and use a point turner or a chopstick to push out the tips of the ears. This ensures that the points are crisp and that the Bunny-Shaped Goody Bags – Pattern looks exactly like the photos in the instructions. It is these small, technical finishing moves that elevate the project from a simple craft to a professional-grade gift bag.
Attaching the face should ideally happen before the final assembly of the Bunny-Shaped Goody Bags – Pattern if you are using a sewing machine, or after if you are hand-sewing. Many crafters find that marking the face with a disappearing ink pen before stitching ensures that the bunny’s expression is symmetrical. Following the placement guide in your Bunny-Shaped Goody Bags – Pattern is the best way to ensure the eyes and nose are perfectly centered for maximum cuteness.
Finally, the tail of the bunny is a fun addition that adds a 3D element to your Bunny-Shaped Goody Bags – Pattern. A fluffy pom-pom made of yarn or a small circle of faux fur can be hand-sewn onto the back of the bag. This detail not only completes the look of the Bunny-Shaped Goody Bags – Pattern but also provides a bit of stability, helping the bag lean back slightly and stay upright when placed on a flat surface like a mantel or a party table.
3. Customizing Your Bunny-Shaped Goody Bags – Pattern for Different Events
One of the greatest advantages of a well-written Bunny-Shaped Goody Bags – Pattern is its ability to be scaled up or down depending on your needs. If you need a giant bunny bag to hold a large plush toy, you can simply increase the dimensions of the Bunny-Shaped Goody Bags – Pattern by 200% and use a thicker fabric like felt or fleece. For wedding favors, you can scale the Bunny-Shaped Goody Bags – Pattern down to a miniature size that holds exactly two luxury truffles.
Themers often find that changing the “ears” in a Bunny-Shaped Goody Bags – Pattern can transform the character entirely. If you want a “Lop-Eared” bunny, you can modify the Bunny-Shaped Goody Bags – Pattern to make the ears longer and sew them so they hang downwards instead of pointing up. This slight modification shows how a single Bunny-Shaped Goody Bags – Pattern can be used to create an entire “warren” of different bunny breeds for a diverse and interesting display.
Seasonal variations are easy to implement once you have mastered the basic Bunny-Shaped Goody Bags – Pattern. For a “Winter Bunny,” you might use a white minky or velvet fabric with silver ribbon to give it a frosty, elegant look. For a “Garden Bunny,” a Bunny-Shaped Goody Bags – Pattern executed in rustic burlap with twine drawstrings creates a farmhouse aesthetic that is very popular for outdoor spring weddings or rustic home decor.
Personalization is another way to make your Bunny-Shaped Goody Bags – Pattern stand out. Using a heat-transfer vinyl (HTV) or a fabric marker, you can add names or the year to the back of the bunny’s ears. This turns a simple Bunny-Shaped Goody Bags – Pattern into a cherished keepsake that children will want to keep in their rooms long after the candy inside has been eaten. It adds a layer of thoughtfulness that store-bought bags simply cannot replicate.
For those who love to crochet, adding beaded accents to the drawstring of your Bunny-Shaped Goody Bags – Pattern can add a touch of sophistication. Sliding a few wooden beads onto the ends of the ribbon or yarn ties gives the bag a finished, high-end look. When you combine the soft texture of the Bunny-Shaped Goody Bags – Pattern with natural wood elements, you achieve a “Montessori-style” aesthetic that is very trendy in modern nursery design.
If you are making these for a large group, you can speed up the process by using a “batch-work” approach with your Bunny-Shaped Goody Bags – Pattern. Cut all your fabric pieces at once, sew all the ears in one go, and then assemble the bodies. This systematic way of following the Bunny-Shaped Goody Bags – Pattern ensures that all your bags are consistent in size and quality, which is especially important if you are selling them at craft fairs or through an online shop.
4. Care and Maintenance of Handcrafted Bunny Bags
Because a Bunny-Shaped Goody Bags – Pattern is often used for candies that might melt or sticky treats, knowing how to clean them is essential. If you used high-quality cotton for your Bunny-Shaped Goody Bags – Pattern, most can be turned inside out and placed in a mesh laundry bag for a gentle wash. However, if your Bunny-Shaped Goody Bags – Pattern includes delicate pom-poms or hand-painted details, spot cleaning with a damp cloth is the much safer route to preserve the design.
Ironing your bags after a wash can help them regain the crisp shape intended by the Bunny-Shaped Goody Bags – Pattern. Pay special attention to the ears; a little bit of spray starch can help them stand upright again if they have become floppy over time. When you take the time to press your finished Bunny-Shaped Goody Bags – Pattern, it instantly looks more professional and “store-bought” in the best possible way, showing off your sewing or crochet skills.
Storage is another factor to consider if you plan to reuse your Bunny-Shaped Goody Bags – Pattern every year. It is best to store them flat in a cool, dry place to prevent the fabric from yellowing or the yarn from attracting dust. If your Bunny-Shaped Goody Bags – Pattern has safety eyes, make sure they aren’t pressed against something heavy that could scratch the plastic. Proper storage ensures that your hard work lasts for many seasons to come.
If you notice a thread coming loose or a seam popping on your Bunny-Shaped Goody Bags – Pattern, address it immediately with a quick needle and thread. Small repairs are easy to do on these compact items, and it prevents a tiny hole from becoming a major tear. A well-maintained Bunny-Shaped Goody Bags – Pattern project can be passed down through siblings or even generations, becoming a staple of your family’s holiday traditions.
For those using these as “eco-friendly” alternatives to plastic, the sustainability of the Bunny-Shaped Goody Bags – Pattern is a huge selling point. You can explain to gift recipients that their Bunny-Shaped Goody Bags – Pattern is a zero-waste product that can be used to store jewelry, hair ties, or small collectibles after the party is over. This adds value to the gift and highlights the practicality of the Bunny-Shaped Goody Bags – Pattern beyond its initial festive purpose.
Ultimately, the joy of completing a Bunny-Shaped Goody Bags – Pattern comes from the smiles it brings to those who receive it. Whether you are a hobbyist or a professional crafter, the process of turning raw materials into a cute, functional character is incredibly satisfying. Keep your Bunny-Shaped Goody Bags – Pattern instructions in a safe place, and you’ll find yourself returning to this charming project year after year whenever a touch of whimsy is needed.
FAQ – Common Questions About Bunny Goody Bags
What is the best size for a Bunny-Shaped Goody Bags – Pattern?
A standard size is usually around 5×7 inches for the bag body. This provides enough room for a handful of treats without making the Bunny-Shaped Goody Bags – Pattern look too bulky or difficult for a child to carry.
Can I make a Bunny-Shaped Goody Bags – Pattern without a sewing machine?
Yes! You can use a simple running stitch or backstitch to sew the fabric by hand, or follow a crochet-based Bunny-Shaped Goody Bags – Pattern which requires only a hook and yarn.
How do I make the ears stand up in my Bunny-Shaped Goody Bags – Pattern?
Using a stiff fusible interfacing inside the ear pieces is the most effective way. For crochet versions, using a smaller hook to create a tighter, stiffer fabric will help the ears stay upright.
Is it safe to use these for food?
If you plan to put unwrapped food inside, ensure you use food-grade lining or fabrics that haven’t been treated with harsh chemicals. Most people use the Bunny-Shaped Goody Bags – Pattern for wrapped candies to stay on the safe side.
How much fabric do I need for one Bunny-Shaped Goody Bags – Pattern?
Usually, one fat quarter (18″ x 22″) is more than enough to make two small bags, including the ears. This makes the Bunny-Shaped Goody Bags – Pattern a very budget-friendly project.
Can I sell items made from this Bunny-Shaped Goody Bags – Pattern?
Most designers allow you to sell finished items as long as you credit the original Bunny-Shaped Goody Bags – Pattern. Always check the specific terms included with your pattern download.
Conclusion
In this article, we have thoroughly explored how to create, customize, and care for your own Bunny-Shaped Goody Bags – Pattern. We discussed the importance of selecting the right cotton fabrics or yarns, the technical precision required for the drawstring casing and ear assembly, and how to scale the design for different events like weddings or large holiday parties.
By following these steps, you can ensure that your Bunny-Shaped Goody Bags – Pattern results in a durable, adorable, and highly functional gift that outshines any store-bought alternative.