Creating a beautiful Fabric Rose – Pattern is one of the most fulfilling projects a textile artist or hobbyist can undertake, as it allows you to capture the timeless elegance of nature using simple materials. Whether you are looking to embellish a bridal gown, decorate a home interior, or create a unique hair accessory, mastering a Fabric Rose – Pattern offers a versatile skill set that transforms scraps of silk, satin, or cotton into everlasting blooms. This guide is designed to walk you through the intricate details of floral construction, ensuring that your handmade flowers possess a professional, high-end finish that mimics the delicate layers of a real botanical specimen.
The magic of a high-quality Fabric Rose – Pattern lies in its ability to be customized to suit any aesthetic, from the rustic charm of frayed linen to the sophisticated glow of organza and velvet. By following a structured Fabric Rose – Pattern, you learn the essential balance between symmetry and organic imperfection, which is what truly breathes life into a fabric flower. Unlike real flowers that wither within days, a rose created from a well-executed Fabric Rose – Pattern becomes a keepsake, a durable piece of art that can be passed down or used repeatedly in various fashion ensembles without losing its structural integrity or vibrant color.
In today’s world of fast fashion and mass production, engaging with a Fabric Rose – Pattern provides a much-needed outlet for slow, mindful crafting that prioritizes quality over quantity. This article will provide you with a comprehensive roadmap, covering the best tools to use, the specific cutting techniques required, and the assembly methods that ensure your flower remains sturdy and beautiful. By focusing on the nuances of the Fabric Rose – Pattern, you will discover how a few simple folds and stitches can result in a complex, three-dimensional masterpiece that serves as a testament to your creativity and manual dexterity.
1. Selecting the Perfect Textiles for Your Fabric Rose – Pattern
The foundation of any successful Fabric Rose – Pattern starts with the choice of material, as the weight and drape of the fabric will dictate the final look of the petals. If you are aiming for a realistic, soft appearance, lightweight fabrics like silk habotai or chiffon are ideal because they react beautifully to heat-shaping and have a natural fluidity. For a more structured and modern Fabric Rose – Pattern, sturdier options like felt, denim, or heavy satin provide the necessary stiffness to hold sharp edges and defined curves without requiring extra stiffening agents.
Color selection is the next vital component when preparing your Fabric Rose – Pattern materials, as it sets the mood of the finished piece. Monochromatic roses offer a classic look, but using gradient-dyed fabrics or combining two shades of the same color can add incredible depth to your Fabric Rose – Pattern. Many professional crafters prefer to use hand-painted silks, which allow for subtle transitions from a dark center to lighter outer petals, mimicking the natural biological development of a real rose in full bloom.
Don’t overlook the importance of fabric grain when laying out your Fabric Rose – Pattern pieces, as the bias of the fabric (the diagonal direction) allows for more stretch and natural curling. When you cut your petals on the bias, they tend to roll at the edges more gracefully, which is a desired effect in a realistic Fabric Rose – Pattern. If you are working with synthetic materials, you can even use a soldering iron or a candle flame to heat-seal the edges, preventing fraying while simultaneously creating organic, wilted-looking textures that enhance the realism.
The backing of your Fabric Rose – Pattern also requires consideration, especially if the flower will be attached to a heavy garment or a rigid headband. Using a stiff felt circle or a piece of buckram as a base provides a solid surface for gluing or sewing your petals in place. This ensures that the delicate layers of your Fabric Rose – Pattern don’t collapse under their own weight. Choosing a base color that matches your fabric will keep the mechanics of the flower hidden from view, maintaining the illusion of a floating blossom.
If you are a beginner, starting your Fabric Rose – Pattern journey with cotton broadcloth is highly recommended because it is easy to handle and doesn’t slip during the cutting process. As you become more comfortable with the Fabric Rose – Pattern, you can graduate to more challenging materials like velvet or lace. These luxury fabrics add a tactile dimension to your project, making the Fabric Rose – Pattern feel more like a piece of high-fashion millinery than a simple DIY craft, perfect for special occasions or gala events.
Lastly, consider the “sheen” of the fabric in relation to your intended use for the Fabric Rose – Pattern. A matte finish is often preferred for daytime accessories or rustic wedding themes, while a high-gloss finish is perfect for evening wear and theatrical costumes. By understanding how light interacts with different textures, you can manipulate your Fabric Rose – Pattern to highlight the shadows between the petals, creating a sense of volume and drama that makes the flower pop against any background.
2. Cutting and Shaping Techniques for the Fabric Rose – Pattern
Precision in cutting is what separates a mediocre craft from a high-quality Fabric Rose – Pattern result. Most patterns involve three sizes of petals: small for the “heart” or center, medium for the transition, and large for the outer bloom. When you follow a Fabric Rose – Pattern, using sharp fabric shears is non-negotiable to ensure clean edges. Any jagged cuts can ruin the silhouette of the flower, especially if you are working with delicate silks that tend to snag or pull easily during the preparation phase.
Shaping the petals is where the true artistry of the Fabric Rose – Pattern comes into play. One popular method involves using millinery tools—metal balls on wooden handles that are heated and pressed into the fabric to create concave shapes. If you don’t have professional tools, you can achieve a similar effect in your Fabric Rose – Pattern by using the back of a warm spoon or even your fingers to stretch and mold the fabric. This curling technique gives the Fabric Rose – Pattern a life-like bounce and prevents it from looking flat or artificial.
The “singeing” technique is another advanced way to refine your Fabric Rose – Pattern when using synthetic fabrics like polyester or nylon. By carefully hovering the edge of a petal near a small flame, the plastic fibers melt and curl inward. This creates a beautiful, hardened edge that mimics the organic irregularities of nature. When applying this to your Fabric Rose – Pattern, always work in a well-ventilated area and keep a bowl of water nearby for safety, as synthetic fabrics can ignite quickly if held too close to the heat source.
If your Fabric Rose – Pattern calls for a softer, more romantic look, you might choose to leave the edges raw and allow them to fray slightly. This “shabby chic” style is very popular for farmhouse decor and vintage-inspired weddings. To control the fraying in your Fabric Rose – Pattern, you can apply a thin line of liquid fray check or clear nail polish to the base of the petals while leaving the tips free to soften. This ensures the flower remains durable while still possessing that sought-after ethereal and weathered aesthetic.
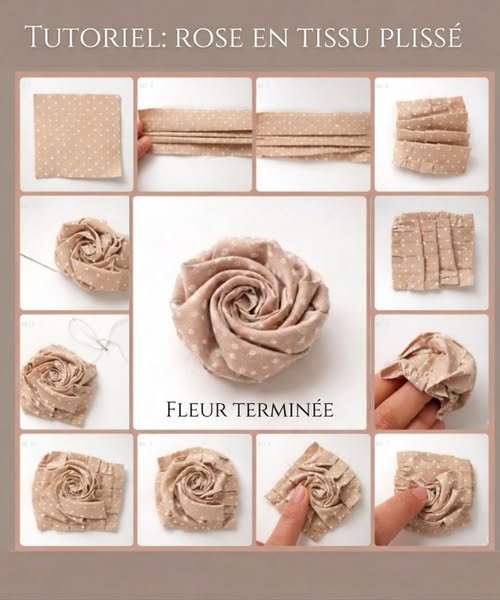
For those who prefer a more structured, geometric Fabric Rose – Pattern, the origami folding technique is a fantastic alternative to traditional petal cutting. This involves folding long strips of fabric into triangular units that are then rolled together to form a rose. This type of Fabric Rose – Pattern is incredibly sturdy and works exceptionally well with “crisp” fabrics like taffeta or starched linen. It provides a clean, modern look that is very popular in contemporary jewelry design and minimalist home styling.
Finally, remember to stay organized by labeling your petal groups according to the Fabric Rose – Pattern instructions. It is easy to mix up the sizes once they are all cut out, and the order of assembly is crucial for achieving the correct floral “spiral.” Keeping your petals in separate bowls or marked envelopes will save you time and frustration during the assembly phase of your Fabric Rose – Pattern, allowing you to focus entirely on the creative process of building the flower’s core and outer layers.
3. Assembling the Core and Layers of Your Fabric Rose – Pattern
The assembly of a Fabric Rose – Pattern begins with the “bud” or the center of the flower, which is the most tightly coiled part of the design. You usually start by taking a small, rectangular strip of fabric and folding it over a wire or a knotted piece of thread. Rolling this tightly is the key to a realistic Fabric Rose – Pattern, as it creates the illusion of a flower that is just beginning to open. Secure this center with a few hidden stitches or a small drop of hot glue to ensure the foundation remains firm.
Once the bud is secure, you begin attaching the smallest petals from your Fabric Rose – Pattern in a circular fashion. Each petal should overlap the previous one by about half its width. This overlapping technique is essential in any Fabric Rose – Pattern because it hides the attachment points and creates the characteristic spiral seen in natural roses. Be sure to keep the base of the petals aligned horizontally so that the bottom of your Fabric Rose – Pattern remains flat and easy to attach to other surfaces later on.
As you move to the medium-sized petals of the Fabric Rose – Pattern, you should start to place them slightly lower than the center bud to create a “cupped” effect. This is the stage where you can begin to manipulate the “openness” of the bloom. If you want a tight rosebud, keep the petals close together; for a full-blown garden rose, tilt the petals outward as you sew them. Following the Fabric Rose – Pattern closely during this transition ensures that the flower maintains its proportions and doesn’t become lopsided or top-heavy.
The outer petals are the final and most visible part of your Fabric Rose – Pattern. These large petals should be handled with care, as they define the overall diameter and “personality” of the rose. Some artists like to add a bit of wire to the outer edges of these petals in their Fabric Rose – Pattern to allow for maximum adjustability. This allows you to “peel” the petals back or tuck them in, giving you complete control over the final silhouette and making the Fabric Rose – Pattern look as though it is swaying in a gentle breeze.
For a professional finish, the “bottom” of your Fabric Rose – Pattern must be neatly concealed. This is usually done by attaching sepals—the small green leaves found at the base of a real flower. Most Fabric Rose – Pattern guides include a template for a five-pointed star shape made of green felt or silk. Not only does this add a pop of contrasting color, but it also hides all the thread knots and glue marks, giving your Fabric Rose – Pattern a clean and polished appearance from every angle.
Integration into larger projects is the final step of the assembly. If your Fabric Rose – Pattern is intended for a brooch, you would now sew a pin back onto the felt base. For floral arrangements, you would wrap the central wire in floral tape to create a realistic stem. The beauty of the Fabric Rose – Pattern is that once the flower head is complete, the mounting possibilities are endless, ranging from napkin rings and curtain tie-backs to extravagant hair fascinators for high-profile events.
4. Maintenance and Creative Variations for the Fabric Rose – Pattern
Once you have mastered the basic Fabric Rose – Pattern, the possibilities for variation are limited only by your imagination. You can experiment with “mixed media” roses by incorporating layers of tulle, organza, and leather within a single flower. This creates a rich, multi-textured Fabric Rose – Pattern that is highly sought after in the world of wearable art. Mixing different weights of fabric can also change how the light hits the flower, adding a sense of mystery and complexity to your handmade creation.
Another popular variation is the vintage-style Fabric Rose – Pattern, which involves tea-staining your fabric before you begin. By soaking white or cream cotton in strong black tea, you give the material an antique, sepia-toned look that is perfect for period costumes or “shabby chic” decor. When you apply this to a Fabric Rose – Pattern, the resulting flower looks like a precious heirloom discovered in a dusty attic, adding a layer of storytelling and nostalgia to your craftsmanship.
Adding “dewdrops” to your Fabric Rose – Pattern can provide an extra touch of realism that truly wows onlookers. This can be achieved by using clear glass beads or small droplets of clear-drying 3D fabric paint on the tips of the petals. When someone sees a Fabric Rose – Pattern with glistening dewdrops, it creates a powerful sensory experience that blurs the line between the artificial and the natural, making your work stand out in any display or gallery.
Proper care and storage are essential for maintaining the longevity of your Fabric Rose – Pattern. Since fabric flowers can act as “dust magnets,” it is best to store them in breathable boxes away from direct sunlight, which can fade the dyes over time. To clean a dusty Fabric Rose – Pattern, a gentle blast of cool air from a hairdryer or a soft makeup brush is usually sufficient. Avoid using water or steam on roses that have been heat-shaped, as moisture can cause the petals to lose their curl and return to a flat state.
For those looking to turn their Fabric Rose – Pattern skills into a business, branding and packaging are key. Presenting your fabric roses in beautiful window boxes or attached to custom backing cards can significantly increase their perceived value. Since a Fabric Rose – Pattern is a labor-intensive item, positioning them as “luxury handmade botanical art” allows you to command a price that reflects your time and expertise. Many crafters find success selling their Fabric Rose – Pattern creations on platforms like Etsy or at high-end artisan markets.
Finally, never stop experimenting with the scale of your Fabric Rose – Pattern. Creating “giant” fabric roses for wall decor or “miniature” roses for dollhouses requires different adjustments in tension and material choice, but both use the same fundamental principles. By pushing the boundaries of the Fabric Rose – Pattern, you keep your passion for the craft alive and continue to develop new techniques that will keep your work fresh, relevant, and endlessly beautiful in the eyes of your audience.
FAQ – Frequently Asked Questions
What is the best fabric for a realistic Fabric Rose – Pattern?
For the most realistic results, silk organza or silk habotai are the top choices. They are thin enough to layer without becoming bulky and they respond exceptionally well to heat-shaping tools, allowing you to create the delicate curves found in nature.
Do I need a sewing machine for a Fabric Rose – Pattern?
No, most fabric roses are best made using hand-sewing or hot glue. Hand-stitching allows for much greater precision when positioning petals and ensures that the delicate fabric isn’t crushed by the presser foot of a machine.
How do I prevent the edges of my Fabric Rose – Pattern from fraying?
You can use fray check liquid, clear nail polish, or the heat-sealing method (for synthetic fabrics). Another option is to use “pinking shears” which cut the fabric in a zigzag pattern, significantly reducing the tendency of the threads to unravel.
Can I make a Fabric Rose – Pattern out of old clothes?
Absolutely! Upcycling is a great way to use a Fabric Rose – Pattern. Old silk scarves, polyester blouses, or even soft cotton t-shirts can be transformed into beautiful flowers, giving new life to sentimental garments that are no longer worn.
How do I attach a stem to my Fabric Rose – Pattern?
The easiest way is to use 20-gauge floral wire. Create a small loop or hook at the end of the wire, and build your rose “bud” directly around it. Once the flower is finished, wrap the wire in green floral tape for a realistic stem appearance.
How long does it take to make one flower from a Fabric Rose – Pattern?
A simple rose can take about 20 to 30 minutes, while a highly detailed, hand-painted, and heat-shaped professional rose can take 2 to 3 hours to complete, depending on the number of layers and the complexity of the finish.
Conclusion
In this comprehensive guide, we have explored the intricate art of the Fabric Rose – Pattern, covering everything from the selection of premium textiles like silk and satin to the advanced techniques of heat-shaping and singeing.
We learned that the secret to a professional-looking flower lies in the careful layering of petals and the hidden mechanics of a solid base and realistic sepals. By understanding the nuances of the Fabric Rose – Pattern, you can create durable, beautiful accessories and decor items that far outlast their natural counterparts while providing a deeply satisfying creative outlet.