Creating a Crochet Flower – Pattern is one of the most delightful ways to bring a touch of nature and handmade charm into your home or wardrobe without the worry of petals ever wilting. Whether you are looking to embellish a cozy winter hat, create a stunning floral garland for a nursery, or simply practice your tension on a small and satisfying project, mastering a Crochet Flower – Pattern is an essential milestone for any fiber artist. These tiny works of art offer instant gratification, allowing you to see a beautiful result in just a few minutes of focused stitching and creativity.
The beauty of a modern Crochet Flower – Pattern lies in its incredible versatility, as these designs can range from simple, flat daisies to complex, multi-layered roses that look almost real. By following a well-structured Crochet Flower – Pattern, you can experiment with different yarn weights and hook sizes to achieve various scales, turning a single design into a tiny earring or a large decorative cushion appliqué. Many crafters find that working on a Crochet Flower – Pattern is the perfect “palate cleanser” between larger, more demanding projects like blankets or sweaters because they require very little yarn and provide a quick sense of accomplishment.
In this comprehensive guide, we will dive deep into the world of floral fiber arts, ensuring you understand every nuance of your chosen Crochet Flower – Pattern. We will discuss the best materials to use, the foundational stitches that form the petals, and the professional finishing techniques that make your work stand out. By the time you reach the end of this article, you will feel confident enough to tackle any Crochet Flower – Pattern you encounter, transforming simple lengths of string into everlasting blooms that can brighten any space or outfit throughout the year.
1. Selecting the Perfect Materials for Your Crochet Flower – Pattern
The first step in successfully executing a Crochet Flower – Pattern is choosing the right yarn, as the fiber content drastically changes the flower’s final “bloom” and structure. For a crisp, well-defined Crochet Flower – Pattern, many experts recommend using mercerized cotton, which provides a slight sheen and excellent stitch definition that holds its shape over time. If you prefer a softer, more romantic look for your Crochet Flower – Pattern, a delicate alpaca blend or a fine mohair can create a fuzzy, ethereal halo around the petals that mimics the softness of a real garden flower.
Your choice of crochet hook size is equally vital when following a Crochet Flower – Pattern, as it determines the density and size of the finished piece. If you want a tight, structured blossom that won’t flop over, you might choose a hook that is slightly smaller than what the yarn label suggests for your Crochet Flower – Pattern. Conversely, using a larger hook can create a lacy, open-work effect that is perfect for vintage-style floral motifs or delicate wedding decorations. Always check the gauge recommendations within your Crochet Flower – Pattern to ensure your petals don’t end up looking distorted or overly bulky.
Color selection is where your Crochet Flower – Pattern truly comes to life, allowing you to play with vibrant gradients or subtle monochromatic tones. Many enthusiasts love using variegated yarn for a Crochet Flower – Pattern because the natural color shifts can mimic the organic variegation found in real orchids or pansies. Alternatively, using a solid, bright hue for the center of the Crochet Flower – Pattern and a contrasting shade for the petals can create a striking visual impact. Don’t be afraid to mix and match leftovers from your stash, as floral patterns are the ultimate way to use up those small, precious scraps of luxury yarn.
In addition to yarn, you may need a few specialized tools to finish your Crochet Flower – Pattern with a professional touch. A sharp pair of embroidery scissors and a high-quality tapestry needle are essential for weaving in ends securely so your petals don’t unravel with use. If you plan on turning your Crochet Flower – Pattern into jewelry or a brooch, having some jewelry findings like pin backs or earring hooks on hand is a great idea. Some complex patterns might also require stitch markers to keep track of the beginning of rounds, especially when working on 3D layered flowers.
Understanding the “drape” of your fabric is a hidden secret to a successful Crochet Flower – Pattern. A flower made with acrylic yarn might be more durable and easier to wash, making it ideal for children’s accessories or hair clips. However, if your Crochet Flower – Pattern is meant for a high-end fashion piece, investing in silk or bamboo thread can provide a sophisticated drape and a luxurious feel that elevates the entire project. Consider the final purpose of your flower before you commit to a specific material to ensure it performs exactly as you expect.
Finally, consider the environmental impact of your materials when starting a new Crochet Flower – Pattern. Many modern crafters are moving toward organic cotton or recycled wool to ensure their hobby remains sustainable and eco-friendly. Choosing natural fibers for your Crochet Flower – Pattern not only feels better in your hands while you work but also ensures that your handmade creations are biodegradable and safe for the planet. High-quality materials will ensure that your hard work on the Crochet Flower – Pattern lasts for generations, potentially becoming a cherished family heirloom.
2. Essential Stitches and Foundations for a Crochet Flower – Pattern
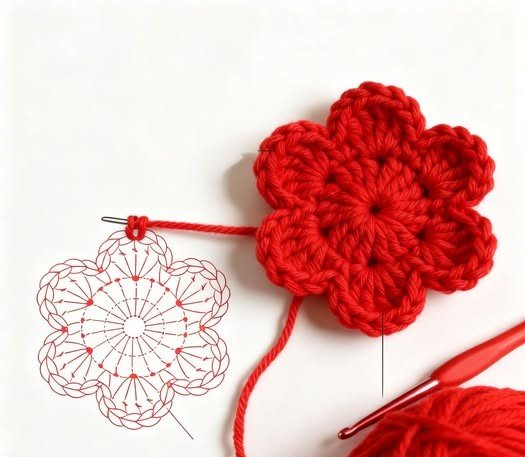
To begin any Crochet Flower – Pattern, you must be comfortable with the magic ring (or magic circle) technique, which allows you to pull the center of the flower tight. Unlike a standard chain loop, the magic ring ensures there is no visible hole in the middle of your Crochet Flower – Pattern, providing a professional and clean starting point for your petals. If the magic ring feels too intimidating, most patterns will offer an alternative, such as chaining four and joining with a slip stitch, but mastering the ring is a game-changer for floral designs.
The most common stitches used to create the curves of a Crochet Flower – Pattern are the double crochet (dc) and the treble crochet (tr). By varying the height of these stitches within a single petal, you create the rounded, organic shape that is characteristic of a Crochet Flower – Pattern. For example, a typical petal might start with a short stitch, grow into several tall stitches, and then taper back down to a short stitch, all worked into the same space. This rhythmic increase and decrease is the secret formula behind almost every successful Crochet Flower – Pattern you will encounter.
Layering is another technique that adds depth and realism to your Crochet Flower – Pattern. Many advanced designs will instruct you to work into the back loops only (BLO) or to work stitches behind the first layer of petals to create a tiered effect. This “3D” approach to a Crochet Flower – Pattern makes the bloom look more substantial and allows for beautiful color play between the inner and outer layers. Understanding how to navigate the post of a stitch (using front post or back post stitches) can also add incredible texture and ribbing to your floral creations.
The picot stitch is a small but powerful detail often found in a Crochet Flower – Pattern to represent pointed petal tips or tiny decorative buds. It consists of a small loop of chains closed with a slip stitch, and it adds a delicate, lace-like quality to the edges of your work. Incorporating picots into your Crochet Flower – Pattern can transform a basic circle into a complex-looking starflower or carnation with very little extra effort. It is these small “finishing stitches” that truly define the character of the specific flower you are trying to replicate.
Tension control is arguably the most difficult part of perfecting a Crochet Flower – Pattern. If your tension is too loose, the petals may look limp and lose their definition; if it is too tight, the flower may curl inward like a bowl. When working on a Crochet Flower – Pattern, try to maintain a consistent, firm grip on your yarn to ensure every petal is identical in size. If you notice your flowers are looking a bit “wonky,” practicing a few swatches of the Crochet Flower – Pattern can help your hands find the right rhythm and muscle memory for that specific design.
Finally, reading a Crochet Flower – Pattern correctly involves understanding the difference between US and UK terminology. A “double crochet” in a US Crochet Flower – Pattern is a “treble crochet” in a UK pattern, which can lead to a very confusing and oversized flower if you aren’t careful! Always double-check the origins of your Crochet Flower – Pattern before you start. Clear documentation and a good understanding of abbreviations like inc (increase) and dec (decrease) will make the process of following the pattern a relaxing and meditative experience.
3. Advanced Customization and Decorative Uses for Your Crochet Flower – Pattern
Once you have mastered the basic Crochet Flower – Pattern, the possibilities for customization are virtually endless. You can add seed beads or small pearls to the center of your flower to mimic stamens and add a touch of sparkle. Pre-stringing these beads onto your yarn before you begin the Crochet Flower – Pattern allows you to slide them into place as you work the center ring, creating a seamless and sturdy embellishment. This technique is particularly popular for bridal accessories or high-fashion embellishments that require an extra level of detail.
Another way to enhance your Crochet Flower – Pattern is through the use of surface crochet or embroidery. After the main flower is finished, you can use a contrasting thread to “slip stitch” around the edges of the petals or add veins to the center of each leaf. This adds a graphic, illustrative quality to the Crochet Flower – Pattern that makes it pop against a solid background. Many artists use this method to give their flowers a “vintage” or “shabby chic” look that is highly sought after in the handmade market.
If you find that your Crochet Flower – Pattern feels a bit too floppy for its intended use, you can apply a stiffening agent to give it more structure. A simple mixture of water and white craft glue, or a professional fabric stiffener, can be brushed onto the back of the Crochet Flower – Pattern. Once dry, the flower will hold its shape perfectly, making it ideal for use in a crochet bouquet or as a standalone decorative item on a bookshelf. This process “locks” your stitches in place, ensuring the beauty of the Crochet Flower – Pattern is preserved for years.
The scale of your Crochet Flower – Pattern can be adjusted simply by changing your “yarn and hook” combination. A pattern designed for worsted weight yarn can be worked with embroidery floss and a tiny 1.0mm hook to create a miniature version suitable for a dollhouse or a delicate pendant. Conversely, using super bulky t-shirt yarn with a giant hook can turn that same Crochet Flower – Pattern into a bold, modern floor rug or a large wall hanging. This flexibility is why floral motifs are a staple in the repertoire of many professional designers.
Beyond simple decoration, a Crochet Flower – Pattern can be functional as well. Many crafters use these flowers as decorative buttons for sweaters, as “toppers” for gift wrapping, or even as functional coasters if the design is flat enough. A group of flowers made from a consistent Crochet Flower – Pattern can be joined together to create a stunning “flower garden” blanket or a lace shawl. Learning how to join motifs as you go (the JAYGO method) is a fantastic skill to pair with your floral projects.
For those who enjoy a bit of mixed media, combining your Crochet Flower – Pattern with other materials like felt, leather, or even wire can produce extraordinary results. Some designers insert thin floral wire into the final round of their petals, allowing the Crochet Flower – Pattern to be bent and posed just like a real stem. This opens up the world of permanent floral arrangements, where you can “grow” a garden that never needs watering. The intersection of traditional crochet and modern floral design is a space filled with endless innovation.
4. Finishing Touches and Professional Care for Your Crochet Flower – Pattern
The way you finish your Crochet Flower – Pattern can make the difference between a project that looks “homemade” and one that looks “handmade.” Proper blocking is the secret weapon here. By pinning your finished flower to a foam mat and lightly steaming it with an iron, you can relax the fibers and encourage the petals of your Crochet Flower – Pattern to lay perfectly flat or curve exactly how you want them to. This professional step ensures that the geometry of the Crochet Flower – Pattern is showcased to its fullest potential.
Weaving in the ends of a Crochet Flower – Pattern requires a bit of strategy, especially if the flower will be seen from both sides. Instead of just knotting the yarn, use your tapestry needle to follow the path of the existing stitches, hiding the tail within the bulk of the petals. For a Crochet Flower – Pattern that will be washed frequently, such as on a child’s hat, weaving the tail back and forth three times is the gold standard for security. This prevents the center of your beautiful Crochet Flower – Pattern from coming loose during a laundry cycle.
If your Crochet Flower – Pattern is intended as a gift, consider the presentation as part of the crafting process. Mounting a single flower onto a piece of high-quality cardstock or pinning it to a “handmade with love” tag adds immense value to the item. Because a Crochet Flower – Pattern is relatively small, the packaging can really highlight the detail and effort you put into the stitches. Many crafters even scent their crochet flowers with a drop of essential oil like lavender or rose to provide a full sensory experience.
Caring for your finished Crochet Flower – Pattern depends heavily on the fiber you used. Natural wool flowers should be hand-washed in cool water with a gentle wool soak to avoid felting, while cotton or acrylic flowers from a Crochet Flower – Pattern can usually handle a gentle machine wash in a mesh bag. Always avoid wringing or twisting the flower, as this can distort the delicate petal shapes you worked so hard to create. Instead, roll the Crochet Flower – Pattern in a towel to remove excess moisture and reshape it while damp.
Storing your collection of flowers from a Crochet Flower – Pattern should be done with care to prevent them from being crushed. A sturdy box with tissue paper is better than a soft bag where they might get squished under other projects. If you have made a large number of pieces from a Crochet Flower – Pattern, sorting them by color or size in clear containers can provide instant inspiration when you are ready to start a new assembly project. Keeping your floral “blooms” organized makes it easy to grab the perfect embellishment at a moment’s notice.
Finally, remember that every Crochet Flower – Pattern you complete is an opportunity to learn. If a particular petal shape didn’t turn out quite right, don’t be afraid to unravel it (or “frog” it) and try again with a different tension or hook size. The journey of mastering a Crochet Flower – Pattern is just as much about the process as it is about the finished product. With each flower you make, your stitches will become more even, your confidence will grow, and your “crochet garden” will flourish with unique, handmade beauty.
FAQ – Frequently Asked Questions
What is the best yarn for a Crochet Flower – Pattern?
Most crafters prefer mercerized cotton because it is sturdy and shows off the stitch detail perfectly. However, for a soft look, wool or acrylic also work well depending on the intended use.
How do I stop my crochet flower from curling?
If your Crochet Flower – Pattern is curling too much, try using a larger hook or loosening your tension. You can also “block” the flower by wetting it and pinning it flat until it dries.
Can I make a Crochet Flower – Pattern without a magic ring?
Yes! You can chain 3 or 4 stitches and join them with a slip stitch to form a circle, then work your first round of the Crochet Flower – Pattern into that circle.
How can I use these flowers?
You can use a finished Crochet Flower – Pattern as a brooch, hair clip, hat embellishment, or even join many together to create a scarf, blanket, or wall hanging.
Is a Crochet Flower – Pattern suitable for beginners?
Absolutely! Many floral patterns are very simple and use only basic stitches. They are a great way for beginners to practice working in the round and changing colors.
How do I add beads to my Crochet Flower – Pattern?
The easiest way is to string the beads onto your yarn before you start crocheting. Then, simply slide a bead up to your hook whenever the Crochet Flower – Pattern calls for a bit of sparkle.
Conclusion
In this guide, we have explored the intricate and rewarding process of following a Crochet Flower – Pattern, from the initial selection of high-quality materials like mercerized cotton to the advanced techniques of layering and blocking. We learned that the secret to a professional-looking bloom lies in mastering the magic ring, maintaining consistent tension, and choosing the right hook size to suit your specific yarn.
Whether you are creating a single dainty blossom for a piece of jewelry or an entire garden of textures for a blanket, the Crochet Flower – Pattern is a versatile tool that allows for endless creative expression. We also covered how to properly care for and “stiffen” your creations to ensure they remain beautiful for years to come.