Finding a high-quality Crochet Flower – Pattern is often the first step toward transforming a simple project into a masterpiece of texture and color. These delicate floral accents are incredibly versatile, serving as the perfect embellishment for hats, scarves, blankets, or even as standalone jewelry pieces like earrings and brooches. When you master a Crochet Flower – Pattern, you unlock a world of creative possibilities where yarn and hook come together to mimic the intricate beauty of nature.
The appeal of a Crochet Flower – Pattern lies in its immediate gratification; most of these designs can be completed in under thirty minutes, making them ideal for crafters with busy schedules. Whether you are looking for a layered 3D rose or a simple five-petal daisy, following a well-structured Crochet Flower – Pattern ensures that your tension remains consistent and your petals are symmetrical. For many beginners, learning how to work in the round via a floral design is a rite of passage that builds confidence for more complex garments later on.
In this comprehensive guide, we will delve into the essential materials, the technical nuances of the stitches, and the finishing techniques required to make your Crochet Flower – Pattern look professional and polished. We will explain how to choose the right yarn weights, how to read complex diagrams, and how to customize each bloom to suit your specific aesthetic needs. By the time you finish reading, you will have all the knowledge necessary to execute any Crochet Flower – Pattern with precision and artistic flair.
1. Choosing the Best Materials for Your Crochet Flower – Pattern
The success of your Crochet Flower – Pattern begins with the selection of your yarn, as different fibers yield vastly different results. For a crisp, well-defined look that mimics real petals, mercerized cotton is often the top choice among experienced crafters because it has a slight sheen and holds its shape exceptionally well. If you are aiming for a soft, vintage feel for a baby blanket, a lightweight acrylic blend or fine merino wool can provide the necessary softness while still showing off the details of the Crochet Flower – Pattern.
Hook size is the next critical component to consider when starting a new Crochet Flower – Pattern. Generally, you want to use a hook that is slightly smaller than what the yarn label suggests to ensure your stitches are tight enough to prevent the stuffing or the “skeleton” of the flower from showing through. A 2.5mm or 3.0mm hook is standard for most floral projects, as it allows for the intricate manipulation of loops required for delicate petal edges. Always check the gauge listed in your Crochet Flower – Pattern to avoid a flower that is either too floppy or too rigid.
Color selection can make or break the visual impact of your Crochet Flower – Pattern. Many designers recommend using variegated yarns to create natural-looking color transitions without the hassle of constantly weaving in new ends. However, if you are working on a layered Crochet Flower – Pattern, using high-contrast solid colors for each layer can create a stunning 3D effect that pops off the fabric. Consider the final application of your flower—bright neons for a summer bag or muted pastels for a spring wreath—to guide your palette choices.
Don’t overlook the importance of notions and tools when preparing to work on a Crochet Flower – Pattern. You will need a sharp pair of embroidery scissors for clean cuts and a high-quality tapestry needle for weaving in ends, which can be numerous in multi-colored floral designs. Some patterns may also require floral wire or stiffening spray if you intend to create a bouquet that stands upright. Having these items on hand before you start your Crochet Flower – Pattern will make the crafting process much more fluid and enjoyable.
Stitch markers are surprisingly useful even in small projects like a Crochet Flower – Pattern. When working in the round, it is very easy to lose track of where your petals begin, especially if the design involves complex slip stitches or increases. Placing a marker at the start of each round ensures that your petal count remains accurate, preventing the lopsided look that can occur if a stitch is accidentally skipped. Even for a simple Crochet Flower – Pattern, organization is the key to a professional-looking finished product.
Lastly, consider the “weight” or “ply” of the yarn in relation to the intended size of your Crochet Flower – Pattern. A pattern designed for fingering weight yarn will look significantly different if executed with bulky yarn. If you want a tiny flower for a hair clip, stick to embroidery floss or thread; if you want a large floral focal point for a pillow, scale up your yarn and hook size accordingly. Adapting a Crochet Flower – Pattern by changing the material weight is one of the easiest ways to customize your work.
2. Mastering Essential Stitches for Floral Designs
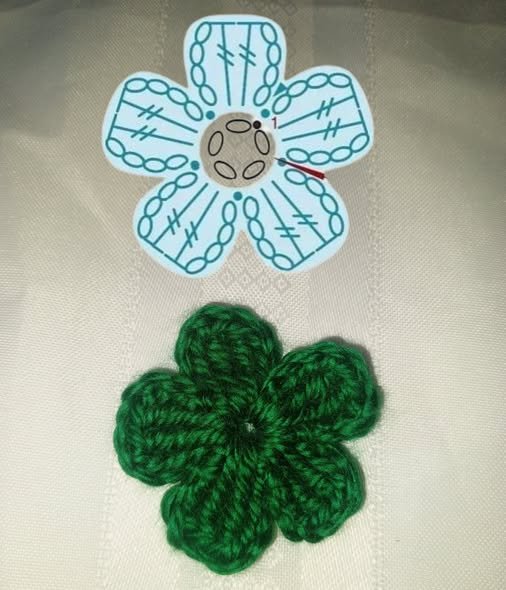
To successfully navigate a Crochet Flower – Pattern, you must be comfortable with the magic ring (or magic circle) technique. This method allows you to pull the center of your flower tight, eliminating the hole that often appears in the middle of traditional chain starts. Most modern Crochet Flower – Pattern instructions begin with this technique because it provides a clean, professional base for the first round of petals. Mastery of the magic ring is essential for anyone serious about floral crochet.
The treble crochet (tr) and double treble crochet (dtr) are frequently used in a Crochet Flower – Pattern to create height and drama in the petals. These tall stitches allow the petals to fan out and curve, giving the flower its organic shape. When following a Crochet Flower – Pattern, pay close attention to where these stitches are placed; often, multiple tall stitches are worked into a single base stitch to create a “shell” or “fan” that forms an individual petal.
Another vital technique for an advanced Crochet Flower – Pattern is working in the front loops only (FLO) or back loops only (BLO). This is often used to create layered flowers, where one set of petals is worked into the front loops and a second, larger set is worked into the back loops of the same round. By utilizing these loops correctly, your Crochet Flower – Pattern can achieve a realistic, multi-dimensional appearance that looks much more difficult to create than it actually is.
The picot stitch is the secret to adding delicate “points” or texture to the tips of your petals in a Crochet Flower – Pattern. By chaining three and slip-stitching into the first chain, you create a tiny decorative bump that mimics the natural irregularities found in real botanical life. Many a Crochet Flower – Pattern will use picots to represent the serrated edges of a leaf or the tiny details at the center of a sunflower, adding a touch of realism to your yarn work.
Consistency in tension is perhaps the most important skill when executing a Crochet Flower – Pattern. If your tension varies, your petals will be uneven, causing the flower to pull or pucker in strange directions. To keep your Crochet Flower – Pattern looking neat, try to maintain a relaxed but firm grip on the yarn. If you notice your stitches getting tighter as you work, take a break and stretch your hands; a consistent rhythm is the hallmark of a master crafter.
Understanding how to read a stitch diagram can be incredibly helpful when working on a Crochet Flower – Pattern. These visual maps show exactly where each stitch is placed in relation to the others, which is often clearer than written text for complex floral shapes. Many international Crochet Flower – Pattern designers use diagrams as a universal language. Learning the symbols for chains, single crochets, and clusters will allow you to tackle a Crochet Flower – Pattern from any part of the world.
3. Advanced Techniques for 3D Crochet Flowers
Creating a three-dimensional Crochet Flower – Pattern often involves a technique called surface crochet. This involves adding decorative stitches directly onto the surface of a finished piece of fabric, allowing you to add veins to leaves or extra ruffles to the center of a bloom. When a Crochet Flower – Pattern incorporates surface work, it adds a layer of sophistication and “pop” that standard flat patterns simply cannot match. It’s a great way to hide transitions between different colors.
The bullion stitch is another advanced move that can take your Crochet Flower – Pattern to the next level. This stitch involves wrapping the yarn around the hook many times before pulling through, creating a thick, textured coil. While challenging to master, the bullion stitch is perfect for creating the dense, textured centers of flowers like daisies or ranunculus. If your Crochet Flower – Pattern calls for this, take your time and use a hook with a smooth “throat” to make the pull-through easier.
If you want your Crochet Flower – Pattern to be structural, such as for a wedding bouquet, you might explore wired crochet. This involves crocheting over a thin piece of florist wire during the final round of the petal. This allows you to bend and shape the petals of your Crochet Flower – Pattern into permanent positions, giving the flower a lifelike “bloom” that won’t sag over time. This technique is highly effective for long-stemmed roses or lilies.
Color blending through shading is a technique where you use two strands of very thin thread together in your Crochet Flower – Pattern. By changing one of the strands to a different shade while keeping the other the same, you create a soft gradient effect. This “marled” look is fantastic for a Crochet Flower – Pattern that aims for botanical accuracy, as real flowers rarely consist of just one flat color. It adds depth and a “painterly” quality to your crochet work.
Blocking is just as important for a Crochet Flower – Pattern as it is for a large sweater. After finishing your crochet, you should pin the petals out on a foam board and lightly steam them. This relaxes the fibers and ensures that the Crochet Flower – Pattern reaches its full intended diameter and shape. For flowers that need to be very stiff, like those used in jewelry, you can apply a mixture of water and fabric stiffener during the blocking process.
Finally, don’t be afraid to incorporate beads and sequins into your Crochet Flower – Pattern. Adding a cluster of yellow seed beads to the center of a flower can perfectly mimic pollen, while a single pearl can add elegance to a bridal Crochet Flower – Pattern. Pre-stringing these onto your yarn before you begin allows you to work them directly into the stitches, ensuring they are securely attached and perfectly positioned for maximum visual impact.
4. Creative Ways to Use Your Finished Crochet Flowers
Once you have mastered the Crochet Flower – Pattern, the question becomes: what do you do with all these beautiful blooms? One of the most popular uses is creating a floral garland or bunting to decorate a nursery or a garden party. By joining multiple results of your Crochet Flower – Pattern with a long chain, you create a whimsical decoration that is both durable and charming. You can mix and match different flower types for a “wildflower” look.
Another fantastic application for a Crochet Flower – Pattern is in the world of fashion accessories. You can sew a finished flower onto a plain headband, hair clip, or even a pair of flip-flops to give them a custom, handmade feel. A small, delicate Crochet Flower – Pattern made with silk thread can also be turned into a beautiful brooch or pinned to a denim jacket for a touch of feminine flair. The possibilities for personalization are truly endless.
For home decor, you can use the Crochet Flower – Pattern to create stunning wall art. By mounting several flowers of different sizes and colors onto a canvas or inside a shadow box, you create a piece of 3D art that adds texture to any room. You can also sew your Crochet Flower – Pattern creations onto decorative throw pillows or the corners of a cozy blanket to add a pop of color and interest to your living space.
If you enjoy gift-giving, a Crochet Flower – Pattern can be used as a sustainable alternative to traditional gift toppers. Instead of a plastic bow, tie a beautiful handmade flower onto your package using twine. Not only does it look more elegant, but the recipient can also keep the flower as a memento or use it for their own crafting. A Crochet Flower – Pattern adds a level of thoughtfulness to a gift that store-bought items simply cannot replicate.
Creating a crochet bouquet is perhaps the ultimate project for someone who loves the Crochet Flower – Pattern. Unlike real flowers, these will never wilt and don’t require water, making them perfect for hospital patients or for long-term home decoration. By following various Crochet Flower – Pattern designs for stems, leaves, and different bloom types, you can assemble a permanent arrangement that brings joy and color to your home year-round.
Finally, consider using your Crochet Flower – Pattern skills for charity work. Many organizations accept donations of small crochet items to be used in hats for premature babies or as comfort items for the elderly. A cheerful, bright Crochet Flower – Pattern attached to a simple beanie can bring a huge smile to someone’s face. Sharing your talent for creating beauty out of yarn is a wonderful way to give back to the community while doing something you love.
FAQ – Frequently Asked Questions
How do I stop my crochet flower from curling?
Curling often happens because the tension is too tight or there aren’t enough stitches in the outer rounds. Following a Crochet Flower – Pattern carefully and blocking the finished piece with steam or water usually solves this issue.
What is the easiest Crochet Flower – Pattern for a beginner?
The simplest design is a basic five-petal flower made by working a series of (chain, double crochet, chain) into a central ring. This Crochet Flower – Pattern is quick to learn and provides instant results.
Can I use any yarn for a Crochet Flower – Pattern?
While you can use any yarn, thinner yarns like sport weight or lace weight typically produce more detailed and realistic flowers. Bulky yarns are better for large, stylized floral “pops” on blankets or rugs.
How do I attach my crochet flower to another project?
The best way is to leave a long “tail” of yarn when you finish your Crochet Flower – Pattern. Use a tapestry needle to sew the flower onto your base project using small, hidden stitches around the center and the base of the petals.
How can I make my crochet flowers look more realistic?
Use multiple shades of the same color to create depth, and don’t be afraid to use thin wire in the edges of the petals. Following a Crochet Flower – Pattern that includes varied stitch heights (sc, hdc, dc, tr) will also help mimic natural petal shapes.
Are crochet flowers durable enough for clothing?
Yes, provided you use a durable yarn like cotton or a high-quality acrylic. Ensure you weave in your ends very securely so the Crochet Flower – Pattern doesn’t unravel during washing.
Conclusion
In this article, we have explored the intricate and rewarding process of following a Crochet Flower – Pattern. From selecting the perfect mercerized cotton yarn and the right hook size to mastering advanced techniques like the magic ring, bullion stitches, and blocking, we have covered the essential steps to creating beautiful, professional-grade floral accents.
We also discussed how a Crochet Flower – Pattern can be adapted for everything from home decor and fashion accessories to meaningful charity donations and permanent bouquets. By focusing on tension, color theory, and proper finishing techniques, you can turn a simple ball of yarn into a botanical treasure that lasts a lifetime.