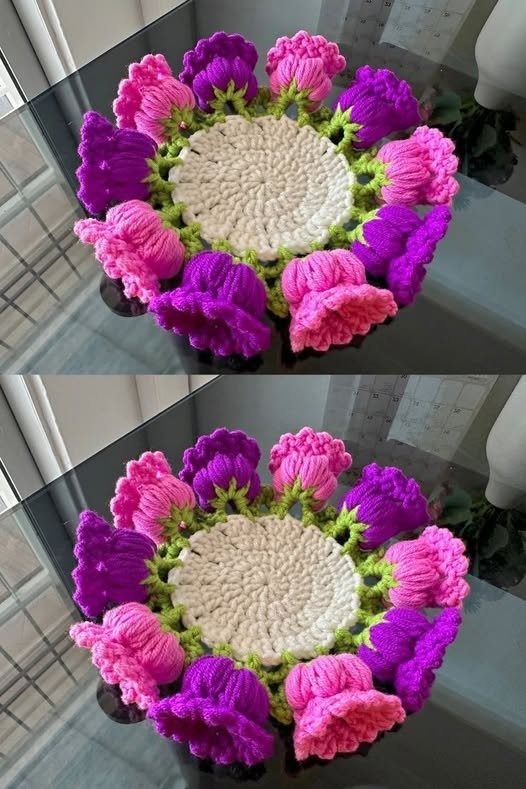
Crochet coaster Tulips Pattern is one of the most charming projects you can undertake if you are looking to combine utility with floral elegance in your home decor. There is something deeply satisfying about creating a functional piece of art that protects your furniture while adding a splash of spring to your living room. Whether you are a seasoned pro or a curious beginner, mastering this specific design allows you to experiment with color theory and texture in a compact, manageable format.
When you dive into a Crochet coaster Tulips Pattern, you aren’t just following a set of instructions; you are engaging in a relaxing ritual that results in a handmade treasure. These coasters make for incredible gifts, especially for housewarmings or Mother’s Day, because they carry the warmth of a handmade item. The intricate look of the tulip stitch creates a 3D effect that mimics a garden in bloom, making every coffee break feel a bit more special and intentional.
To achieve the best results with your Crochet coaster Tulips Pattern, it is essential to focus on the quality of your materials and the consistency of your tension. Using the right cotton yarn ensures that your coaster is absorbent and durable, while a precise crochet hook size helps define the “petals” of your tulips. In this guide, we will explore everything from the foundational stitches to the finishing touches, ensuring your final product looks professional and beautiful.
1. Essential Materials for Your Crochet coaster Tulips Pattern
Selecting the right yarn is the first step toward a successful Crochet coaster Tulips Pattern. For items that will interact with heat and moisture, a 100% mercerized cotton yarn is highly recommended because it holds its shape and doesn’t pill easily. You will want at least three colors: green for the stems/leaves, a floral color (like pink, red, or yellow) for the tulip petals, and a neutral base color for the coaster’s background.
The crochet hook size you choose will dictate the drape and density of your fabric. Usually, a 3.5mm or 4.0mm hook works best with medium-weight cotton to ensure the crochet stitches are tight enough to protect surfaces. If your tension is naturally loose, consider sizing down so your tulip flowers don’t look floppy or lose their distinct shape over time.
Don’t forget the small but vital crochet accessories like a sharp pair of scissors and a blunt-tipped tapestry needle. Because the Crochet coaster Tulips Pattern involves multiple color changes, you will have several ends to weave in. A good needle makes this process seamless, ensuring that the back of your handmade coaster looks just as tidy and professional as the front.
Stitch markers are another lifesaver when working on a circular crochet pattern. Since the tulip motif usually repeats around a center ring, marking the beginning of your rounds helps you keep track of your increases. This prevents the coaster from curling upward or becoming wavy, keeping your table protection perfectly flat and functional for your mugs.
Lighting and ergonomics also play a role in your crafting experience. Since the tulip stitch requires identifying specific “V” spaces from previous rows, working in a well-lit area will reduce eye strain. A comfortable grip on your hook allows you to maintain consistent tension, which is the secret ingredient to making your Crochet coaster Tulips Pattern look like it came from a high-end boutique.
Lastly, having a printed or digital copy of the Crochet coaster Tulips Pattern instructions allows you to visualize the project before you start. Familiarizing yourself with the stitch abbreviations—such as DC for double crochet or the cluster stitch used for the petals—saves time and prevents mistakes. Preparation is half the battle when creating intricate floral crochet designs that stand the test of time.
2. Understanding the Tulip Stitch Technique
The heart of the Crochet coaster Tulips Pattern lies in the clever combination of stitches that create the floral illusion. Usually, this involves a “V-stitch” made in green yarn to represent the leaves, followed by a bobble stitch or a cluster stitch in the flower color. Learning how to transition between these colors smoothly is what gives the tulip design its clean, vibrant pop against the background.
To start the tulip row, you will typically work into the spaces created by the previous round. The “V-stitch” is created by working a double crochet, a chain stitch, and another double crochet all into the same spot. This creates the “nest” where your tulip petals will eventually sit, making the Crochet coaster Tulips Pattern look organized and symmetrical across the entire circumference.
When it comes time to “grow” the flowers, you will use the popcorn stitch or a 3-DC cluster. By pulling the yarn through multiple loops at once, you create a rounded, voluminous shape that mimics a budding tulip. This adds a wonderful tactile texture to your DIY coaster, making it not just a visual delight but a sensory one as well for anyone using it.
Managing your yarn floats is crucial during this stage of the Crochet coaster Tulips Pattern. Since you are switching colors frequently, you can either carry the yarn behind your work or cut and join as you go. For a small crochet project like a coaster, cutting and weaving is often preferred to keep the piece thin enough to sit flat on a table without wobbling.
Accuracy in your stitch count is the difference between a circle and an accidental hexagon. The Crochet coaster Tulips Pattern relies on mathematical increases (usually 12 stitches per round) to stay flat. If you miss a “V-stitch” or add an extra petal, the edges might start to “ruffle,” which is a common issue for beginners working on circular crochet motifs.
Practice makes perfect when it comes to the tulip stitch. If your first flower looks a bit cramped, don’t be afraid to frog (unravel) a few stitches and adjust your tension. A relaxed but firm hand will produce the best crochet tulips, ensuring that each flower in your Crochet coaster Tulips Pattern is uniform and clearly defined against the leafy green backdrop.
3. Step-by-Step Guide to Starting Your Coaster
Every great Crochet coaster Tulips Pattern begins with a solid foundation, usually a magic ring (or magic circle). This technique allows you to pull the center hole completely shut, creating a seamless look that is much cleaner than a standard chain-start. Inside this ring, you will typically work 12 double crochet stitches to establish the base of your floral project.
As you move to the second round, the goal is to expand the circle while keeping it flat. In the Crochet coaster Tulips Pattern, this usually involves placing two stitches into every stitch from the previous round. Using a neutral color yarn for the first few rows helps the colorful tulip border stand out later, creating a sophisticated frame for your drinks.
Once the base reaches the desired diameter, it is time to introduce the green yarn for the stems. Following the Crochet coaster Tulips Pattern, you will create the V-stitches mentioned earlier. It is important to ensure these are spaced evenly; usually, you skip a stitch between each “V” to allow the crochet fabric enough room to breathe without bunching up.
The most exciting part is adding the tulip flower row. Using your bright floral yarn, you will work the cluster stitches into the chain-1 spaces of the green V-stitches. This is where the Crochet coaster Tulips Pattern truly comes to life. Watching the row of tiny flowers emerge from your hook is an incredibly rewarding experience that makes the effort worth it.
After the flowers are complete, a final “edging” round is often added to stabilize the piece. This could be a simple single crochet border or a decorative shell stitch in the original base color. This final step in the Crochet coaster Tulips Pattern secures the flower row and gives the coaster a finished, polished look that prevents the edges from curling.
Once the crochet work is done, you are left with the task of weaving in the ends. Use your tapestry needle to hide the yarn tails inside the stitches of the same color. For a durable crochet coaster, weave the ends in one direction, then back the other way; this “locking” method ensures that your Crochet coaster Tulips Pattern won’t unravel even after multiple washes.
4. Customizing and Caring for Your Crochet Tulips
The beauty of the Crochet coaster Tulips Pattern is how easily it can be customized to fit your personal style or home decor. You aren’t limited to traditional tulip colors; you can create a “gothic garden” with dark purples and blacks, or a “summer meadow” with bright oranges and teals. Changing the yarn color palette completely transforms the vibe of the finished product.
You can also adjust the size of your Crochet coaster Tulips Pattern by adding more rounds to the base before starting the flower rows. If you want to create a matching set, try making a larger version to act as a crochet trivet for hot teapots or serving dishes. This creates a cohesive, themed look for your dining table that is sure to impress guests.
Blocking your finished coasters is a pro tip that many beginners skip. By wetting your crochet tulips slightly and pinning them into a perfect circle on a foam board, you set the stitches in place. This makes the Crochet coaster Tulips Pattern look perfectly symmetrical and ensures they lay bone-flat on your furniture, providing the best possible protection.
In terms of care, cotton-based crochet coasters are quite resilient. You can usually hand wash them in warm soapy water and lay them flat to dry. If you used a high-quality mercerized cotton, the colors in your Crochet coaster Tulips Pattern should remain vibrant for years, even with regular use and occasional spills from coffee or tea.
If you want to add an extra layer of functionality, you can sew a piece of felt backing to the bottom of your coaster. This hides the back of the stitches and adds a non-slip quality. While the Crochet coaster Tulips Pattern is beautiful on its own, this small addition can make the item feel more substantial and “store-bought” in terms of quality.
Finally, consider making a small crochet coaster holder to keep your set organized. Using the same base color as your Crochet coaster Tulips Pattern, you can whip up a simple “basket” to store four to six coasters. This makes the set a perfect, ready-to-go gift that showcases your skills and attention to detail in the wonderful world of fiber arts.
FAQ – Frequently Asked Questions
1. What is the best yarn for a Crochet coaster Tulips Pattern? The best yarn is definitely 100% cotton. Cotton is absorbent, which is vital for a coaster, and it handles heat well. Synthetic fibers like acrylic can melt if a very hot mug is placed on them, and they don’t soak up condensation as effectively as cotton does.
2. Is this pattern suitable for beginners? Yes, if you know the basic stitches (single crochet, double crochet, and chain). The tulip stitch might require a quick YouTube tutorial or a bit of practice, but it is a repetitive pattern that is very easy to pick up once you finish the first few flowers.
3. How long does it take to make one coaster? An experienced crocheter can finish a Crochet coaster Tulips Pattern in about 30 to 45 minutes. For a beginner, it might take an hour or two. It is the perfect “one-sitting” project for an evening of relaxation.
4. Why is my coaster curling up at the edges? Curling is usually caused by tension that is too tight or missing an increase in the early rounds. If it’s a minor curl, “blocking” the coaster (wetting and pinning it flat) will usually fix the issue. If it’s severe, you may need to use a larger hook.
5. Can I use this pattern to make other items? Absolutely! The tulip stitch used in this Crochet coaster Tulips Pattern can be scaled up to create beautiful blankets, scarves, or even decorative borders for pillowcases. The logic of the stitch remains the same regardless of the project size.
Conclusion
Creating a Crochet coaster Tulips Pattern is a delightful journey into the world of floral crochet. Throughout this article, we have covered the importance of selecting high-quality cotton yarn, the specific techniques required to master the tulip stitch, and the step-by-step process of building a flat, functional, and beautiful coaster.
We also discussed how to care for your finished pieces to ensure they remain a staple of your home decor for a long time. This project is a fantastic way to sharpen your skills while producing something truly unique and useful.