Crochet Vest With Squares – Pattern is one of the most versatile and timeless projects you can undertake, blending vintage aesthetics with a modern flair that fits almost any wardrobe. Whether you are a seasoned artisan or a curious beginner, the beauty of a crochet vest with squares lies in its modular nature, allowing you to play with colors, textures, and layouts before ever picking up a sewing needle. This specific pattern has seen a massive resurgence in recent years, driven by the slow fashion movement and the desire for unique, handmade garments that stand out from mass-produced retail items.
The appeal of the Crochet Vest With Squares – Pattern is deeply rooted in its accessibility and the sheer joy of seeing small, individual motifs transform into a functional piece of wearable art. By mastering the basic square construction, you unlock the ability to customize the length, width, and drape of your crochet vest, making it a perfect gift or a signature addition to your own closet. In this guide, we will dive deep into the technical requirements, the creative choices, and the step-by-step assembly process that makes this pattern a favorite among the global crafting community.
To successfully execute the Crochet Vest With Squares – Pattern, it is essential to understand the core components of the design, from selecting the right yarn weight to mastering the joining techniques that ensure a professional finish. We will explore how to choose a color palette that reflects your personal style and how to measure your body accurately to ensure the crochet vest fits perfectly. By following this comprehensive breakdown, you will not only create a beautiful garment but also enhance your crochet skills through repetitive practice and structural assembly.
1 Understanding the Crochet Vest With Squares – Pattern Basics
The foundation of any Crochet Vest With Squares – Pattern is the individual motif, often referred to as a granny square or a geometric block. These blocks are worked from the center outward, typically using a combination of double crochet stitches and chain spaces to create a breathable, lace-like fabric. Understanding the tension of your stitches is vital because each square must be uniform in size to ensure the final vest aligns correctly during the assembly phase.
Choosing the right materials is the first step in bringing your Crochet Vest With Squares – Pattern to life. Most crafters prefer a cotton blend yarn or a soft acrylic yarn for this project, as these fibers provide the necessary structure while remaining comfortable against the skin. The hook size you select should correspond to your yarn choice, usually ranging from a 3.5mm to a 5.0mm hook, depending on whether you want a tight or loose stitch definition.
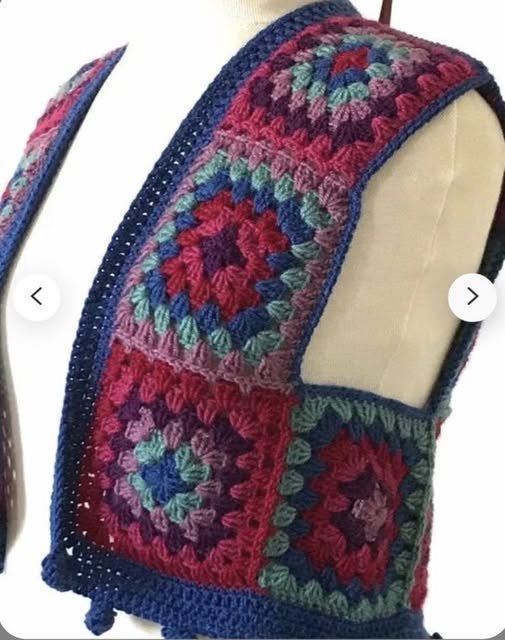
In this pattern, the “squares” serve as the building blocks for the front panels, the back panel, and sometimes the shoulder straps. Because the Crochet Vest With Squares – Pattern is modular, you have the freedom to mix and match different stitch patterns within each square. You might choose a classic solid block for a modern look or a floral-centered motif for a more bohemian, retro vibe that mimics the styles of the 1970s.
Mapping out your design is a crucial part of the Crochet Vest With Squares – Pattern workflow. Before you start crocheting, it is helpful to draw a simple diagram of how many squares you will need for each section of the vest. A standard medium-sized vest might require approximately 20 to 30 squares, depending on their individual dimensions. This planning stage helps you estimate the total yardage of yarn required and prevents you from running out of a specific color mid-project.
Consistency is the secret ingredient to a professional-looking Crochet Vest With Squares – Pattern. To achieve this, many experts recommend blocking your squares before joining them. Blocking involves wetting the finished pieces and pinning them to a specific measurement on a foam board. This process ensures that every square is exactly the same size, making the seaming process much smoother and giving the vest a polished, high-end appearance.
Finally, the Crochet Vest With Squares – Pattern allows for infinite scaling. If you want a cropped look, you simply use fewer rows of squares. If you prefer a long, duster-style vest, you can add extra rows to the bottom. This adaptability is why the pattern remains a top choice for DIY fashion enthusiasts who want to create clothing that accommodates different body types and personal fashion preferences effortlessly.
2 Essential Materials and Tools for Your Crochet Vest
When starting your Crochet Vest With Squares – Pattern, the quality of your tools will directly impact your experience. High-quality ergonomic crochet hooks are recommended to prevent hand fatigue, especially since you will be making many repetitive squares. Additionally, having a sharp pair of yarn snips and a sturdy tapestry needle is essential for weaving in the numerous ends that come with multi-colored square patterns.
The choice of yarn is perhaps the most significant decision for your Crochet Vest With Squares – Pattern. For a summer-ready vest, look for lightweight (Category 3) yarn, which offers excellent breathability. If you are designing a piece for autumn or winter layering, a worsted weight (Category 4) wool or wool-blend yarn will provide the warmth and “heaviness” needed for a cozy, substantial crochet garment.
Don’t forget the importance of stitch markers when working on the Crochet Vest With Squares – Pattern. These small tools are incredibly helpful for marking the corners of your squares or for holding pieces together while you decide on the final layout. They also help in counting your rounds if you are working on complex motifs that require precise stitch counts to maintain their geometric shape.
A measuring tape is another non-negotiable tool for the Crochet Vest With Squares – Pattern. You must measure your bust, waist, and desired length before you begin. Since crochet fabric tends to stretch over time, it is often wise to design the vest with a small amount of negative ease or a “true-to-size” fit, ensuring that it doesn’t become overly baggy after a few wears.
For those following a Crochet Vest With Squares – Pattern that uses multiple colors, a yarn bowl can be a lifesaver. It keeps your different skeins from tangling as you switch between colors for each round of the square. Keeping your workspace organized ensures that the creative process remains relaxing rather than stressful, allowing you to focus on the rhythm of your stitches.
Lastly, consider the finishing touches such as buttons or ties. While many crochet vests are designed to be worn open, adding a simple wooden button or a crocheted cord can add functionality and a decorative element to your pattern. These small details are what transform a simple project into a bespoke piece of clothing that looks like it came from a high-end boutique.
3 Step-by-Step Assembly and Joining Techniques
Once you have completed all the individual pieces for your Crochet Vest With Squares – Pattern, the assembly phase begins. There are several ways to join your squares, each offering a different aesthetic. The slip stitch join creates a flat, almost invisible seam, while the whip stitch (using a tapestry needle) is a classic method that is very secure. For a more decorative look, the join-as-you-go (JAYG) method allows you to connect squares while working the final round.
Layout is key before you apply any permanent stitches to your Crochet Vest With Squares – Pattern. Lay all your finished squares on a flat surface, such as a bed or a large table, and arrange them into the shape of your vest. This is the time to check your color distribution and ensure that no two identical colors are touching, unless that is your specific design intent for the pattern.
Begin by joining the squares for the back panel of the vest first. This provides a stable base to which you will later attach the front panels. In the Crochet Vest With Squares – Pattern, the back panel is usually a rectangular or slightly tapered grid of squares. Once the back is complete, move on to the two front panels, ensuring they are symmetrical so the vest hangs evenly on the body.
The shoulder seams are the most structural part of the Crochet Vest With Squares – Pattern. These seams take the most weight, so it is important to reinforce them with a strong joining stitch. You can even add a row of single crochet across the shoulder join to provide extra stability and prevent the crochet vest from stretching out at the shoulders over time.
After the main body is joined, many Crochet Vest With Squares – Pattern designs call for a border or edging. Working a few rounds of half double crochet or a scalloped edge around the armholes and the bottom hem can tie the whole design together. This not only hides any minor imperfections in the joining process but also gives the vest a finished, professional look that frames the squares beautifully.
The final step in the assembly of your Crochet Vest With Squares – Pattern is weaving in the ends. While it may be tempting to rush this part, taking the time to securely weave in every yarn tail ensures that your vest won’t unravel in the wash. Using a weaving technique that goes in multiple directions will lock the yarn in place, making your handmade garment durable enough for years of regular wear.
4 Customizing and Styling Your Finished Vest
The beauty of the Crochet Vest With Squares – Pattern is how easily it can be customized to fit your unique style. You can experiment with monochromatic colors for a chic, minimalist look, or go full “maximalist” with bright, contrasting neon yarns. Some makers even choose to incorporate beads or fringe into the bottom edge of their crochet vest to add movement and a “boho” flair to the finished piece.
Styling your Crochet Vest With Squares – Pattern is equally fun. For a casual daytime look, layer your vest over a simple white t-shirt and high-waisted jeans. The crochet squares add a layer of texture that elevates a basic outfit. Because the pattern often features gaps between the stitches, it provides a “peek-a-boo” effect that looks great over solid-colored tops or even sundresses.
If you want a more formal or professional look, you can create a Crochet Vest With Squares – Pattern using dark, sophisticated tones like navy, charcoal, or forest green. Pairing a structured crochet vest with a button-down blouse and tailored trousers creates a sophisticated ensemble that is perfect for the office or a gallery opening, proving that crochet fashion can be incredibly versatile.
For the adventurous crafter, you can modify the Crochet Vest With Squares – Pattern to include functional elements like pockets. By simply crocheting two additional squares and sewing them onto the front panels, you add a practical feature that is both cute and useful. This is a common modification for those who use their vests as lightweight jackets during the transitional seasons of spring and fall.
Seasonal changes also offer opportunities for variation in the Crochet Vest With Squares – Pattern. In the summer, use bamboo yarn for a cool, silky feel. In the winter, switch to a mohair or alpaca blend to create a fuzzy, warm texture that looks beautiful over long-sleeved sweaters. The squares act as a canvas for you to play with the tactile qualities of different fibers.
Lastly, don’t be afraid to share your progress and your finished Crochet Vest With Squares – Pattern with the online community. Platforms like Instagram and Pinterest are full of inspiration, and seeing how other makers have interpreted the same pattern can give you new ideas for your next project. The crochet community thrives on sharing tips, color combinations, and “hacks” that make the crafting journey even more rewarding.
FAQ – Frequently Asked Questions
1. Is the Crochet Vest With Squares – Pattern suitable for absolute beginners?
Yes, it is! As long as you know the basic stitches like the chain, single crochet, and double crochet, you can complete this project. The modular nature of the squares makes it less intimidating than crocheting a large garment in one piece.
2. How long does it take to finish a Crochet Vest With Squares – Pattern?
The timeline varies based on your speed and the complexity of the squares. On average, a dedicated crafter can finish a vest in about 10 to 20 hours of active crocheting time.
3. What is the best yarn for a Crochet Vest With Squares – Pattern?
For durability and ease of care, a cotton/acrylic blend is often the best choice. It holds its shape well and can usually be machine-washed on a gentle cycle, which is important for wearable items.
4. How do I calculate how many squares I need?
Measure the widest part of your torso and divide that by the width of one finished square. This will tell you how many squares you need for the circumference of the vest. Then, decide on the length to determine the number of rows.
5. Can I use different square patterns in the same vest?
Absolutely! Mixing different square patterns (like a mix of sunburst squares and traditional granny squares) can create a stunning, eclectic look. Just make sure all the squares end up being the same final size.
6. Does the Crochet Vest With Squares – Pattern stretch over time?
Like all crochet items, some stretching is natural. To minimize this, use a smaller hook for a tighter stitch and avoid hanging the vest on a hanger; instead, store it folded to maintain its shape.
Conclusion
In this article, we have explored the wonderful world of the Crochet Vest With Squares – Pattern, covering everything from the initial planning and material selection to the final assembly and styling.
We learned that the secret to a successful crochet vest lies in the consistency of your squares, the quality of your joins, and the creativity you bring to the color palette. This project is not just about making a garment; it’s about expressing your personality through every stitch and creating a piece that can be cherished for years.