The Fabric Sewing Machine Organizer – Pattern is one of the most practical and rewarding projects any sewing enthusiast can undertake to improve their creative workspace. If you have ever found yourself frustrated by a cluttered desk or spent precious minutes searching for your favorite seam ripper under a pile of scraps, this sewing organizer is the ultimate solution. By following a well-structured sewing machine mat pattern, you can create a dedicated space for all your essential tools, ensuring they are always within arm’s reach while you work on your latest masterpiece.
Crafting your own Fabric Sewing Machine Organizer – Pattern allows for complete customization, which is something you simply cannot get with store-bought plastic bins. You have the freedom to select high-quality quilting cotton, choose colors that inspire your creativity, and even adjust the pocket sizes to fit your specific shears, marking pens, and bobbins. This project serves a dual purpose: it acts as a cushioned vibration-dampening mat for your machine while providing a hanging “apron” of pockets that drapes over the edge of your table for maximum efficiency.
Engaging with a Fabric Sewing Machine Organizer – Pattern is also an excellent way to use up your favorite fabric remnants or “fat quarters” that have been sitting in your stash. It is a beginner-friendly project that introduces fundamental techniques such as topstitching, creating pleated pockets, and applying bias tape binding. In the following sections, we will delve into the specific requirements, assembly steps, and professional tips needed to transform a simple piece of cloth into a sophisticated sewing room accessory that will serve you for years to come.
1. Choosing the Best Materials for Your Fabric Sewing Machine Organizer – Pattern
When you begin your Fabric Sewing Machine Organizer – Pattern, the selection of fabric is your most important decision for both durability and style. I highly recommend using a sturdy medium-weight cotton or canvas for the main body of the organizer. These fabrics provide the structural integrity needed to hold the weight of heavy metal scissors and multiple spools of thread without sagging or losing their shape over time.
For the interior lining and pockets of your sewing organizer, you can get creative with coordinating prints or contrasting colors to make the Fabric Sewing Machine Organizer – Pattern visually striking. Quilting cotton is an excellent choice here because it is easy to press and sew, which is vital when you are creating multiple small compartments. Using a bright or light-colored fabric for the pockets also makes it much easier to see small items like silver needles or clear bobbins.
Interfacing is the “secret ingredient” that makes a Fabric Sewing Machine Organizer – Pattern successful and professional-looking. You should use a fusible fleece or a heavy-weight stabilizer between your fabric layers. This extra padding not only helps the organizer maintain its form but also acts as a muffler, reducing the noise and vibration generated by your sewing machine during high-speed stitching.
Don’t forget the importance of choosing the right sewing thread for this project. Since the pockets will be under constant tension from tools being inserted and removed, a high-quality polyester or cotton-wrapped polyester thread is ideal. It offers the strength and slight stretch needed to prevent the seams from popping, ensuring your handmade organizer remains intact through years of heavy use in your craft room.
The finishing details of the Fabric Sewing Machine Organizer – Pattern often involve bias tape or binding. You can make your own matching bias tape from your fabric scraps or buy pre-made double-fold bias tape for a quicker finish. This binding covers the raw edges of your project, providing a clean, “boutique” look while reinforcing the perimeter of the mat against wear and tear.
Lastly, consider adding a specialized “pincushion” area or a scrap catcher attachment to your organizer. Many advanced versions of this sewing pattern include a detachable bag held by velcro or snaps to collect thread tails and fabric snippets. Having these extra materials ready before you start ensures a smooth sewing experience and a more functional finished product that caters to every aspect of your workflow.
2. Preparing and Cutting Your Fabric Sewing Machine Organizer – Pattern
Before you make the first cut for your Fabric Sewing Machine Organizer – Pattern, it is essential to pre-wash and iron your fabrics. Cotton fabrics are notorious for shrinking, and there is nothing more disappointing than having a perfectly fitted sewing mat warp after its first wash. Ironing ensures that your fabric is flat and smooth, which is critical for accurate measuring and cutting according to the pattern specifications.
The dimensions of your Fabric Sewing Machine Organizer – Pattern should be based on the size of your specific sewing machine and your workspace. Typically, a base mat of 20 inches by 24 inches works well for most standard machines. Use a rotary cutter and a transparent quilting ruler to ensure your rectangles are perfectly square, as even a small deviation can cause the organizer to sit crookedly on your table.
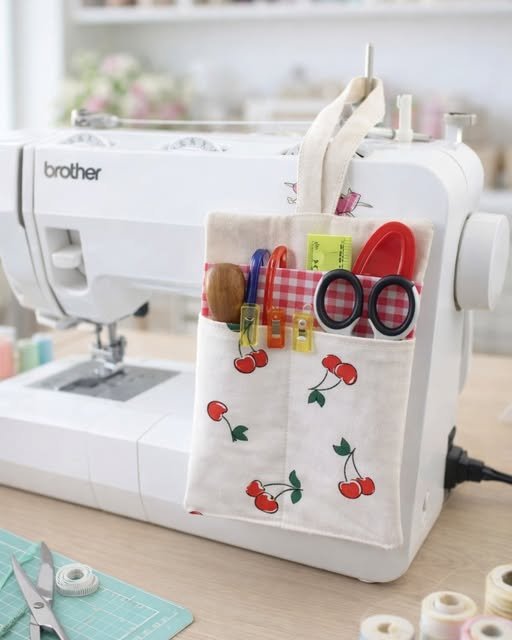
When cutting the pockets for your sewing organizer, think about the tools you use most frequently. You might want one wide pocket for your fabric shears, several narrow slots for marking pencils and seam rippers, and perhaps a pleated pocket for bulkier items like a measuring tape or a pincushion. Measuring these tools beforehand allows you to customize the Fabric Sewing Machine Organizer – Pattern to your unique needs.
Marking your stitch lines on the fabric is a step that saves an immense amount of time during the assembly phase. Use a water-soluble fabric pen or tailor’s chalk to mark exactly where each pocket divider will be sewn. This ensures that your pockets are uniform and that the Fabric Sewing Machine Organizer – Pattern maintains a balanced, symmetrical appearance that looks like it was made by a professional.
If your Fabric Sewing Machine Organizer – Pattern includes a fleece or foam stabilizer, cut these pieces slightly smaller than your fabric (usually by 1/2 inch). This technique, known as “reducing bulk,” makes it much easier to sew the final edges and apply the binding. It prevents your sewing machine from having to struggle through too many thick layers at once, resulting in much neater topstitching.
The final preparation step involves “fusing” your interfacing to the wrong side of your main fabric pieces using a hot iron. Take your time with this process to ensure there are no bubbles or wrinkles. Once your pieces are fused and cut, lay them out on your table to visualize the Fabric Sewing Machine Organizer – Pattern before you start sewing. This “dry run” helps you catch any layout errors before they become permanent.
3. Sewing the Pockets and Assembling the Main Body
The assembly of the Fabric Sewing Machine Organizer – Pattern usually begins with the pocket strip. Hem the top edge of your pocket fabric first, as this will be the opening where you reach for your tools. If you want a more decorative look, you can add a piece of lace or Rick-Rack along this edge to give your sewing organizer a bit of vintage flair and personality.
Align the pocket strip with the bottom edge of your front main fabric piece and pin it securely. To create the individual compartments described in your Fabric Sewing Machine Organizer – Pattern, sew vertical lines according to the marks you made earlier. Remember to backstitch at the top of every pocket; these points will experience the most stress, and the backstitching prevents the pockets from pulling away over time.
Once the pockets are secure, it is time to quilt the main mat of the Fabric Sewing Machine Organizer – Pattern. Place your front fabric, the stabilizer/fleece, and the backing fabric together like a “fabric sandwich.” You can do simple straight-line quilting or a cross-hatch pattern. This not only looks beautiful but also bonds the layers together, ensuring the sewing mat stays flat under your machine.
If your Fabric Sewing Machine Organizer – Pattern features a detachable thread catcher, now is the time to sew the velcro or snap fasteners. Positioning is key—the bag should hang freely off the front of the table without interfering with your legs while you sew. This attention to ergonomic detail is what distinguishes a high-quality handmade organizer from a generic one.
Now you will join the pocket section to the main mat. In many sewing machine organizer patterns, the pocket section is a long strip that hangs over the edge of the table. Ensure the seam where the mat meets the “apron” is reinforced with multiple rows of stitching. This horizontal seam bears the weight of all your stored tools, so it must be exceptionally strong.
The final structural step of the Fabric Sewing Machine Organizer – Pattern is basted the edges. Run a long stitch around the entire perimeter of the organizer about 1/8 inch from the edge. This holds all the layers in place and makes the application of the binding tape much smoother. Your organizer is now taking its final shape, and you can see the efficiency of your new workspace coming to life.
4. Applying the Binding and Professional Finishing Touches
Applying the binding is the stage where your Fabric Sewing Machine Organizer – Pattern truly starts to look like a finished product. Start on one of the long sides, leaving a small tail of binding tape. Use a walking foot if you have one, as it helps move the thick layers of fabric and stabilizer through the machine evenly, preventing the fabric from “creeping” or puckering.
Mitering the corners is the secret to a high-end Fabric Sewing Machine Organizer – Pattern. To achieve this, fold the binding at a 45-degree angle at each corner. This technique creates a clean, sharp point that is aesthetically pleasing and durable. If you are new to binding, don’t rush this part—accurate corners are the hallmark of a skilled sewing enthusiast.
Once the binding is sewn to the front, you can flip it to the back and finish it by hand with a ladder stitch for an invisible look, or machine-stitch it for a faster result. If you choose to machine-stitch, “stitching in the ditch” or using a decorative topstitch can add an extra layer of detail to your Fabric Sewing Machine Organizer – Pattern that reflects your personal style.
After the binding is complete, give the entire sewing organizer a final press with a steam iron. This “sets” the stitches and flattens the binding, making the whole project look crisp and professional. At this point, you can also remove any remaining fabric marking lines with a damp cloth or by waiting for the air-erasable ink to disappear.
The very last touch for your Fabric Sewing Machine Organizer – Pattern might include adding a few personal labels or “Handmade with Love” tags. Some crafters also like to add a small strip of magnetic tape inside one of the pockets to hold loose pins or needles securely. These small innovations make your sewing mat even more functional for your specific needs.
Now, place your machine on top of your brand-new Fabric Sewing Machine Organizer – Pattern. Arrange your scissors, rulers, and bobbins in their designated spots. Take a moment to appreciate the organized beauty of your workspace. Not only have you created a useful tool, but you have also completed a project that showcases your sewing skills and commitment to your craft.
FAQ – Frequently Asked Questions
1. Is a Fabric Sewing Machine Organizer – Pattern suitable for beginners?
Yes! This project is excellent for beginners because it involves mostly straight lines and basic assembly. It is a fantastic way to practice quilting and binding on a smaller scale before moving on to larger quilts.
2. What is the best fabric for this sewing organizer?
The best choice is a sturdy cotton canvas or quilting cotton combined with a fusible fleece. This provides the necessary weight to keep the mat in place and the softness to protect your table and machine.
3. Can I adjust the size of the Fabric Sewing Machine Organizer – Pattern?
Absolutely. You should measure the footprint of your sewing machine and the height of your table. You can easily make the mat wider or the hanging pocket section longer depending on your workspace requirements.
4. How do I keep the organizer from sliding off the table?
The weight of the sewing machine usually keeps the Fabric Sewing Machine Organizer – Pattern secure. However, you can also sew a piece of non-slip shelf liner to the bottom of the mat for extra grip if your table surface is very slick.
5. Can I wash my Fabric Sewing Machine Organizer – Pattern?
Yes, provided you used washable fabrics and stabilizers. It is best to wash it on a gentle cycle in cold water and lay it flat to dry to maintain the shape of the pockets and the integrity of the interfacing.
6. Do I need a special foot for my sewing machine to make this?
While a standard foot works, a walking foot is highly recommended. It helps feed the multiple layers (fabric, fleece, and pockets) through the machine at the same rate, preventing the layers from shifting.
Conclusion
Creating a Fabric Sewing Machine Organizer – Pattern is more than just a craft project; it is an investment in your future sewing productivity.
In this article, we have covered the entire journey—from selecting durable cotton fabrics and the right stabilizers to the intricacies of sewing custom pockets and achieving a professional finish with mitered binding. By organizing your tools and dampening machine vibrations, you create a more peaceful and efficient environment for your creativity to flourish.