A Crochet Anklets – Pattern is the ultimate summer accessory, offering a unique blend of bohemian flair and delicate craftsmanship that you simply cannot find in mass-produced jewelry. Whether you are walking barefoot on a sandy beach or pairing them with your favorite sandals for a garden party, these handmade accessories add a touch of personal style to any outfit. Mastering a Crochet Anklets – Pattern is an excellent project for both beginners and advanced crafters because it requires very little yarn, works up quickly, and allows for endless customization with beads, charms, and intricate stitch variations.
When you dive into the world of a Crochet Anklets – Pattern, you are engaging in a form of “micro-crochet” that emphasizes detail and precision over bulk. Unlike larger projects like blankets or sweaters, an anklet pattern focuses on the beauty of the individual stitch, often utilizing fine lace-weight yarn or embroidery floss to achieve a jewelry-like finish. This type of crochet jewelry is not only fun to make but also serves as a wonderful gift for friends and family, especially those who appreciate the “boho-chic” aesthetic that is currently trending in the fashion world.
To successfully execute a Crochet Anklets – Pattern, it is essential to understand the balance between aesthetics and durability. Since these pieces are worn around the ankle, they need to be strong enough to withstand movement while remaining soft against the skin. In this comprehensive guide, we will explore everything from the best materials to use for your crochet anklets to the specific techniques that ensure a perfect fit every time. By the end of this article, you will have all the knowledge needed to create a stunning collection of crocheted foot jewelry using our specialized tips.
1. Choosing the Best Materials for Your Crochet Anklets – Pattern
The success of your Crochet Anklets – Pattern starts with the selection of the right thread. For jewelry that sits directly against the skin, I highly recommend using a mercerized cotton thread, such as size 10 or size 20. This type of thread has been treated to be smoother, stronger, and more lustrous than regular cotton, ensuring your crochet anklet looks like high-end jewelry rather than a craft project.
Because you are working with very fine thread, the choice of a steel crochet hook is paramount. Usually, a hook size ranging from 1.25mm to 1.75mm works best for most Crochet Anklets – Patterns. Using a hook that is too large will result in a floppy, loose accessory, whereas the correct small hook creates a crisp, defined stitch that holds its shape beautifully throughout the day.
Durability is a key factor when selecting components for your handmade anklet. Since the ankle is a high-motion area, you should consider using a nylon-based thread or a high-quality silk if you want a bit of extra shine and strength. These materials are resistant to fraying and can handle the occasional splash of water if you happen to wear your crochet creation near the pool or ocean.
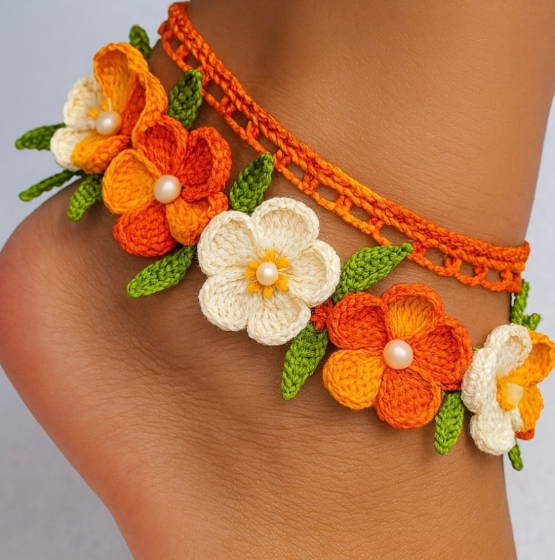
Incorporating beads is a popular way to elevate a Crochet Anklets – Pattern. If you choose to add embellishments, make sure the beads have a hole large enough for your thread to pass through. Glass seed beads or small metallic spacers are perfect for adding weight and a bit of sparkle to the anklet design, making it catch the light with every step you take.
Fastenings are the final material consideration for your anklet pattern. While many people prefer a simple tie-closure made of crochet chains, you can also use lobster claws or button toggles for a more secure fit. If you opt for a metal clasp, ensure it is made of stainless steel or sterling silver to prevent tarnishing and skin irritation, especially if you have sensitive skin.
Lastly, don’t forget a small pair of embroidery scissors and a fine-tipped tapestry needle. These tools are essential for weaving in the tiny ends of your Crochet Anklets – Pattern. Because the project is so small, any loose ends will be very visible, so having the right tools for a clean finish is the secret to a professional-looking bohemian accessory.
2. Essential Stitches and Techniques for the Pattern
The most common foundation for a Crochet Anklets – Pattern is the foundation chain, but to make it more comfortable, many experts suggest the foundation single crochet (fsc). This technique creates a base that is much more elastic than a standard chain. Since your ankle expands slightly when you walk, an elastic base prevents the crochet jewelry from feeling too tight or restrictive.
Most anklet patterns utilize a combination of slip stitches, chains, and picots. The picot stitch is particularly favored in Crochet Anklets – Pattern designs because it creates a delicate, pointed decorative edge that mimics the look of lace. Learning how to place these picots evenly will give your anklet a symmetrical and sophisticated appearance that looks great on any foot.
If you are following a more intricate Crochet Anklets – Pattern, you might encounter the shell stitch or the v-stitch. These clusters of stitches allow you to add width and decorative “fans” to the center of the anklet. When worked in a fine thread, these stitches create a vintage-inspired look that pairs perfectly with summer dresses and beachwear.
For those who want to add a “toe ring” element to their anklet, the technique involves creating a long loop from the center of the crochet band that fits over the middle toe. This is often referred to as a “barefoot sandal” or a slave anklet pattern. It requires careful measurement to ensure the loop is long enough to be comfortable but short enough to stay in place.
Bead integration is a technique where you pre-string your beads onto the thread before you start the Crochet Anklets – Pattern. You then slide a bead up to your hook and secure it with a chain stitch or a single crochet. This keeps the beads firmly locked into the fabric of the anklet, ensuring they don’t slide around or fall off during wear.
Blocking is just as important for a small crochet anklet as it is for a large shawl. Once you finish your Crochet Anklets – Pattern, you should lightly dampen it and pin it out to its final shape. This “sets” the stitches and ensures the lace pattern is fully opened and visible, turning a slightly crumpled string into a beautiful piece of wearable art.
3. Customizing the Fit and Style of Your Anklet
The most important rule of any Crochet Anklets – Pattern is getting the measurements right. An anklet should sit comfortably just below or above the ankle bone. To get a perfect fit, measure your ankle with a flexible tape and subtract about half an inch; this allows for the natural “give” of the crochet fabric so the jewelry doesn’t sag or drag on the ground.
Color choice can completely transform the vibe of your Crochet Anklets – Pattern. A crisp white or cream thread creates a classic “bridal” or “shabby chic” look, perfect for beach weddings. On the other hand, using vibrant neons or deep earthy tones can turn the same pattern into a bold statement piece for a music festival or a casual summer outing.
Adding charms is a fantastic way to personalize your Crochet Anklets – Pattern. Small silver shells, stars, or even tiny tassels can be sewn onto the bottom edge of the crochet band. These additions provide movement and sound, creating a gentle “clink” that adds to the sensory experience of wearing handmade jewelry.
For a more modern look, you can experiment with multi-strand crochet anklets. This involves making two or three very thin chain-based patterns and joining them together at the clasp. This layered effect is very popular in current fashion trends and allows you to mix different thread colors or bead types within a single anklet project.
If you find that your Crochet Anklets – Pattern is turning out too thin, you can “bulk it up” by working over a piece of jewelry wire or a thin leather cord. This technique, known as crochet cord jewelry, provides a much sturdier structure and gives the anklet a more rugged, industrial feel that appeals to a wide variety of styles.
Don’t be afraid to experiment with the width of your Crochet Anklets – Pattern. While thin, dainty strings are traditional, “cuff-style” anklets that are one or two inches wide are becoming increasingly popular. These wider bands allow you to showcase complex lace motifs or even small floral appliques, making the anklet the centerpiece of your look.
4. Care and Maintenance for Handmade Crochet Jewelry
Since your Crochet Anklets – Pattern is made of fiber, it requires a bit more care than metal jewelry. To keep it looking fresh, you should avoid wearing it while swimming in chlorinated pools or salty ocean water, as these can break down the cotton fibers over time. If it does get wet, make sure to rinse it in fresh water and lay it flat to dry.
Cleaning your crochet anklet is simple. Use a small bowl of lukewarm water and a drop of mild detergent. Gently swish the crochet piece in the water, rinse thoroughly, and pat dry with a towel. Never wring or twist your handmade jewelry, as this can distort the delicate stitches and ruin the symmetry of the pattern.
Over time, your Crochet Anklets – Pattern might lose some of its stiffness. You can easily fix this by using a commercial fabric stiffener or a simple DIY sugar-water solution. Lightly dipping the anklet and letting it dry pinned to a flat surface will restore its original shape and keep the lace edges from curling.
Storage is another important factor for the longevity of your Crochet Anklets – Pattern. Avoid tossing them into a cluttered jewelry box where they might snag on metal earrings or necklaces. Instead, hang them on a small hook or store them flat in a dedicated pouch. This prevents the delicate thread from tangling or being pulled out of shape.
If you notice a loose thread or a “fuzzy” appearance on your crochet anklet, you can use a small pair of scissors to carefully trim any stray fibers. Applying a tiny dot of clear nail polish or fabric glue to the knots where you changed thread will ensure the Crochet Anklets – Pattern doesn’t unravel during heavy use.
Finally, remember that the beauty of a Crochet Anklets – Pattern is that it is replaceable! If your favorite anklet becomes too worn after a long summer of adventures, you can simply grab your hook and whip up a new one in less than an hour. The ability to create an endless supply of custom jewelry is the greatest perk of being a crochet enthusiast.
FAQ – Frequently Asked Questions
1. Is a Crochet Anklets – Pattern suitable for beginners?
Yes! Because anklets are small and use basic stitches like the chain and single crochet, they are an ideal project for beginners. It’s a great way to practice working with smaller hooks and thinner threads without the commitment of a large project.
2. Can I use regular yarn for an anklet?
While you can use worsted weight yarn, it will result in a very bulky and likely uncomfortable anklet. For the best results in a Crochet Anklets – Pattern, stick to size 10 cotton thread or embroidery floss for a refined, jewelry-like appearance.
3. How do I make the anklet adjustable?
To make your anklet pattern adjustable, instead of a fixed clasp, end each side of the band with a long chain (about 4 inches). This allows the wearer to tie the anklet at their preferred tightness, making it a “one size fits all” gift.
4. Will the colors fade in the sun?
If you use high-quality mercerized cotton, the colors are quite resistant to fading. However, prolonged exposure to direct sunlight and salt water will eventually dull any fiber. To prevent this, store your crochet jewelry in a dark place when not in use.
5. How many beads do I need for a standard anklet?
This depends on your specific Crochet Anklets – Pattern. For a minimalist look, 5 to 10 beads are enough. For a fully beaded “boho” look, you might need 50 to 100 small seed beads. Always string more than you think you’ll need!
6. Can I add a toe loop to any anklet pattern?
Yes! You can add a toe loop to almost any Crochet Anklets – Pattern by finding the center point of the band and attaching a chain of about 3 to 4 inches, then looping it back to the starting point and securing it.
Conclusion
In this guide, we have explored the intricate and beautiful process of creating a Crochet Anklets – Pattern, from selecting the finest mercerized cotton to mastering decorative stitches like the picot and the shell.
We discussed how to achieve a perfect fit by measuring correctly and how to customize your jewelry with beads and charms to match your personal style. Finally, we looked at the essential care steps needed to keep your handmade crochet jewelry looking brand new for years to come.