Finding the perfect Fabric Chicken – Pattern is the first step toward creating a charming, handmade piece of decor that adds a touch of rustic warmth to any home. Whether you are an experienced sewist or a curious beginner, crafting a fabric chicken is a rewarding project that combines creativity with functionality. These whimsical creations serve many purposes, from simple nursery decorations to practical doorstops or pincushions, making the search for a versatile Fabric Chicken – Pattern a top priority for DIY enthusiasts around the globe.
In the world of textile arts, a Fabric Chicken – Pattern represents more than just a template; it is a gateway to exploring different sewing techniques, fabric textures, and color palettes. By choosing the right pattern, you can transform scrap pieces of cotton, linen, or felt into a characterful farmhouse companion. The beauty of this specific project lies in its simplicity and the ability to customize every detail, from the wattle and comb to the choice of button eyes, ensuring that no two chickens are ever exactly alike.
To achieve professional results, it is essential to understand the structural components of a Fabric Chicken – Pattern. This includes mastering the seam allowance, understanding how to pivot at sharp corners, and learning the best methods for stuffing to ensure your chicken sits upright and holds its shape. As we dive deeper into this guide, we will explore the essential materials, the step-by-step assembly process, and the various ways you can personalize your project to make it a standout piece in your handmade collection.
1 Understanding the Fabric Chicken – Pattern Basics
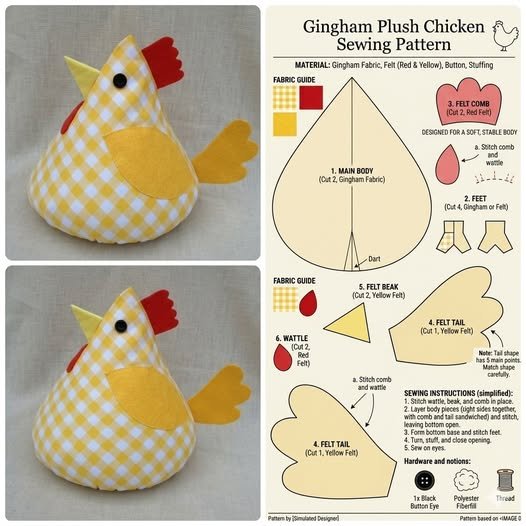
When you begin your journey with a Fabric Chicken – Pattern, the first thing to recognize is the template geometry. Most patterns consist of two main body panels, a base (to help it stand), and separate pieces for the beak, comb, and wattle. Understanding how these shapes interlock is crucial for a clean finish.
Choosing the right fabric weight is the next vital step in maximizing your pattern’s potential. A medium-weight quilting cotton is often recommended because it holds its shape well without being too difficult to turn inside out. If you prefer a more “primitive” look, using repurposed burlap or flannel can add wonderful texture to the design.
The cutting phase is where precision truly matters in a Fabric Chicken – Pattern. Always ensure your fabric is ironed flat before pinning your paper template to the cloth. Using sharp fabric shears or a rotary cutter will prevent fraying and ensure that your seams line up perfectly during the sewing stage.
Don’t overlook the importance of grainlines when laying out your Fabric Chicken – Pattern. Aligning the pattern pieces with the grain of the fabric ensures that the chicken won’t stretch awkwardly once it is filled with polyester fiberfill or dried beans. This attention to detail is what separates a hobbyist project from a professional-grade handicraft.
A great Fabric Chicken – Pattern often includes marks for tucking or pleating. These small details are what give the chicken its plump, rounded appearance. Taking the time to transfer these markings from the paper to your fabric using a vanishing ink pen or tailor’s chalk will make the assembly process much smoother.
Lastly, consider the scale of your project. Many Fabric Chicken – Patterns can be easily resized using a photocopier or printer settings. Whether you want a tiny keychain chicken or a large, cuddly floor pillow, the fundamental sewing principles remain the same, allowing for endless variety in your DIY sewing projects.
2 Essential Materials for Your Fabric Chicken Project
To successfully execute a Fabric Chicken – Pattern, you need a curated list of supplies that go beyond just the cloth. High-quality all-purpose polyester thread is a must, as it provides the durability needed to withstand the pressure of the stuffing. Match your thread color to your main fabric for a seamless look, or use a contrasting color for a decorative topstitch.
The “anatomy” of the chicken requires specific colors; traditionally, red felt or fleece is used for the comb and wattle, while yellow or orange is preferred for the beak. These small scraps of fabric are perfect for using up your “leftovers” bin, making the Fabric Chicken – Pattern an eco-friendly and sustainable sewing choice.
For the filling, you have several options depending on the intended use of your fabric chicken. If it’s a toy, use soft hypoallergenic stuffing. However, if you want your chicken to function as a doorstop, a mix of poly-pellets, clean sand, or crushed walnut shells at the base will provide the necessary weight to keep it stable.
Hand-sewing needles are just as important as your sewing machine when working with a Fabric Chicken – Pattern. While the majority of the body can be stitched by machine, you will likely need to use a ladder stitch (also known as a hidden stitch) to close the opening after stuffing, ensuring a professional and “invisible” finish.
Embellishments are where your Fabric Chicken – Pattern truly comes to life. Consider using vintage buttons, black safety eyes, or even embroidery floss to create the eyes. Adding a little lace trim around the wings or a ribbon bow around the neck can give your chicken a unique personality that reflects your personal style.
Tools like hemostats or a turning tool are incredibly helpful for pushing out the small corners of the beak and comb. When working with a Fabric Chicken – Pattern, getting those points sharp and crisp is essential for a high-quality look. A good steam iron will also be your best friend for pressing seams open as you go.
3 Step-by-Step Assembly of the Fabric Chicken
The assembly of a Fabric Chicken – Pattern typically starts with the comb and beak. These small parts are sewn first and then “sandwiched” between the main body panels, facing inward. This ensures that when you turn the chicken right side out, the features are perfectly positioned and securely attached to the head section.
Once the internal features are pinned, you will sew around the perimeter of the Fabric Chicken – Pattern, leaving an opening at the bottom. It is vital to backstitch at the beginning and end of your seam to prevent the stitches from unraveling when you turn the fabric. Slow and steady wins the race when navigating the curves of the chicken’s breast.
Clipping the curves is a “secret” SEO-friendly tip for anyone following a Fabric Chicken – Pattern. By making small snips into the seam allowance (without cutting the thread), you allow the fabric to stretch and lay flat once turned. This prevents the fabric from “puckering” and ensures your chicken has a smooth, organic silhouette.
Turning the project right side out is the most exciting part of the Fabric Chicken – Pattern process. Carefully push the fabric through the opening, using a blunt tool to define the tail and head. Give the entire piece a good press with your iron to set the seams before you move on to the stuffing phase.
When stuffing your fabric chicken, start with small clumps of filling to avoid lumps. Push the stuffing into the furthest corners first, such as the tail and the top of the head. If you are using a weighted base, add your pellets or heavy filling last, ensuring they are centered so the Fabric Chicken – Pattern remains balanced and doesn’t tip over.
The final step in your Fabric Chicken – Pattern journey is the closure. Fold the raw edges of the opening inward and pin them shut. Using a needle and thread, perform a neat blind stitch to seal the chicken. Once closed, give your chicken a “massage” to distribute the stuffing evenly, and your handmade masterpiece is complete.
4 Creative Variations and Decorative Tips
One of the best things about a Fabric Chicken – Pattern is its adaptability to different seasons. For a springtime look, use bright florals and pastel shades. If you want a holiday-themed chicken, consider using red and green plaid or even a metallic gold fabric to create a festive “Golden Hen” for your mantle.
You can also modify the Fabric Chicken – Pattern to create different breeds. For example, by lengthening the tail feathers or using faux fur, you can mimic the look of a Silkie chicken. Adding “wings” by sewing two heart-shaped pieces of fabric and attaching them to the sides adds another layer of dimension to your sewing project.
For those who love shabby chic decor, try using distressed linen and adding tea-stained lace to your Fabric Chicken – Pattern. This gives the item an “antique” feel that looks beautiful in farmhouse-style kitchens. You can even scent your chicken by adding dried lavender to the stuffing for a pleasant aroma.
If you are making these for children, safety is the number one priority for your Fabric Chicken – Pattern. Instead of using buttons for eyes, which can be a choking hazard, use embroidery or fabric paint to create the facial features. Always ensure all seams are double-stitched for extra durability during play.
Marketing your creations is also possible once you master the Fabric Chicken – Pattern. These items are popular at craft fairs and on platforms like Etsy. Creating a “family” of chickens in various sizes—using the same pattern scaled up and down—makes for an adorable and highly sellable set of home accents.
Finally, don’t be afraid to experiment with patchwork. If you have a collection of very small scraps, sew them together first to create a “new” piece of fabric before laying out your Fabric Chicken – Pattern. This quilted approach creates a beautiful, eclectic look that celebrates the art of upcycling and textile creativity.
FAQ: Frequently Asked Questions about Fabric Chicken Patterns
What is the best fabric to use for a Fabric Chicken – Pattern?
The most popular choice is 100% cotton quilting fabric because it is easy to handle, comes in endless prints, and holds its shape. However, for a more rustic look, linen, flannel, or wool felt are excellent alternatives.
Can a beginner sew a Fabric Chicken – Pattern?
Absolutely! This is considered an intermediate-beginner project. It teaches basic skills like sewing curves, pivoting, and hand-finishing, making it a perfect “growth” project for someone new to the craft.
How do I make my fabric chicken stand up straight?
The key to a stable chicken is the base construction and the weighting. Ensure your Fabric Chicken – Pattern includes a flat bottom piece, and use heavy fillers like poly-pellets or dried rice at the very bottom before adding the soft stuffing.
How long does it take to complete one chicken?
Once you have your Fabric Chicken – Pattern cut out, the actual sewing and stuffing usually take between 1 to 2 hours, depending on your experience level and the amount of hand-detailing you choose to add.
Are these fabric chickens washable?
If you use polyester stuffing and pre-washed cotton, they are generally machine washable on a gentle cycle. However, if you use organic fillers like rice or beans, or if you’ve added delicate vintage buttons, spot cleaning is highly recommended.
Conclusion
In conclusion, mastering the Fabric Chicken – Pattern is a delightful way to enhance your sewing skills while creating something truly unique. We have covered everything from the initial template selection and material gathering to the intricate details of assembly and creative customization.
By following these steps and focusing on quality craftsmanship, you can produce charming fabric chickens that serve as gifts, decor, or even a small business venture. The versatility of this pattern ensures that it remains a timeless favorite in the sewing community.