Creating a Patchwork Table Runner- Pattern is one of the most rewarding projects for both beginner and experienced quilters alike. When you decide to dive into the world of quilt patterns, you aren’t just sewing scraps of fabric together; you are crafting a functional piece of art that brings warmth and personality to your dining room or kitchen. A well-designed Patchwork Table Runner- Pattern serves as the perfect canvas to experiment with color theory, fabric textures, and various stitching techniques without the overwhelming commitment of a full-sized quilt.
The beauty of working with a Patchwork Table Runner- Pattern lies in its versatility and the speed at which you can see results. Many crafters find that these long, narrow decorative pieces are the ideal way to celebrate the changing seasons, as you can easily swap them out for holidays or special occasions. By following a structured quilt design, you ensure that your seams line up perfectly and your quilt blocks remain symmetrical, resulting in a professional finish that looks like it came straight from a boutique.
To master the art of the Patchwork Table Runner- Pattern, it is essential to understand the core terminology and the technical steps involved in the process. In this guide, we will break down the essential components of a patchwork design, focusing on how to select materials and execute the construction flawlessly. Whether you are looking for a modern table runner or a more traditional quilting style, the following sections will provide the depth and detail you need to complete your project with confidence and style.
1. Understanding the Core Elements of a Patchwork Table Runner- Pattern
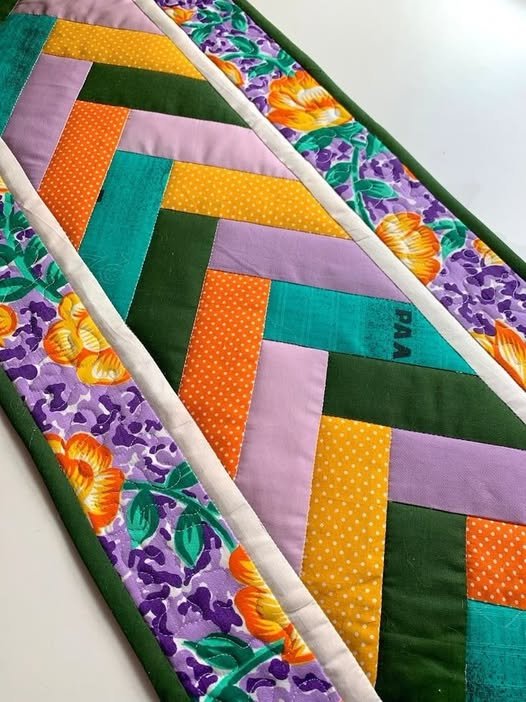
The foundation of any successful project is the Patchwork Table Runner- Pattern itself, which acts as the architectural blueprint for your sewing. A patchwork pattern is essentially a set of instructions that details how various pieces of fabric are cut and joined together to create a larger design. For a table runner, this often involves repetitive geometric shapes like squares, triangles, or rectangles that form a cohesive visual flow across the length of the table.
When you look at a Patchwork Table Runner- Pattern, you will notice a focus on fabric coordination. This refers to the way different colors and prints interact with one another within the quilt top. Most patterns will suggest a mix of “focal fabrics” (the busy prints) and “blender fabrics” (the more subtle tones) to ensure the design isn’t too chaotic. Choosing the right cotton fabric is crucial, as high-quality materials prevent fraying and ensure the runner lays flat.
Another vital term in any Patchwork Table Runner- Pattern is the seam allowance. In the world of quilting, the standard is almost always a 1/4 inch seam allowance. This precision is what allows the corners of your patchwork blocks to meet perfectly at the intersections. If your seams are inconsistent, the final runner may end up wavy or skewed, making it difficult to center on your furniture.
The layout of your Patchwork Table Runner- Pattern determines the final dimensions and the visual impact. You might choose a row-based design, where blocks are placed side-by-side, or a medallion style, where a central motif is surrounded by decorative borders. Understanding how to read these diagrams is the first step toward becoming a proficient quilter and successfully executing complex designs.
Furthermore, a Patchwork Table Runner- Pattern will often specify the “finished size” versus the “unfinished size.” The unfinished size includes the extra fabric for the seams, while the finished size is what you see once the project is complete. Keeping track of these measurements is essential for ensuring your table decor fits your specific table measurements perfectly without hanging too low or looking too short.
Finally, modern Patchwork Table Runner- Patterns often incorporate pre-cut fabrics like Charm Packs (5-inch squares) or Jelly Rolls (2.5-inch strips). Using these pre-cuts can significantly speed up the process and guarantee that your fabric colors are already professionally curated to match. This makes the patchwork process much more accessible for those who might feel intimidated by picking out individual bolts of fabric at the store.
2. Essential Tools and Materials for Your Pattern Execution
To bring your Patchwork Table Runner- Pattern to life, you need more than just a sewing machine; you need a specific set of quilting tools. The most important tool in your arsenal is a rotary cutter paired with a self-healing cutting mat. This combination allows you to cut through multiple layers of fabric with extreme precision, ensuring that every piece of your patchwork is identical in size and shape.
Accompanying the cutter should be a set of acrylic quilting rulers. These clear rulers allow you to see the fabric underneath while providing a solid edge to guide your blade. When following a Patchwork Table Runner- Pattern, you will likely need a long ruler for cutting strips and a square ruler for “squaring up” your blocks. Accurate cutting is the secret to a professional-looking quilt that doesn’t have unsightly puckers.
The thread choice also plays a significant role in the longevity of your Patchwork Table Runner- Pattern. Experts recommend using 50wt cotton thread, which is thin enough to keep your seams flat but strong enough to withstand regular use and washing. Using a neutral color like grey or tan often works best, as these shades tend to blend into almost any fabric color, making your stitches nearly invisible.
Don’t overlook the importance of a high-quality iron and ironing board. In the context of a Patchwork Table Runner- Pattern, “pressing” is just as important as sewing. You must press your seams as you go—typically toward the darker fabric—to ensure the quilt top stays flat. A crisp, pressed seam makes it much easier to align the next piece of fabric in your quilting sequence.
For the “sandwich” layer of your Patchwork Table Runner- Pattern, you will need batting (also known as wadding). This is the middle layer that provides thickness and texture. For table runners, a low-loft cotton batting or a heat-resistant material like Insul-Bright is often preferred, especially if you plan on placing hot dishes on the runner. This protects your table’s finish from heat damage while adding a lovely quilted dimension.
Lastly, you will need backing fabric and binding. The backing is the fabric on the underside of your runner, while the binding is the thin strip of fabric that wraps around the edges to seal everything together. Many Patchwork Table Runner- Patterns suggest using a contrasting color for the binding to provide a “frame” for your work, giving the entire piece a polished and complete look.
3. Step-by-Step Construction of the Patchwork Design
Once your pieces are cut according to your Patchwork Table Runner- Pattern, the construction begins with piecing. Piecing is the process of sewing the individual fabric shapes together to create the blocks. It is best to work in “units,” sewing small pairs together first and then joining those pairs into larger rows. This systematic approach reduces the margin for error and keeps your quilting project organized.
After your blocks are formed, the next phase of the Patchwork Table Runner- Pattern is the assembly of the quilt top. This involves sewing the finished blocks together in the desired order. Many quilters like to use a design wall—or simply a flat floor—to lay out the blocks and move them around until the color balance feels right. This visual check is crucial before the final sewing to avoid having two identical fabrics touching.
When the top is fully assembled, you move on to basting. Basting is the process of temporarily joining the top, the batting, and the backing together so they don’t shift during the quilting process. You can use curved safety pins or a temporary spray adhesive for this step. For a Patchwork Table Runner- Pattern, pin basting every few inches is usually sufficient to keep the layers stable as they move through the sewing machine.
The actual quilting is where you sew through all three layers. You can follow the lines of the patchwork (often called “stitch in the ditch”) or create a decorative pattern like stippling or echo quilting. The Patchwork Table Runner- Pattern you choose might offer specific suggestions for the quilting motifs that best complement the overall design, such as straight lines for a modern look or feathers for a traditional one.
Once the quilting is complete, you must trim the excess batting and backing so the edges are perfectly straight and square. This step is often called “squaring up.” It prepares the runner for the final application of the binding. A perfectly squared runner is the hallmark of an experienced crafter and ensures that your Patchwork Table Runner- Pattern results in a piece that hangs straight and looks balanced on your table.
The final touch in completing your Patchwork Table Runner- Pattern is the binding process. You will sew the binding strip to the front of the runner, fold it over the raw edge to the back, and then finish it by hand-stitching or machine-stitching. This secures the “sandwich” and provides a durable edge. Once the binding is on, give the entire runner a final steam press to set the stitches and give it a crisp, high-end appearance.
4. Maintenance and Display of Your Quilted Table Runner
After putting so much effort into your Patchwork Table Runner- Pattern, proper care is essential to ensure it lasts for years. Most handmade quilts should be washed on a gentle cycle with cold water and a mild detergent. To prevent color bleeding, especially if you used vibrant reds or blues, consider using a “color catcher” sheet in the wash. This keeps your patchwork fabrics looking bright and prevents the whites from turning grey.
Drying your runner requires a bit of caution to maintain the integrity of the Patchwork Table Runner- Pattern. While you can use a dryer on low heat, air-drying by laying the runner flat on a clean towel is the safest method. This prevents the cotton fibers from shrinking excessively and keeps the quilting stitches from becoming distorted. If the runner needs a quick refresh, a light steam ironing will bring back its original shape.
Displaying your Patchwork Table Runner- Pattern is the most enjoyable part of the process. While the dining table is the obvious choice, these versatile pieces also look fantastic on sideboards, dressers, or coffee tables. You can even use a smaller runner as a “bed runner” to add a pop of color to a guest room. The narrow shape makes it a perfect accent for almost any flat surface in your home.
If you enjoy changing your decor frequently, consider making a reversible table runner. By using a different but coordinating Patchwork Table Runner- Pattern or a single beautiful print on the back, you effectively get two pieces of decor in one. This is a great way to maximize your fabric stash and give your home a fresh look with a simple flip of the fabric.
For those who treat their quilting projects as heirlooms, storing them correctly is key. Never store your patchwork runner in a plastic bag, as this can trap moisture and lead to mildew. Instead, wrap it in acid-free tissue paper or a clean cotton pillowcase. Avoid folding it in the same place every time to prevent permanent creases; instead, roll it around a cardboard tube to keep the quilt top smooth.
Finally, remember that a Patchwork Table Runner- Pattern makes for an incredible handmade gift. Whether it’s for a housewarming, a wedding, or a holiday, a quilted runner shows a level of care and effort that store-bought items simply cannot match. You can even customize the colors to match the recipient’s home decor, making it a truly personalized piece of functional art that they will cherish for a lifetime.
FAQ: Frequently Asked Questions About Patchwork Table Runners
Q: Is a Patchwork Table Runner- Pattern suitable for a complete beginner?
A: Absolutely! In fact, table runners are often recommended as the first project for new quilters because they are small, manageable, and allow you to practice all the basic skills—cutting, piecing, quilting, and binding—without the bulk of a large blanket.
Q: How much fabric do I need for a standard Patchwork Table Runner- Pattern?
A: While it depends on the specific design, most runners require about 1 to 1.5 yards of fabric in total, divided among your different prints. If you are using pre-cuts, one Charm Pack is usually more than enough to complete a standard-sized runner.
: Can I use different types of fabric like silk or linen for a patchwork runner?
A: While you can, it is highly recommended that beginners stick to 100% quilting cotton. Cotton is stable, doesn’t slip while sewing, and handles heat well. Fabrics like silk or linen can be slippery or fray easily, which might make following a Patchwork Table Runner- Pattern more difficult for those without experience.
Q: How do I choose the right size for my table?
A: A good rule of thumb is that the runner should be about 1/3 the width of your table and should hang 6 to 10 inches over each end. However, many modern Patchwork Table Runner- Patterns are designed to sit entirely on the table surface without hanging over, which is a matter of personal preference.
Q: Do I need a special sewing machine for quilting?
A: No, a standard domestic sewing machine is perfectly fine. As long as your machine can do a straight stitch and has a walking foot (highly recommended for quilting through layers), you can successfully complete any Patchwork Table Runner- Pattern.
Q: How do I stop my table runner from sliding on a wooden table?
A: You can use a thin piece of non-slip shelf liner underneath the runner, or simply ensure that your backing fabric is a slightly textured cotton, which naturally provides more grip than synthetic, slippery fabrics.
Conclusion
In this article, we explored the fascinating process of creating a Patchwork Table Runner- Pattern, from the initial selection of fabrics and understanding core quilting terminology to the final steps of binding and maintenance.
We discussed how a well-structured quilt design can transform a simple table into a centerpiece of your home, and how the right tools—like rotary cutters and acrylic rulers—are essential for achieving professional results. By following the systematic approach of piecing, basting, and quilting, anyone can create a beautiful, durable piece of home decor that reflects their personal style.