Creating a Crochet Chicken Coaster – Pattern is one of the most delightful ways to combine utility with whimsical home decor. Whether you are a seasoned pro with a crochet hook or a complete beginner looking for a weekend project, these charming little hens bring a touch of farmhouse warmth to any coffee table. In this comprehensive guide, we will explore everything you need to know about crafting your own set, ensuring your furniture stays protected while your kitchen gains a splash of handmade personality.
The beauty of the Crochet Chicken Coaster – Pattern lies in its versatility and the minimal amount of yarn required. Most enthusiasts find that this project is the perfect “stash buster,” allowing you to use up those colorful scraps of cotton yarn sitting in your craft basket. Because coasters are small, they provide instant gratification, making them excellent gifts for housewarmings, Mother’s Day, or even local craft fairs where “cottagecore” aesthetics are currently in high demand.
Beyond just being a functional item, a Crochet Chicken Coaster – Pattern serves as a fantastic educational tool for learning how to work in the round and shape 3D elements like beaks and combs. By following a structured approach, you can master the art of the Crochet Chicken Coaster – Pattern and eventually customize your chickens with different colors, wing shapes, and facial expressions. Let’s dive deep into the materials, techniques, and steps needed to bring these clucking companions to life.
1. Understanding the Crochet Chicken Coaster – Pattern Basics
When you first look at a Crochet Chicken Coaster – Pattern, you will notice it typically starts with a flat circle, often referred to as the “body.” Using 100% cotton yarn is highly recommended because it is heat-resistant and absorbent, which is essential for any high-quality Crochet Chicken Coaster – Pattern.
The “Pattern” aspect refers to the specific set of instructions—usually written in standard US crochet terms—that guide you through increases and decreases. A well-written Crochet Chicken Coaster – Pattern ensures that your coaster lies perfectly flat, preventing your mugs from wobbling or tipping over.
In the world of crochet patterns, the Crochet Chicken Coaster – Pattern is categorized as an easy-to-intermediate project. This is because it involves basic stitches like the magic ring, single crochet, and double crochet, but adds a bit of flair with the “picot stitch” or “shell stitch” for the feathers.
One key element of the Crochet Chicken Coaster – Pattern is the tension of your stitches. If you crochet too tightly, the coaster might curl upward like a bowl; if you crochet too loosely, the Crochet Chicken Coaster – Pattern won’t provide a sturdy enough surface for heavy ceramic mugs.
Most versions of the Crochet Chicken Coaster – Pattern will instruct you to use a 3.5mm or 4.0mm crochet hook. This size allows for a dense fabric that keeps condensation from seeping through the Crochet Chicken Coaster – Pattern and onto your wooden surfaces.
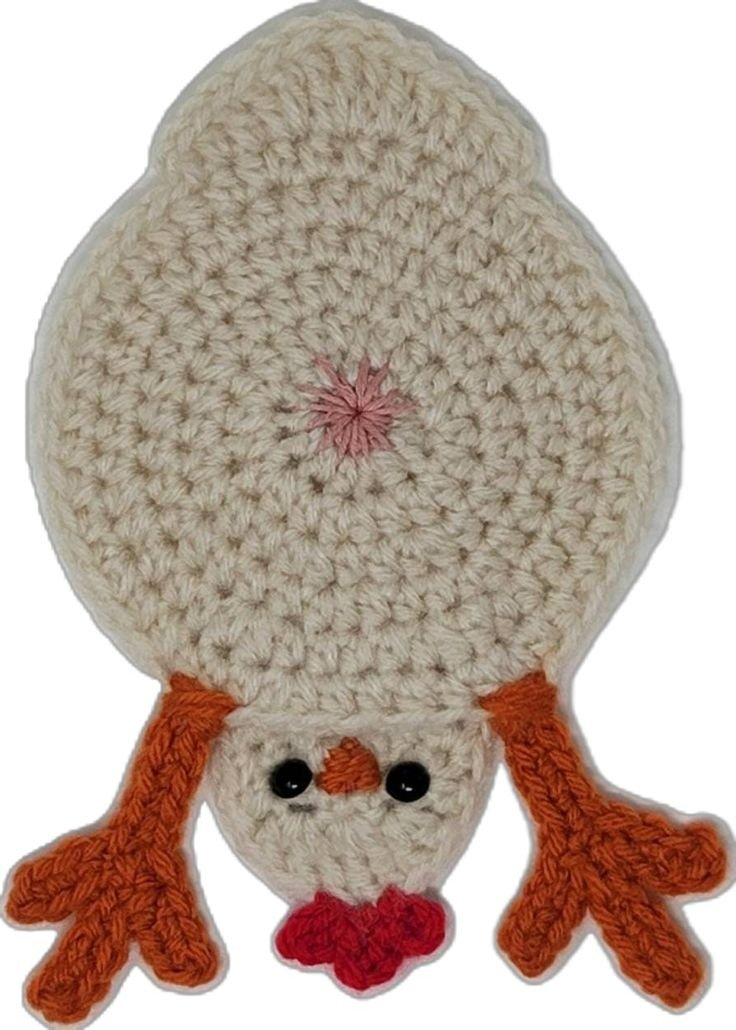
Finally, the Crochet Chicken Coaster – Pattern is unique because it combines flat-work with applique-style additions. You aren’t just making a circle; you are sculpting a character, which is why the Crochet Chicken Coaster – Pattern remains a favorite among hobbyists who love amigurumi-style details.
2. Essential Materials for Your Crochet Chicken Coaster – Pattern
To successfully execute a Crochet Chicken Coaster – Pattern, the most vital component is your choice of medium-weight cotton yarn. Cotton is superior to acrylic for this Crochet Chicken Coaster – Pattern because acrylic can melt under high heat and doesn’t absorb moisture as effectively.
You will also need a tapestry needle to weave in the ends of your Crochet Chicken Coaster – Pattern. Since these coasters are often washed, securing your yarn tails within the stitches of the Crochet Chicken Coaster – Pattern is crucial for long-term durability and a professional finish.
The “Chicken” part of the Crochet Chicken Coaster – Pattern requires at least three colors: a main body color, red for the comb/wattle, and yellow or orange for the beak. Having these colors ready before starting the Crochet Chicken Coaster – Pattern makes the process much more organized and enjoyable.
Small black safety eyes or black embroidery floss are needed to give your Crochet Chicken Coaster – Pattern its personality. If you are making these for a household with small children, using embroidery for the eyes is a safer choice than plastic beads within the Crochet Chicken Coaster – Pattern.
Don’t forget a pair of sharp craft scissors and a stitch marker. Using a stitch marker in your Crochet Chicken Coaster – Pattern is helpful for keeping track of the beginning of each round, especially when the body of the chicken starts to grow in diameter.
Lastly, having a measuring tape nearby ensures that your Crochet Chicken Coaster – Pattern results in a standard size, usually between 4 to 5 inches. Consistency is key if you are making a set of four or six coasters using the same Crochet Chicken Coaster – Pattern.
3. Step-by-Step Guide to the Crochet Chicken Coaster – Pattern Body
The first step in the Crochet Chicken Coaster – Pattern is creating a magic ring with your main color. This technique allows the center of your Crochet Chicken Coaster – Pattern to be pulled tight, leaving no hole where liquid could leak through to the table.
Once the ring is secure, the Crochet Chicken Coaster – Pattern usually calls for 12 double crochet stitches into the center. This creates the foundational circle that serves as the “belly” of the chicken in your Crochet Chicken Coaster – Pattern.
In the second round of the Crochet Chicken Coaster – Pattern, you will perform an increase in every stitch. This means putting two stitches into every one stitch from the previous row, a standard technique for keeping any crochet coaster flat and wide.
As you progress to the third round of the Crochet Chicken Coaster – Pattern, the pattern of increases shifts (e.g., 2 stitches in the first, 1 in the next). This mathematical precision is what makes the Crochet Chicken Coaster – Pattern so satisfying to complete as the circle expands evenly.
The transition from a circle to a bird happens in the final round of the Crochet Chicken Coaster – Pattern. Here, you will use slip stitches and half-double crochets to create a slight “tail” peak on one side of the Crochet Chicken Coaster – Pattern.
After finishing the main body of the Crochet Chicken Coaster – Pattern, you should have a flat, slightly teardrop-shaped piece. This serves as the canvas for the decorative elements that make the Crochet Chicken Coaster – Pattern recognizable as a hen.
4. Finishing Details and Customizing Your Crochet Chicken Coaster – Pattern
The most exciting part of the Crochet Chicken Coaster – Pattern is adding the head and face. You will attach your red yarn to the top of the “teardrop” to create the comb using a series of chain stitches and single crochets as dictated by the Crochet Chicken Coaster – Pattern.
For the beak, the Crochet Chicken Coaster – Pattern usually suggests a simple triangle stitch or a small puff stitch. Using a bright orange yarn against the body color makes the features of your Crochet Chicken Coaster – Pattern pop and look truly adorable.
Some advanced versions of the Crochet Chicken Coaster – Pattern include instructions for small side wings. These are typically worked as separate small ovals and sewn onto the sides of the Crochet Chicken Coaster – Pattern to give it a more layered, 3D appearance.
If you want a more rustic look for your Crochet Chicken Coaster – Pattern, consider using variegated yarn. This creates a “speckled hen” effect that adds visual interest without needing to change yarn colors constantly throughout the Crochet Chicken Coaster – Pattern.
Blocking your finished project is a professional secret for the Crochet Chicken Coaster – Pattern. By lightly steaming the cotton, you ensure the Crochet Chicken Coaster – Pattern sits perfectly flat on the table, which is the primary function of any high-quality coaster.
Experimenting with the Crochet Chicken Coaster – Pattern allows for endless creativity. You can turn your Crochet Chicken Coaster – Pattern into a holiday theme by using white and red for Christmas or pastel colors for an Easter-themed kitchen setup.
FAQ – Frequently Asked Questions
Which yarn is best for a Crochet Chicken Coaster – Pattern?
The best yarn is 100% cotton (Worsted or DK weight). Cotton is highly absorbent and won’t lose its shape when it gets wet from mug condensation. Avoid wool or acrylic for this specific pattern.
How long does it take to finish one coaster?
For an intermediate crocheter, one coaster usually takes about 20 to 30 minutes. It is a very fast project, making it ideal for last-minute gifts.
Can I wash my crochet coasters?
Yes! If you used cotton yarn, you can machine wash them on a gentle cycle. However, laying them flat to dry is recommended to maintain the shape of the chicken features.
Is this pattern suitable for beginners?
Absolutely. If you know how to make a magic ring, single crochet, and double crochet, you can easily complete this project. It is a great way to practice basic shaping.
What size should the finished coaster be?
A standard coaster should be between 4 and 5 inches (10-12 cm) in diameter to accommodate most mugs and glasses comfortably.
Do I need safety eyes for this pattern?
While safety eyes look great, they are not mandatory. You can use black yarn to embroider a small “V” or a French knot for the eyes, which is often more durable for items that will be washed frequently.
Conclusion
In this article, we have explored the wonderful world of the Crochet Chicken Coaster – Pattern. We discussed the importance of choosing the right cotton yarn, the fundamental stitches required to build the body, and the creative ways to add personality through the comb, beak, and wings.
By following these steps, you can create a functional piece of art that brings joy to your daily coffee routine or serves as a thoughtful, handmade gift for friends and family. This project is not only a great way to improve your crochet skills but also an eco-friendly alternative to disposable or plastic coasters.