Creating a Crochet squares c2c in tulip shape- Pattern is one of the most rewarding projects for any yarn enthusiast looking to combine geometric precision with floral elegance. This specific technique allows you to build a beautiful, textured image of a flower using the popular corner-to-corner (c2c) method, which is essentially working in diagonal rows rather than traditional horizontal lines. If you are looking for a way to brighten up your home decor or create a personalized gift, this crochet pattern offers the perfect blend of challenge and aesthetic appeal.
The beauty of working on Crochet squares c2c in tulip shape- Pattern lies in the versatility of the design, as these squares can be joined together to form massive afghans, delicate baby blankets, or even decorative pillow covers. Using the c2c technique means you are creating small “tiles” or blocks of double crochet stitches, which gives the finished tulip a pixelated, modern look that is very popular in the contemporary crochet community. Many crafters prefer this method because it grows quickly and allows for easy color changes, which are essential when shaping the petals and leaves of a tulip.
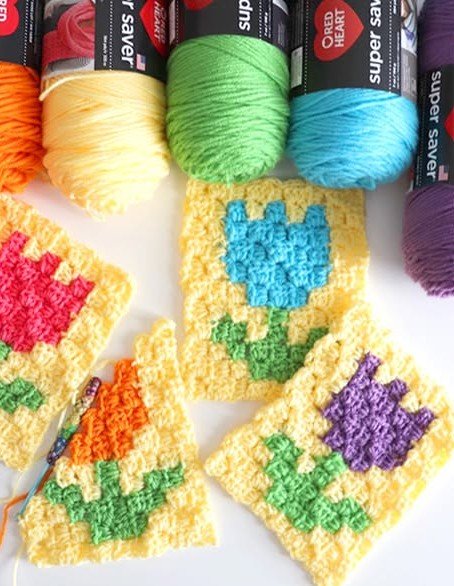
Starting your journey with a Crochet squares c2c in tulip shape- Pattern requires a bit of planning, especially regarding your yarn choice and color palette. To make the tulip “pop,” you’ll want to select high-contrast colors for the flower head, a vibrant green for the stem, and a neutral background color like cream or soft gray. This step-by-step crochet guide will walk you through the logic of the c2c chart, how to manage your yarn bobbins, and the best way to finish your edges for a professional look. Let’s dive into the details of making these floral masterpieces.
1. Understanding the Crochet squares c2c in tulip shape- Pattern Basics
The core of the Crochet squares c2c in tulip shape- Pattern is the corner-to-corner stitch, a method where you start at the bottom corner of a chart and work your way up to the opposite corner. This creates a square or rectangle made of small crochet blocks, typically consisting of a chain-3 and three double crochets.
To successfully execute this floral crochet design, you must be comfortable reading a pixel graph or a written color block instruction. Each square on your grid represents one “tile” in your c2c crochet work, and following the pattern ensures that the tulip shape emerges correctly as you increase and then decrease your rows.
One of the most important crochet tips for this pattern is maintaining consistent tension. Because c2c squares are worked diagonally, uneven tension can lead to a warped square that is difficult to join with others later on. Practice your double crochet clusters to ensure they are uniform.
When working on a Crochet squares c2c in tulip shape- Pattern, you will be dealing with multiple colors simultaneously. This is often referred to as tapestry crochet or intarsia crochet within the c2c framework. Managing your yarn skeins is crucial to prevent a tangled mess behind your work.
Choosing the right crochet hook size is also vital for the tulip pattern. Most patterns recommend a 4.0mm or 5.0mm hook depending on your yarn weight. Using a hook that is too large can make the tulip shape look loose and undefined, while a hook too small makes the fabric stiff.
Finally, remember that the Crochet squares c2c in tulip shape- Pattern is modular. You aren’t just making a single flower; you are making a building block. Understanding how the increase rows and decrease rows function is the secret to getting that perfect square dimensions every single time.
2. Essential Materials and Yarn Selection for Your Tulip Square
For a high-quality Crochet squares c2c in tulip shape- Pattern, selecting the right fiber content is the first step toward success. Cotton yarn is excellent for stitch definition, making the tulip petals look crisp, while acrylic yarn offers softness and warmth for blankets.
You will need at least three distinct colors for this crochet project: a “flower” color (like pink, red, or yellow), a “leaf” color (green), and a “background” color. High-quality worsted weight yarn is the standard choice for most c2c crochet patterns due to its durability and ease of use.
In addition to yarn, you will need a set of ergonomic crochet hooks. Since c2c projects involve repetitive movements, having a comfortable grip will allow you to work on your tulip squares for longer periods without hand fatigue, which is a common issue for avid crocheters.
Don’t forget the small tools that make a big difference: stitch markers, a sharp pair of yarn scissors, and a tapestry needle. The needle is especially important for this Crochet squares c2c in tulip shape- Pattern because you will have several yarn tails to weave in after the color changes.
Using yarn bobbins is a highly recommended technique for this specific tulip pattern. Instead of carrying the yarn across the back (which can show through), you use a separate small ball of yarn for each section of color, ensuring the crochet fabric remains clean and reversible.
Lastly, consider using a row counter or a digital app to track your progress on the tulip graph. It is very easy to lose your place in a c2c pattern, and one misplaced block can distort the entire tulip shape, requiring you to “frog” or rip out your hard work.
3. Mastering Color Changes in the C2C Tulip Design
The magic of the Crochet squares c2c in tulip shape- Pattern happens during the color transitions. To achieve a seamless look, you should change colors during the final pull-through of the last stitch of the previous block. This ensures the new color starts fresh on the next crochet tile.
When working the tulip petals, you will often have “floating” colors. Instead of cutting the yarn every time, you can sometimes “carry” the yarn if the next block of that color is only one or two squares away. This is a common advanced crochet technique used to minimize weaving in ends.
The tulip stem and leaves usually require sharp diagonal movements on the graph. When following the Crochet squares c2c in tulip shape- Pattern, pay close attention to whether the row is a “Right Side” (RS) or “Wrong Side” (WS) row. This determines which direction you drop and pick up your yarn strands.
If you find gaps forming between your color changes, try pulling your yarn slightly tighter at the junction. A neat finish is what separates a beginner project from a professional-looking c2c crochet masterpiece. The tulip design relies on these clean lines to look realistic.
For those who find charts difficult, many Crochet squares c2c in tulip shape- Patterns include written instructions like “Row 10: 3B, 2G, 5B.” Learning to read both the visual graph and the written shorthand will make your crochet journey much smoother and faster.
Don’t be afraid to experiment with variegated yarn for the tulip head. This can give your Crochet squares c2c in tulip shape- Pattern a natural, “painted” look, mimicking the way real tulips have gradients and different shades within their petals, adding depth to your handmade decor.
4. Finishing Touches and Joining Your Crochet Squares
Once you have completed the main body of your Crochet squares c2c in tulip shape- Pattern, the work isn’t quite done. Blocking your crochet is a vital step. By pinning your square to a blocking board and lightly steaming it, you ensure the tulip shape is perfectly square and the stitches are settled.
After blocking, you will likely have several yarn ends to deal with. Use your tapestry needle to weave them securely into the blocks of the same color. In a c2c tulip pattern, hiding the ends within the “clusters” is the best way to ensure they don’t pop out later during washing.
If you are making multiple tulip squares, you need a cohesive joining method. The invisible mattress stitch or the slip stitch join are great options. Joining your Crochet squares c2c in tulip shape- Pattern correctly ensures the overall blanket looks like a continuous garden of flowers.
Adding a border can elevate the entire project. A simple single crochet border or a more decorative scalloped edge frames the tulip squares beautifully. It also provides a sturdy edge that prevents the c2c blocks from stretching over time.
Think about the layout of your crochet quilt. You can alternate your tulip squares with solid-colored c2c squares to give the eyes a place to rest, or you can create a full field of tulips in different colors for a vibrant, bohemian crochet style.
Finally, take a moment to admire your handcrafted tulip. Whether it’s a single potholder or a component of a large throw blanket, the effort put into the Crochet squares c2c in tulip shape- Pattern results in a timeless piece of art that showcases your skills as a modern maker.
FAQ – Frequently Asked Questions
What is the best yarn for a C2C tulip square?
Most crafters prefer worsted weight acrylic or cotton yarn. Cotton provides great stitch definition for the tulip shape, while acrylic is more affordable and easier to wash if you are making a large crochet blanket.
How do I read a C2C graph for this pattern?
You start at the bottom right corner (Square 1,1) and work diagonally. Each square on the grid represents one c2c block (usually 3 dc and a ch-3). You read the chart back and forth in a zigzag motion.
Is this pattern suitable for beginners?
If you know the basic double crochet and how to work the c2c increase, you can do this! However, the color changes in the tulip shape require some patience, so it is considered an “intermediate” beginner project.
How many colors do I need for the tulip?
At a minimum, you need three: one for the flower petals, one for the green stem/leaves, and one for the background. You can add more shades to create a more detailed or realistic tulip design.
Can I use this pattern for a full blanket?
Absolutely! You can make many identical tulip squares and join them, or you can use the tulip chart as a center panel surrounded by other floral crochet motifs.
How do I prevent the yarn from tangling during color changes?
Use yarn bobbins or clothespins to keep small amounts of each color separate. When you turn your work at the end of a row, rotate it in the opposite direction each time to “untwist” the strands.
Conclusion
The Crochet squares c2c in tulip shape- Pattern is a fantastic way to practice your colorwork and master the corner-to-corner technique. Throughout this article, we have explored the basics of the c2c stitch, the importance of choosing the right materials, techniques for seamless color transitions, and how to professionally finish your crochet squares.
This pattern is not just a set of instructions; it is a gateway to creating personalized, heirloom-quality items like floral blankets and home accessories. By following these SEO-friendly crochet tips, you can ensure your project is both beautiful and structurally sound.