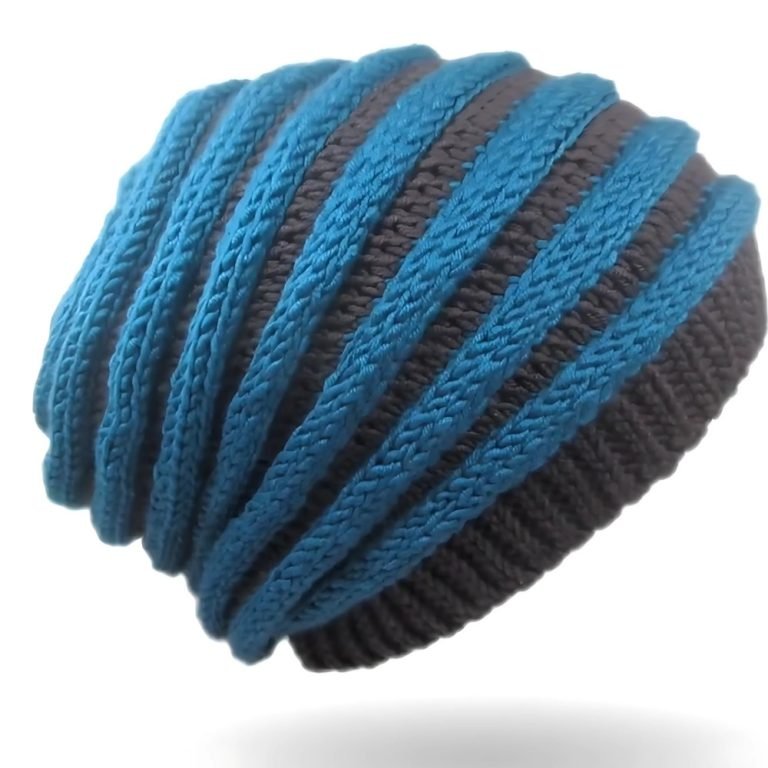
A Crochet Worm Beanie Hat – Pattern is one of those delightful projects that reminds us why we fell in love with fiber arts in the first place: it’s quirky, functional, and guaranteed to turn heads. Whether you are crafting for a newborn photo shoot, a themed costume party, or simply want to add a touch of whimsical flair to your winter wardrobe, this specific crochet pattern offers a unique silhouette that differs from your standard beanie. The “worm” style typically features a longer, slouchier tail or segmented ridges that mimic the look of a garden critter, making it a favorite for those who appreciate handmade accessories with a sense of humor.
When you decide to start a Crochet Worm Beanie Hat – Pattern, you aren’t just making a hat; you are engaging in a creative process that utilizes basic crochet stitches like the double crochet (dc) and half double crochet (hdc) to build texture. Many enthusiasts love this design because it is highly customizable, allowing for vibrant color changes or the addition of “antennae” at the top for extra character. Because the structure is often worked in the round, it’s a fantastic project for improving your tension control and learning how to create seamless transitions between different sections of a crochet garment.
Finding the right Crochet Worm Beanie Hat – Pattern is essential for ensuring that your finished product has the perfect “slouch” and fit. In the world of DIY fashion, the worm beanie stands out because it bridges the gap between a traditional stocking cap and a modern oversized beanie. In the following guide, we will break down the essential components, from selecting the best worsted weight yarn to mastering the increase rounds that give the hat its signature shape. Get your ergonomic crochet hook ready, because we are diving deep into the art of crafting this adorable and eccentric headwear.
1 Understanding the Crochet Worm Beanie Hat – Pattern
The Crochet Worm Beanie Hat – Pattern refers to the specific set of written instructions or a stitch chart that guides a maker through the creation of a worm-inspired hat. A good crochet pattern acts as a roadmap, detailing the yarn weight, hook size, and gauge necessary to achieve the intended dimensions. For this specific style, the pattern usually emphasizes ribbed textures or front post stitches to create the “segments” of the worm.
In the context of this project, the Crochet Worm Beanie Hat – Pattern is often categorized as an easy to intermediate project. This is because it involves working in a magic circle (or magic ring) and requires a solid understanding of crochet increases and decreases. The “worm” effect is typically achieved by alternating rows of different heights or by using back loop only (BLO) techniques to create visible ridges along the body of the hat.
Choosing a high-quality Crochet Worm Beanie Hat – Pattern ensures that you have a clear stitch count at the end of every round. This is vital for maintaining the structural integrity of the hat, especially if you are making it in various sizes, from baby crochet sizes to adult large. Most modern patterns also include a photo tutorial or links to video demonstrations to help with the more complex sections, such as the brim or the finishing touches.
When discussing the Crochet Worm Beanie Hat – Pattern, we must also consider the yarn selection. Most patterns recommend a medium-weight (4) acrylic yarn or a soft cotton blend to ensure the hat is breathable yet warm. The choice of fiber significantly impacts how the “worm” segments drape; a stiffer yarn will hold the ridges better, while a softer yarn will result in a more relaxed, slouchy beanie look.
Another key aspect of the Crochet Worm Beanie Hat – Pattern is the finishing techniques. This includes weaving in ends securely and perhaps adding safety eyes or crochet appliques to give the worm a face. Professional patterns will provide specific measurements for placement to ensure the hat looks symmetrical and polished. It is these small details that elevate a simple crochet project into a professional-grade handmade gift.
Finally, the Crochet Worm Beanie Hat – Pattern serves as a foundation for your own creativity. Once you master the basic circular construction, you can experiment with variegated yarn to create a multi-colored worm without needing to change yarn cakes constantly. The versatility of the pattern is why it remains a popular search term among crocheters looking for something beyond the traditional pom-pom hat.
2 Selecting Materials for Your Crochet Project
To successfully execute the Crochet Worm Beanie Hat – Pattern, you must start with the correct crochet supplies. The most important tool is your crochet hook, usually ranging from 4.0mm (G) to 5.5mm (I), depending on your personal tension. Using an ergonomic hook can prevent hand fatigue, which is common when working on projects with many textured stitches or repetitive rounds.
The yarn fiber you choose for your Crochet Worm Beanie Hat – Pattern will determine the hat’s durability and washability. Acrylic yarn is often preferred for hats because it is inexpensive, comes in every color imaginable, and is machine washable. However, if you are making this for a newborn, you might opt for a superwash merino wool or a bamboo blend for maximum softness against sensitive skin.
Don’t forget the notions required for a professional finish. You will need a tapestry needle (also known as a yarn needle) for sewing the top closed and hiding your yarn tails. Stitch markers are also indispensable when working in continuous rounds, as they help you keep track of where each new row begins, preventing errors in your increase sequence.
Measuring your gauge is a step that many beginners skip, but it is crucial for the Crochet Worm Beanie Hat – Pattern. If your stitches are too loose, the hat will be oversized and floppy; too tight, and it won’t fit the intended head circumference. Always take the time to crochet a small gauge swatch to ensure your dimensions match those specified in the instructional guide.
For the “worm” features, you may need small amounts of accent yarn in black or white. If the Crochet Worm Beanie Hat – Pattern includes antennae or eyes, these are usually crocheted separately and then attached using a whip stitch. Having a pair of sharp embroidery scissors nearby will make the process of trimming your yarn much cleaner and more efficient.
Lastly, consider the aesthetic appeal of your materials. If you want a “realistic” worm, earthy tones like greens, browns, or pinks work wonders. For a more whimsical, “caterpillar” style inspired by children’s books, go for bright primary colors. The Crochet Worm Beanie Hat – Pattern is your canvas, and the materials are your paint, so choose colors that spark joy.
3 Essential Stitches and Techniques Used
The backbone of the Crochet Worm Beanie Hat – Pattern lies in mastering a few fundamental crochet stitches. Most of the body is constructed using the double crochet (dc), which provides height and flexibility. To create the ribbed, segmented look that defines a “worm,” the pattern will likely call for Front Post Double Crochet (fpdc) and Back Post Double Crochet (bpdc), which create a 3D texture.
Another vital technique for the Crochet Worm Beanie Hat – Pattern is the Magic Ring (or Magic Circle). This method allows you to start your hat without a hole in the center of the crown, creating a much neater appearance. If you find the magic ring difficult, most crochet tutorials suggest a “Chain 2” method as an alternative, though the magic ring is superior for a professional look.
To ensure the hat fits comfortably, you will need to perform crochet increases. This involves placing two stitches into a single stitch from the previous row. In a Crochet Worm Beanie Hat – Pattern, these increases are usually done systematically (e.g., 2 dc in every stitch, then 2 dc in every second stitch) until the crown diameter matches the size you are aiming for.
The brim of the hat often uses a different technique to provide elasticity. A ribbed brim can be made by working in the back loops only (BLO) of single crochet or half double crochet stitches. This ensures the Crochet Worm Beanie Hat – Pattern stays securely on the wearer’s head without being too tight, providing that classic “beanie” snugness.
For the elongated “worm” tail found in some variations of the Crochet Worm Beanie Hat – Pattern, you will learn how to maintain a consistent stitch count over many rows. This is where your rhythm and tension become important. Keeping a steady pace ensures that the “body” of the worm looks uniform and doesn’t bulge or narrow unexpectedly.
Finally, joining rounds is a skill you will perfect while following this pattern. Most beanies are joined with a slip stitch (sl st) to the first stitch of the round. Understanding how to do this without creating a visible seam is a hallmark of an advanced crocheter, and it makes your Crochet Worm Beanie Hat – Pattern look like it was bought from a high-end boutique.
4 Customizing and Sizing Your Beanie
One of the best things about the Crochet Worm Beanie Hat – Pattern is its scalability. To adjust the size from a toddler beanie to an adult XL, you simply change the number of increase rounds in the crown. A general rule of thumb in crochet headwear is to multiply the desired head circumference by $3.14$ (pi) to determine the necessary crown diameter, or simply follow a reliable size chart.
Customizing the “segments” of your Crochet Worm Beanie Hat – Pattern can also change the entire vibe of the hat. You can make the ridges further apart for a subtle look or very close together for a highly textured, “scrunchy” effect. This is often done by changing the frequency of post stitch rows versus standard stitch rows.
Adding earflaps is another popular modification for the Crochet Worm Beanie Hat – Pattern, especially for winter versions. By identifying the sides of the hat, you can attach yarn and work in decreasing rows to create flaps that cover the ears. Adding braided tassels at the end of the earflaps adds a cozy, rustic charm to the finished crochet accessory.
For those who love embellishments, the worm theme offers endless possibilities. You can crochet small “feet” along the sides of the hat or add a stuffed pom-pom at the very end of the worm’s tail. Some makers even use glow-in-the-dark yarn for the segments, making the Crochet Worm Beanie Hat – Pattern a hit for Halloween or nighttime events.
Colorwork is perhaps the easiest way to customize your Crochet Worm Beanie Hat – Pattern. Using striping techniques or carrying yarn (tapestry crochet) allows you to create patterns like spots or stripes on your worm. If you are feeling adventurous, you can use gradient yarn (yarn cakes) to watch the colors transition naturally as you work down the hat.
Don’t forget the functional customizations. If you live in a very cold climate, you can line your Crochet Worm Beanie Hat – Pattern with fleece fabric. This involves sewing a simple circle of fleece inside the finished hat, making it extra warm and preventing wind from whistling through the crochet stitches, ensuring your “worm” is as practical as it is cute.
FAQ – Frequently Asked Questions
1. Is the Crochet Worm Beanie Hat – Pattern suitable for absolute beginners?
Yes, it can be! While some versions use advanced stitches, many crochet patterns for this style rely on the double crochet and simple increases. If you can make a basic hat, you can make a worm beanie.
2. How much yarn do I need for a standard adult size?
Usually, one 100g skein of worsted weight yarn (approx. 200 yards) is enough for a standard beanie. If you are making an extra-long “worm” tail, you might want to have a second skein on hand.
3. Can I use chunky yarn for this pattern?
Absolutely. Using chunky or bulky yarn will make the project work up much faster and create very pronounced “worm” segments. Just be sure to use a larger hook size (like 6.5mm or 8.0mm) and adjust your stitch count accordingly.
4. How do I make the ridges of the worm stand out more?
To make the ridges more prominent in your Crochet Worm Beanie Hat – Pattern, use Front Post Double Crochet stitches or work certain rounds in the Back Loop Only (BLO). This creates a physical “lip” on the fabric.
5. How do I wash my finished crochet hat?
This depends on the yarn fiber. If you used acrylic, you can usually machine wash it on a gentle cycle. For wool, hand washing in cool water and laying flat to dry is best to prevent shrinking or felting.
6. Can I sell the hats I make from this pattern?
Generally, most crochet designers allow you to sell finished items made from their patterns, provided you give credit to the original designer. Always check the specific copyright notice included in your Crochet Worm Beanie Hat – Pattern.
Conclusion
In summary, the Crochet Worm Beanie Hat – Pattern is a fantastic project that combines technical skill with creative expression. We have explored everything from selecting the right yarn and hooks to mastering the post stitches that give the hat its unique, segmented texture.
Whether you are aiming for a cute baby hat or a quirky adult accessory, the key lies in maintaining consistent tension and following the increase rounds carefully. Crochet is a journey of patience and joy, and this pattern is a perfect example of how a simple hook and string can turn into something truly special.