The Braided Twist Crochet Headband – Pattern is one of the most popular projects in the modern fiber arts community, offering a sophisticated look that mimics complex knitwear while using simple crochet techniques. This accessory has become a staple for those who love the “boho-chic” aesthetic, providing both warmth during the colder months and a stylish way to keep hair in place during outdoor activities. Crafting a Braided Twist Crochet Headband is a rewarding experience because the pattern is typically quick to complete, making it an ideal choice for last-minute gifts or a satisfying weekend DIY project.
When you start working on a Braided Twist Crochet Headband – Pattern, you are essentially creating a functional piece of art that bridges the gap between traditional craft and high-street fashion. The “twist” element is what truly sets this headband apart from standard ear warmers, as it creates a focal point at the front of the head that is both flattering and modern. Whether you are a seasoned pro or a beginner looking to expand your skills, this crochet pattern allows you to experiment with different textures and yarn weights to achieve a completely customized look.
Understanding the mechanics of the Braided Twist Crochet Headband – Pattern is key to ensuring a comfortable fit and a professional finish. This headwear relies on a specific assembly method where the ends of a rectangular crochet strip are folded and intertwined before being seamed together. By following a well-structured crochet guide, you can learn how to manipulate your stitches to create a fabric that is elastic enough to stay secure without being too tight, ensuring your Braided Twist Crochet Headband remains a favorite in your wardrobe for years to come.
1. Selecting the Perfect Yarn and Tools for Your Braided Twist Crochet Headband – Pattern
The foundation of a successful Braided Twist Crochet Headband – Pattern starts with your choice of yarn fiber. For maximum comfort and warmth, many crafters prefer a wool blend or a high-quality acrylic yarn that offers a bit of stretch, ensuring the headband fits various head sizes snugly.
Your crochet hook size plays a massive role in the final drape of the pattern. Using a slightly larger hook, such as a 6.0mm (J) hook, can create a plush, squishy texture that makes the Braided Twist Crochet Headband feel luxurious and soft against the skin, avoiding any stiffness in the fabric.
When considering the yarn weight for your Braided Twist Crochet Headband – Pattern, a bulky (category 5) or worsted weight (category 4) yarn is highly recommended. These thicker yarns work up quickly and highlight the definition of your crochet stitches, making the braided effect even more prominent.
Don’t forget to have a sharp tapestry needle ready for the assembly phase of the Braided Twist Crochet Headband – Pattern. Since the “twist” is created during the sewing stage, a sturdy needle is essential for weaving through multiple layers of crochet fabric to create a seamless and durable join.
Color selection can also influence the overall vibe of your Braided Twist Crochet Headband. Solid colors tend to show off stitch definition and the braided structure more clearly, while variegated yarns can add a fun, eclectic feel to your finished crochet accessory.
Finally, using stitch markers can help you keep track of your row counts as you work through the Braided Twist Crochet Headband – Pattern. Consistency is vital in this design; ensuring both ends of your rectangle are perfectly even will make the folding and seaming process much easier and more symmetrical.
2. Essential Crochet Stitches for a Textured Braided Twist Look
To achieve the best results with this Braided Twist Crochet Headband – Pattern, mastering the Half Double Crochet (hdc) is often the first step. This stitch provides a perfect balance of height and density, creating a warm fabric that isn’t too “holey,” which is exactly what you want for a winter headband.
Working in the back loop only (BLO) is a secret technique used in many Braided Twist Crochet Headband designs. This simple variation creates a ribbed effect that looks remarkably like knitting and adds a significant amount of vertical stretch to the pattern, improving the overall fit.
The Bean Stitch or Puff Stitch can also be incorporated into a Braided Twist Crochet Headband – Pattern for those who want a more chunky, “bobble” texture. These stitches add volume to the headwear, making it a statement piece that provides extra insulation for the ears during freezing temperatures.
If you prefer a sleek, minimalist look for your Braided Twist Crochet Headband, the Single Crochet (sc) worked tightly can produce a fabric that looks like woven cloth. This approach makes the pattern appear very modern and high-end, especially when worked in neutral tones like cream or charcoal.
The foundation chain length is the most critical measurement in your Braided Twist Crochet Headband – Pattern. You must ensure the chain is long enough to wrap around the head with a slight overlap, as the braiding and twisting will slightly shorten the overall length of the finished piece.
Another advanced technique for this pattern is the Slip Stitch (sl st) ribbing. While it takes a bit longer to grow the fabric, the result is an incredibly elastic and professional-looking Braided Twist Crochet Headband that maintains its shape even after being worn and washed multiple times.
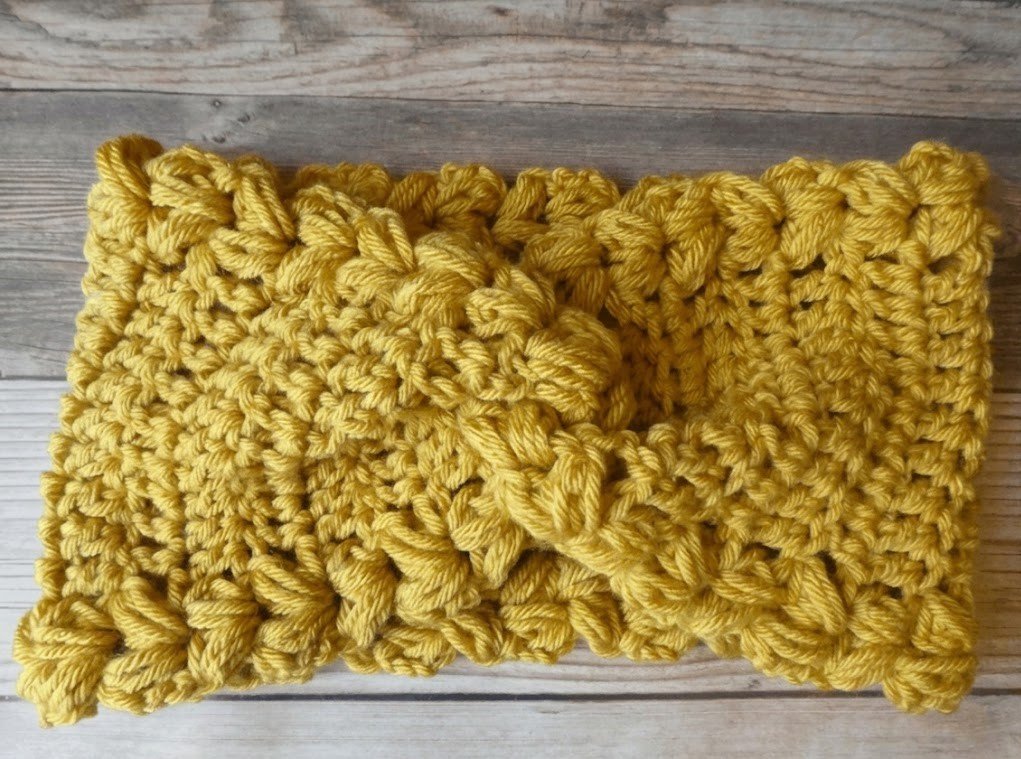
3. The Step-by-Step Assembly of the Twist Feature
The “magic” of the Braided Twist Crochet Headband – Pattern happens once you have finished crocheting your flat rectangular strip. You start by laying the piece flat and folding each end into a “C” or “U” shape, creating two interlocking sandwiches of crochet fabric.
You then slide the two folded ends together so that the layers alternate—imagine interlocking your fingers. This specific alignment is what creates the braided twist once the piece is turned right-side out, making the pattern look much more complicated than it actually is to sew.
Using your tapestry needle, you must sew through all four layers of the folded ends simultaneously. It is important to use a running stitch or a whip stitch that is tight enough to hold the weight of the headband but flexible enough not to create a hard lump at the forehead.
Once the seam is secure, you “flip” the Braided Twist Crochet Headband inside out. This hides the raw edges of your seam inside the twist, leaving a clean, beautiful braided knot on the front of the headband that serves as the centerpiece of the whole pattern.
Checking the symmetry of your twist is a vital step before you finish off your yarn. Make sure the layers are centered so that the Braided Twist Crochet Headband – Pattern sits evenly on the head and doesn’t lean to one side, ensuring a flattering look for the wearer.
The final step in assembly is weaving in the ends. In a Braided Twist Crochet Headband, you can hide your yarn tails inside the thickest part of the twist, which ensures they won’t pop out during wear and provides a very polished, professional finish to your handmade gift.
4. Tips for Customizing and Styling Your Finished Headband
One of the great things about the Braided Twist Crochet Headband – Pattern is its versatility. You can easily adjust the width of the pattern by adding more rows, turning a simple headband into a wide ear warmer that provides full coverage for those extra cold winter days.
For a summer-friendly version of the Braided Twist Crochet Headband, try using a lightweight cotton or bamboo yarn. This change in material transforms the pattern into a stylish hair accessory that wicks away moisture and adds a pop of color to a casual outfit without adding heat.
Adding embellishments like small pearls or sequins into the stitches of your Braided Twist Crochet Headband – Pattern can elevate the piece for special occasions. Imagine a bridal party wearing matching crochet headbands in soft silk yarns—it adds a unique, personalized touch to the event.
The Braided Twist Crochet Headband – Pattern also looks fantastic in a two-tone color scheme. By changing colors halfway through the rectangle, the twist will showcase both colors intertwining, creating a visually striking braided effect that highlights your crochet skills.
Styling this headband is incredibly easy; it looks just as good with hair worn down in loose waves as it does with a messy high bun. Because the Braided Twist Crochet Headband has a built-in “knot,” it acts as a functional piece of jewelry for your hair, framing the face beautifully.
Finally, consider the marketability of this item. If you sell your crafts, a Braided Twist Crochet Headband – Pattern is a high-profit item because it uses less than one skein of yarn and can be completed in under an hour, making it a perfect best-seller for craft fairs and online shops.
FAQ: Common Questions about the Braided Twist Crochet Headband – Pattern
1. Is the Braided Twist Crochet Headband – Pattern suitable for beginners?
Absolutely! If you can crochet a simple rectangle, you can make this pattern. The only “tricky” part is the folding at the end, which is very easy to master with a bit of practice.
2. How much yarn do I need for one headband?
Most Braided Twist Crochet Headband designs require less than 100 yards of yarn. This makes the pattern an excellent “stash-buster” for using up those leftover half-skeins of beautiful yarn you have lying around.
3. How do I make the headband fit a child instead of an adult?
To adjust the Braided Twist Crochet Headband – Pattern for a child, simply shorten the length of your starting chain and reduce the number of rows. Aim for a length that is about 1 to 2 inches smaller than the child’s head circumference.
4. Can I wash my crochet headband?
Yes, but the method depends on the yarn fiber. If you used wool, hand wash in cold water. If you used acrylic for your Braided Twist Crochet Headband – Pattern, you can usually machine wash it on a gentle cycle, but air drying is always best to maintain the shape.
5. What is the best stitch for a stretchy headband?
Working in the Back Loop Only (BLO) is the best way to add stretch to your Braided Twist Crochet Headband – Pattern. It creates a ribbing that expands and contracts, ensuring a perfect fit for various head shapes.
6. Does this pattern work with thin yarn?
You can use thin yarn for a Braided Twist Crochet Headband, but you will need to either hold two strands together or increase the number of stitches significantly to achieve the desired width and warmth.
Conclusion
In this guide, we have explored the wonderful world of the Braided Twist Crochet Headband – Pattern, covering everything from the essential yarn and hook selection to the final twist assembly. We discussed how simple stitches like the half double crochet can be transformed using the back loop only technique to create a professional, knit-look texture.
By understanding the folding process and the importance of tension and measurements, you are now equipped to create a beautiful, functional headband that is perfect for any season.
and?