Easter Bunny Pouch – Pattern crafting is one of the most delightful ways to usher in the spring season and prepare for the upcoming holiday festivities. Whether you are an experienced sewist or a curious beginner looking for a charming DIY project, creating a personalized gift holder adds a touch of handmade warmth that store-bought items simply cannot replicate. This comprehensive guide will walk you through every nuance of the Easter Bunny Pouch – Pattern, ensuring your holiday preparations are both creative and organized.
As we dive into the world of seasonal sewing, it is important to understand that an Easter Bunny Pouch – Pattern is more than just a set of instructions; it is a gateway to creating lasting memories for your children, friends, or family. These pouches serve as the perfect vessel for chocolate eggs, small trinkets, or even jewelry, making them a versatile addition to your Easter decor. By choosing the right fabrics and following a structured approach, you can turn a simple piece of cloth into a whimsical character that brings joy to everyone who sees it.
The beauty of working with an Easter Bunny Pouch – Pattern lies in its adaptability, allowing you to experiment with different textures like felt, cotton, or linen. In this article, we will explore the essential sewing techniques, the materials required, and the step-by-step process to ensure your project is a resounding success. From understanding the fabric grain to mastering the satin stitch for the bunny’s nose, we have curated all the professional tips you need to master this craft while keeping the process fun and humanized.
1. Understanding the Essentials of an Easter Bunny Pouch – Pattern
The foundation of any successful sewing project is a high-quality Easter Bunny Pouch – Pattern. This term refers to the template or blueprint used to cut your fabric pieces into the specific shapes required to form a rabbit-themed bag. Having a precise PDF pattern or a hand-drawn stencil ensures that the ears are symmetrical and the pouch body has the correct proportions to hold your treats securely.
When you select your Easter Bunny Pouch – Pattern, you must consider the scale of the project. A smaller version is ideal for individual party favors, while a larger template can be used as a primary Easter basket alternative. Most patterns will include specific markings for seam allowances, which are crucial for maintaining the intended size of the finished product.
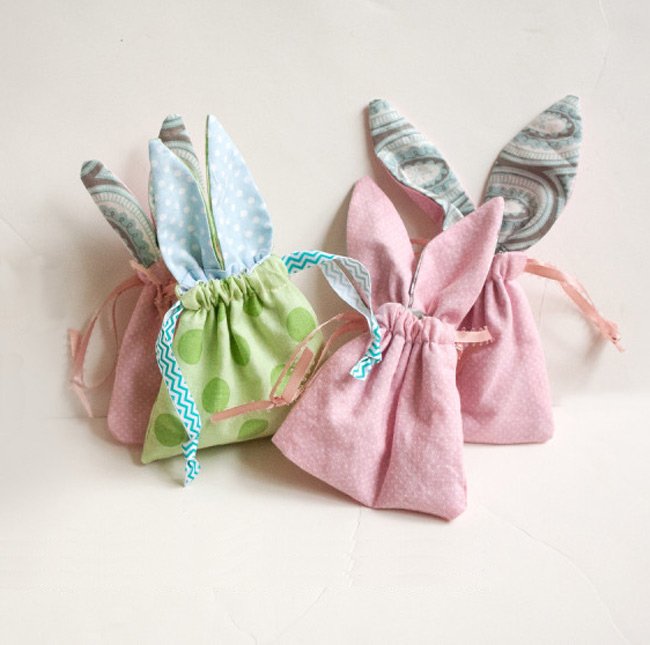
Material selection is the next vital step in utilizing your Easter Bunny Pouch – Pattern effectively. We recommend using 100% cotton fabric for the lining and a sturdier felt or canvas for the exterior to provide structure. The contrast between the soft bunny ears and the durable pouch body creates a professional-looking aesthetic that is both tactile and visually appealing.
To properly transfer the Easter Bunny Pouch – Pattern onto your fabric, use a tailor’s chalk or a disappearing ink pen. This allows you to follow the lines accurately without leaving permanent marks on your beautiful textile. Always remember to pin your pattern pieces securely to the fabric to prevent slipping during the cutting process.
Optimization of your workspace is also key when working with an Easter Bunny Pouch – Pattern. Ensure you have sharp fabric shears and a reliable sewing machine or high-quality embroidery needles if you prefer hand-stitching. A well-prepared environment reduces errors and makes the creative journey much more relaxing and productive.
Finally, don’t be afraid to customize the Easter Bunny Pouch – Pattern by adding unique elements like pom-pom tails or embroidered eyes. While the pattern provides the structure, your personal touch provides the soul. Learning to read and interpret these templates is a fundamental skill that will serve you well in all your future holiday sewing projects.
2. Preparing Your Materials and Tools for the Project
Before you begin sewing your Easter Bunny Pouch – Pattern, you must gather all the necessary supplies to avoid interruptions. You will need at least two coordinating fabrics: one for the exterior bunny face and another for the inner lining. Using spring-themed prints like pastels, florals, or polka dots can enhance the festive feel of your handmade Easter gift.
In addition to your main fabric, you will need interfacing, which is a material used to add stiffness to the bunny ears. Without interfacing, the ears may flop over instead of standing upright, which is a signature feature of the Easter Bunny Pouch – Pattern. Choose a light to medium-weight fusible interfacing for the best results and ease of application.
Thread choice is equally important for a polished finish on your Easter Bunny Pouch – Pattern. We suggest using an all-purpose polyester thread in a color that matches or subtly contrasts with your fabric. If you plan on doing decorative topstitching around the ears or eyes, a slightly thicker embroidery floss can make those details pop.
For the closure of your pouch, you have several options depending on the complexity of your Easter Bunny Pouch – Pattern. A simple drawstring closure using ribbon or twine is the most common and user-friendly method. Alternatively, you could use a magnetic snap or a button loop if you want a more sophisticated look for an adult gift.
Don’t forget the small details that make the Easter Bunny Pouch – Pattern come to life. Small black beads or safety eyes can be used for the face, though embroidery is often safer for items intended for very young children. A small scrap of pink felt is perfect for the inner ears and the nose, adding a “pop” of color to the design.
Lastly, ensure your iron and ironing board are ready to use. Pressing your seams as you go is the secret to a professional-looking Easter Bunny Pouch – Pattern result. Crisp edges and flat seams distinguish a high-quality handmade item from a rushed DIY project, so never skip the pressing stages during your construction.
3. Step-by-Step Construction of the Bunny Pouch
The first step in assembling your Easter Bunny Pouch – Pattern is to sew the ears. Place two ear pieces right sides together, stitch around the curve, and turn them right side out. Once turned, give them a good press with your iron to ensure they lay flat and crisp before attaching them to the main body.
Next, you will attach the prepared ears to the top edge of one of the exterior body pieces of your Easter Bunny Pouch – Pattern. Position them according to the pattern markings, usually facing downward toward the center of the face. Baste them in place with a long stitch to ensure they don’t move when you add the lining later.
Now it is time to create the “face” of your Easter Bunny Pouch – Pattern. Using your preferred method—be it applique, embroidery, or fabric markers—add the eyes, nose, and whiskers. Doing this step while the fabric is still flat is significantly easier than trying to sew details onto a finished, circular bag.
Once the face is complete, place the two exterior pieces of the Easter Bunny Pouch – Pattern right sides together and sew around the sides and bottom. Repeat this process for the lining pieces, but remember to leave a small opening at the bottom of the lining. This gap is essential for “turning” the bag right side out in the final steps.
The most critical part of the Easter Bunny Pouch – Pattern assembly is joining the exterior to the lining. Slip the exterior bag inside the lining bag so that the right sides of the fabric are touching. Align the top raw edges and the side seams, then stitch all the way around the top circumference of the pouch.
Pull the exterior fabric through the hole you left in the lining, effectively turning the whole Easter Bunny Pouch – Pattern right side out. Hand-stitch or machine-sew the gap in the lining closed, push the lining down into the exterior bag, and perform a final topstitch around the top edge. This creates a clean finish and secures the drawstring casing.
4. Tips for Customizing and Marketing Your Creations
If you plan to sell your finished items, the Easter Bunny Pouch – Pattern is a fantastic product for platforms like Etsy or local craft fairs. To make yours stand out, consider using eco-friendly fabrics like organic cotton or recycled felt. Highlighting sustainable materials in your product description can attract a niche audience of environmentally conscious buyers.
Personalization is a huge trend that pairs perfectly with the Easter Bunny Pouch – Pattern. Using a sewing machine with monogramming capabilities allows you to add names to the bunny ears. A personalized pouch becomes a cherished keepsake that parents will want to keep for years, increasing the perceived value of your work.
To optimize your online listings for the Easter Bunny Pouch – Pattern, use high-quality photography. Take photos in natural light and include “lifestyle” shots—perhaps the pouch filled with colorful eggs or sitting in a spring garden. Visual storytelling helps potential customers imagine how the product will look in their own homes during the holidays.
Consider offering different “themes” based on the Easter Bunny Pouch – Pattern. You could create a “Vintage Bunny” using muted linens and lace, or a “Modern Bunny” using bright neon colors and geometric patterns. Diversifying your style ensures that your handmade pouches appeal to a wider variety of tastes and home decor styles.
Packaging is the final touch for your Easter Bunny Pouch – Pattern business. Including a small, handwritten thank-you note or wrapping the pouch in tissue paper with a sprig of dried lavender creates an unboxing experience that encourages repeat customers. These small details reflect the care and effort you put into the sewing process.
Finally, always stay updated on the latest sewing trends and fabric releases to keep your Easter Bunny Pouch – Pattern designs fresh. Join online sewing communities or follow hashtags like #EasterSewing on social media to see what other crafters are creating. Networking with fellow makers can provide inspiration and even lead to collaborative opportunities within the crafting industry.
FAQ – Frequently Asked Questions
What is the best fabric for an Easter Bunny Pouch – Pattern?
The best fabrics are stable, non-stretch materials like quilting cotton, felt, or linen. These fabrics hold their shape well and are easy to sew, especially when creating the intricate shapes of the bunny ears.
Can I make this project if I am a total beginner?
Absolutely! The Easter Bunny Pouch – Pattern is an excellent project for beginners because it involves basic straight stitches and simple curves. It’s a great way to practice seam allowance and bag construction on a small scale.
How long does it take to sew one pouch?
Once your fabric is cut, a single Easter Bunny Pouch – Pattern usually takes between 30 to 60 minutes to complete. If you are making them in batches, you can significantly reduce the time per unit by “chain sewing.”
How do I wash my handmade bunny pouch?
If you used cotton fabric, you can usually machine wash it on a gentle cycle. However, if you added glued-on elements or used felt, we recommend spot cleaning with a damp cloth to preserve the shape and details of the Easter Bunny Pouch – Pattern.
What can I put inside the pouch besides candy?
The Easter Bunny Pouch – Pattern is perfect for small toys, stickers, hair accessories, or even a gift card. It also makes a wonderful “tooth fairy” bag or a holder for small jewelry items like earrings and rings.
Do I need a special sewing machine for this?
No special machine is required. A standard domestic sewing machine with a universal needle is perfectly fine for an Easter Bunny Pouch – Pattern. You can even sew the entire project by hand using a backstitch for durability.
Conclusion
In this article, we have explored the delightful process of creating a festive gift holder using an Easter Bunny Pouch – Pattern. We covered everything from selecting the right textiles and tools to the step-by-step assembly and creative customization tips.
By following these guidelines, you can produce a high-quality, professional-looking pouch that serves as both a functional gift container and a beautiful piece of seasonal decor. Remember that the key to a successful Easter Bunny Pouch – Pattern project lies in the details—neat seams, well-pressed fabric, and those charming facial features that give each bunny its own personality.