The Yarn Buddy Crochet – Pattern is a delightful project that combines utility with a touch of whimsy, making it a must-have for any enthusiast looking to organize their crafting space. If you have ever struggled with runaway yarn balls or tangled strands while working on a complex design, this specific crochet accessory is the ultimate solution. By following a well-structured crochet tutorial, you can create a functional companion that holds your yarn steady, allowing for a smooth and uninterrupted stitching experience.
Crafting your own Yarn Buddy Crochet – Pattern is not just about the final product; it is about the journey of mastering new crochet techniques and customizing your tools to fit your personal style. This project is perfect for using up scrap yarn or diving into that special cotton blend you have been saving for a rainy day. The beauty of this handmade organizer lies in its versatility, as it can be adapted into various shapes, from simple geometric cylinders to adorable amigurumi-style characters that sit right next to you.
As you embark on this DIY crochet project, you will find that the Yarn Buddy Crochet – Pattern serves as an excellent bridge between beginner and intermediate skills. It requires a solid understanding of basic stitches like the single crochet and half-double crochet, but it also introduces concepts of structural integrity in fiber arts. In the following sections, we will break down the essential components, the materials required, and the step-by-step logic to ensure your crochet organizer is both beautiful and durable.
1. Essential Materials for Your Yarn Buddy Crochet – Pattern
To start your Yarn Buddy Crochet – Pattern, you will need a few key supplies to ensure the best results. High-quality worsted weight yarn is often recommended because it provides the necessary thickness to hold the shape of the buddy. You should also have a 5mm crochet hook (or the size recommended on your yarn label) to maintain a tight, consistent tension throughout the piece.
Don’t forget to gather stitch markers, a tapestry needle, and sharp scissors before you begin. Because this pattern often involves creating a weighted base, you might consider using poly-pellets or clean pebbles tucked safely inside a fabric pouch. This weight prevents the yarn holder from tipping over when you pull on the thread during a fast-paced crochet session.
The choice of fiber content is more important than you might think for this specific project. Using a mercerized cotton or a sturdy acrylic blend helps the Yarn Buddy Crochet – Pattern resist stretching over time. Avoid very fuzzy yarns like mohair for the structural parts, as you want the surface to be smooth so it doesn’t snag your main project’s yarn as it rotates or feeds through the guide.
Properly preparing your workspace will make the stitching process much more enjoyable. Make sure you have adequate lighting to see your stitch definition, especially if you are using darker colors for your handmade craft. It is also helpful to have a row counter nearby to keep track of your progress, ensuring that the dimensions of your crochet buddy remain symmetrical and functional.
If you are planning to add decorative elements, such as safety eyes or embroidered details, have those ready as well. The Yarn Buddy Crochet – Pattern can easily be transformed into a cat, a bear, or even a mushroom, depending on the embellishments you choose. These small additions turn a simple tool into a piece of crochet art that brings a smile to your face every time you pick up your hook.
Lastly, consider the portability of your finished item. Many crafters like to take their work on the go, so choosing materials that are lightweight yet sturdy is a smart move. Once you have all your supplies organized, you are ready to dive into the technical aspects of the pattern and begin the foundation of your new favorite crafting assistant.
2. Understanding the Technical Stitches and Techniques
The foundation of the Yarn Buddy Crochet – Pattern usually begins with a magic ring, a technique that allows for a tightly closed center when working in the round. Mastering the magic circle is vital for any amigurumi-style project because it prevents the stuffing or weights from leaking out of the bottom. From there, you will move into continuous rounds, which eliminates the look of a visible seam on your crochet piece.
Increases and decreases are the primary ways you will shape the Yarn Buddy Crochet – Pattern. Using the invisible decrease method is highly recommended here; it keeps the surface of the crochet fabric smooth and professional-looking. This is particularly important for an item that will be handled frequently, as traditional decreases can sometimes create small gaps or bumps in the stitch work.
To give your yarn buddy its height, you will work through several rounds of single crochet without any increases. This creates a sturdy wall of crochet stitches that serves as the main body of the holder. Maintaining an even gauge is the secret to success here, as it ensures the walls are strong enough to support the weight of a full yarn cake or a large skein of yarn.
One unique aspect of this pattern is the inclusion of a “feeder hole” or a crochet loop where the yarn exits. This part of the Yarn Buddy Crochet – Pattern requires careful attention to detail to ensure there are no rough edges. You can reinforce this opening with a slip stitch border to provide extra durability and a clean, finished look to the opening.
If you decide to incorporate different colors, learning the seamless color change technique will elevate the aesthetic of your project. By changing colors in the last pull-through of the previous stitch, you create a crisp line that makes the striped pattern or decorative accents pop. This attention to craftsmanship is what separates a basic project from a high-quality crochet masterpiece.
Finally, finishing the piece involves weaving in ends securely. Use your tapestry needle to hide the yarn tails inside the body of the crochet work. A well-finished Yarn Buddy Crochet – Pattern should look great from every angle, with no loose threads or messy transitions, making it a professional addition to your crochet toolkit.
3. Customizing Your Design for Maximum Functionality
The beauty of the Yarn Buddy Crochet – Pattern is how easily it can be customized to suit your specific needs. If you often work with jumbo yarn, you can simply increase the diameter of the base by adding more increase rounds. Conversely, for lace-weight yarn, a smaller, more delicate version of the buddy might be more appropriate to keep your fine threads from tangling.
Adding a non-slip base is a pro-tip for anyone using the Yarn Buddy Crochet – Pattern on smooth surfaces like wooden tables. You can achieve this by sewing a piece of felt to the bottom or using small dots of puff paint to create grip. These small DIY modifications ensure that your yarn holder stays exactly where you want it, even when you are working at high speeds.
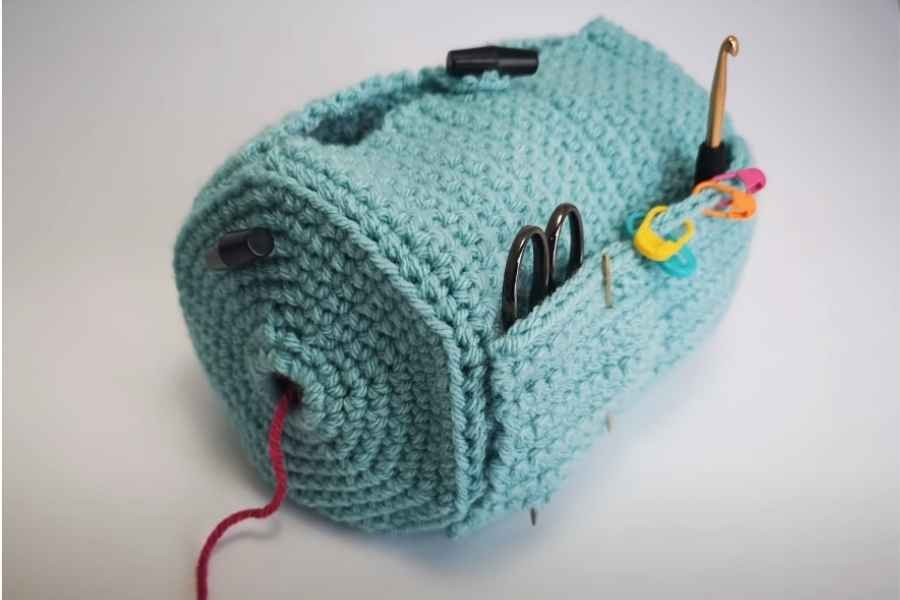
For those who love organization, adding a small crochet pocket to the side of the buddy is a game-changer. This pocket can hold your crochet hooks, a small pair of scissors, or even a few stitch markers. By integrating these features into the Yarn Buddy Crochet – Pattern, you create an all-in-one mobile craft station that is perfect for traveling or sitting on the couch.
Aesthetics play a big role in modern crochet, and your buddy is the perfect canvas for creativity. You can use variegated yarn to create a self-striping effect without the extra work of changing colors. Alternatively, applying surface crochet techniques can add texture and 3D effects to the exterior of your Yarn Buddy Crochet – Pattern, making it a truly unique piece of functional art.
Consider the weight of the items you are using to fill the base. While fiberfill is great for the “head” or decorative parts, the base needs something more substantial. Some crafters use a small bag of rice or dried beans, but for a washable crochet project, plastic beads are the superior choice. This ensures your Yarn Buddy Crochet – Pattern can be cleaned without damaging the internal weighted components.
Don’t be afraid to experiment with the height of your holder. A taller Yarn Buddy Crochet – Pattern can accommodate multiple yarn balls for color-work projects like tapestry crochet or intarsia. Customizing the height allows you to keep your different strands separated, preventing the dreaded “yarn vomit” that often occurs when working with multiple colors at once.
4. Troubleshooting and Maintaining Your Crochet Companion
Even with a perfect Yarn Buddy Crochet – Pattern, you might encounter a few hiccups during the construction phase. If your base is curling upward like a bowl when it should be flat, you might be missing increases or your tension might be too tight. Simply frog a few rows and ensure you are following the increase logic (usually 6 or 8 stitches per round) to keep the bottom perfectly circular.
If the “walls” of your yarn buddy feel too floppy, you can try using a smaller hook size to create a denser fabric. Another trick is to use two strands of yarn held together, which doubles the thickness and provides incredible structural support. This is especially useful if you are making a larger version of the Yarn Buddy Crochet – Pattern meant to hold heavy cotton yarn.
Maintaining your handmade accessory is simple but requires a little care. Since it is made of yarn, it may collect dust or lint over time. A quick pass with a lint roller will keep it looking fresh. If the Yarn Buddy Crochet – Pattern needs a deeper clean, hand washing it in cool water with a mild wool wash is the safest way to preserve the shape and color.
Over time, the yarn feeder hole might stretch out with constant use. If this happens, you can easily “repair” it by adding a round of reverse single crochet (also known as the crab stitch) around the opening. This not only reinforces the hole but adds a decorative, cord-like texture that enhances the overall look of your Yarn Buddy Crochet – Pattern.
If you find that the yarn isn’t sliding through the guide as smoothly as you’d like, check for any internal snags. Sometimes a knot in the yarn or a stray bit of stuffing can catch the thread. Ensuring the interior of your Yarn Buddy Crochet – Pattern is lined or smoothly finished is key to a frictionless crocheting experience.
Finally, remember that every handmade item has its own character. If your buddy isn’t perfectly symmetrical, it just adds to the charm of your DIY creation. The most important thing is that the Yarn Buddy Crochet – Pattern works for you and makes your hobby more organized and enjoyable. Sharing your finished project with the crochet community is a great way to inspire others to organize their craft!
FAQ – Frequently Asked Questions
What is the best type of yarn for a Yarn Buddy Crochet – Pattern?
The most recommended yarn is a worsted weight cotton or a stiff acrylic. These materials provide the durability and structure needed to hold the weight of the yarn balls and maintain the shape of the buddy over time.
Can a beginner complete this project?
Yes! This pattern is designed to be beginner-friendly. As long as you know how to single crochet, increase, and decrease, you can successfully create a functional and beautiful yarn holder.
How do I keep the yarn buddy from sliding on my table?
Adding a non-slip base is the best solution. You can sew a piece of leather or felt to the bottom, or use silicone grip pads to ensure it stays in place while you pull your yarn.
Is the Yarn Buddy Crochet – Pattern washable?
Yes, but it depends on the stuffing and weights you use. If you use poly-pellets and synthetic fiberfill, you can gently hand wash it. Avoid using organic weights like rice or beans if you plan on washing it.
Can I use this for knitting as well?
Absolutely! While it is a crochet pattern, the finished product is a universal yarn management tool that works perfectly for knitters, weavers, or anyone working with skeins and cakes.
How long does it take to make?
Most crafters can finish a standard-sized Yarn Buddy Crochet – Pattern in a few hours or over a single weekend, making it a perfect quick-win project.
Conclusion
Creating the Yarn Buddy Crochet – Pattern is an rewarding experience that results in a highly practical tool for your crafting room. Throughout this article, we have explored the essential materials, the technical stitches, and the various ways you can customize your buddy to fit your unique style. By focusing on quality tension and proper weighting techniques, you now have the knowledge to build an organizer that will last for years. This project not only improves your crafting efficiency but also allows you to express your creativity through handmade art.
We hope you enjoyed this guide and feel inspired to start your own project! Please leave your sincere opinion in the comments below and share any suggestions or variations you have tried. Your feedback helps our community grow and inspires new designs for future crochet patterns!