The Cathedral Window Quilt – Pattern is one of the most breathtaking and rewarding projects a quilter can undertake, offering a unique three-dimensional texture that mimics the stained glass of ancient cathedrals. Unlike traditional quilting where blocks are pieced and then quilted to a batting layer, this specific technique relies on a clever folding and “fussy cutting” method that creates its own finished edges as you go. Mastering the Cathedral Window Quilt – Pattern allows you to showcase your favorite fabric scraps while building a heavy, heirloom-quality piece that requires no traditional binding or batting.
Whether you are a seasoned pro or a curious beginner, diving into a Cathedral Window Quilt – Pattern project is an exercise in patience and precision that pays off with a stunning visual result. This design has stood the test of time, evolving from a classic pioneer-era craft into a modern favorite for those who love textural fabric art and geometric symmetry. By focusing on the interplay between a solid background and vibrant “window” fabrics, you can create a masterpiece that looks far more complex than it actually is to assemble.
In the following guide, we will break down the essential steps to perfecting your own Cathedral Window Quilt – Pattern, focusing on everything from fabric selection to the final hand-stitched flourishes. We will explore the origami-style folding techniques that define this style and ensure your project meets professional standards for durability and aesthetics. If you are looking to elevate your handicraft skills and create something truly iconic, you are in the right place to begin your journey with this timeless design.
1. Selecting the Best Fabric for Your Cathedral Window Quilt – Pattern
Choosing the right materials is the foundation of a successful Cathedral Window Quilt – Pattern because the fabric must hold a crisp crease. High-quality 100% cotton is the industry standard here, as it responds well to heat and steam during the frequent ironing stages required for the folds.
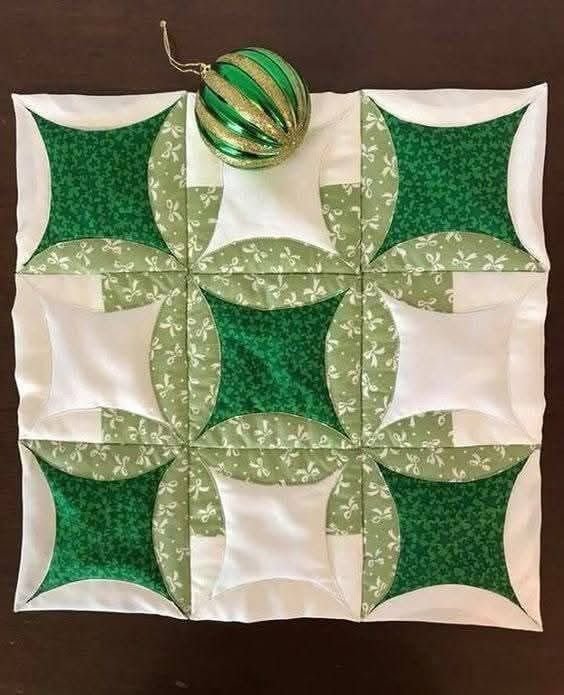
For the background of your Cathedral Window Quilt – Pattern, most quilters prefer a solid neutral like white, cream, or grey to make the “windows” pop. This background fabric acts as the structural frame, so ensure it has a tight weave to prevent fraying during the stitching process.
The “windows” themselves are the perfect place to use fabric scraps or charm packs featuring bold colors and intricate prints. Since the visible portion of the window is relatively small, small-scale floral or geometric patterns often work best to maintain the visual impact of the design.
Don’t forget to consider the weight of the finished Cathedral Window Quilt – Pattern, as the multiple layers of folded fabric make this a heavy quilt. Because of this natural thickness, you typically do not need to add quilt batting, which saves money and reduces the bulk under your sewing machine.
If you are aiming for a vintage aesthetic, consider using repurposed textiles or linens for the frame, provided they are sturdy enough to handle the tension. The contrast between a rustic frame and silk or satin windows can create a high-end artisan quilt look that stands out in any collection.
Always pre-wash your fabrics before starting your Cathedral Window Quilt – Pattern to avoid shrinkage issues later on. Because this technique involves so much precision folding, any distortion caused by fabric bleeding or shrinking after the quilt is finished could ruin the geometric alignment.
2. Essential Tools and Preparation for Your Cathedral Window Quilt – Pattern
To achieve professional results with your Cathedral Window Quilt – Pattern, you need more than just a needle and thread; precision cutting tools are non-negotiable. A rotary cutter, a self-healing mat, and a long quilting ruler will ensure every square is perfectly sized for the initial folds.
A high-quality steam iron is perhaps the most important tool in your arsenal when working on a Cathedral Window Quilt – Pattern. You will be spending a significant amount of time at the ironing board, as every fold must be “set” with heat to ensure the fabric memory holds during assembly.
Marking tools, such as water-soluble fabric pens or tailor’s chalk, are vital for identifying the center points of your squares. Accurate marking ensures that when you fold the corners to the center, your Cathedral Window Quilt – Pattern remains perfectly square and doesn’t begin to slant.
For the stitching phase, you can use a heavy-duty sewing machine or opt for the traditional hand-stitched method. Many enthusiasts find that a monofilament thread (invisible thread) works wonders for the curved “window” edges, allowing the fabric colors to take center stage without visible seams.
Pins or wonder clips are essential for holding the folded “petals” in place before they are permanently sewn down. Since you will be working with several layers of fabric, clips often provide a better grip than pins and won’t distort the folded edges of your quilt blocks.
Finally, prepare a large, flat workspace where you can lay out your Cathedral Window Quilt – Pattern blocks to plan the color distribution. Organizing your “windows” beforehand ensures a balanced look and prevents two identical prints from ending up right next to each other in the final layout.
3. Step-by-Step Folding and Assembly of the Cathedral Window Quilt – Pattern
The magic of the Cathedral Window Quilt – Pattern begins with a large square of background fabric, usually twice the size of the desired finished block. You start by folding the edges over and pressing them to create finished hems on all four sides of the individual fabric units.
Next, you will perform a series of “origami” folds, bringing each corner to the exact center of the square and securing them with a small tack stitch. This creates a smaller square with flaps, which is the core structural unit of the Cathedral Window Quilt – Pattern architecture.
Once you have multiple units, you stitch them together side-by-side to create a grid; this is the stage where the “windows” begin to take shape. The secondary pattern emerges in the spaces between the squares, where the folded edges will eventually be peeled back to reveal the contrast fabric.
Place your small window scrap (usually a 2-inch or 2.5-inch square) over the diamond-shaped space created by the joined units. By gently curving the folded edges of the background fabric over the raw edges of the scrap, you create the signature curved window frame effect.
The most satisfying part of the Cathedral Window Quilt – Pattern is the topstitching, where you sew down those curved edges to lock the window fabric in place. This can be done with a decorative zigzag stitch or a delicate blind hem stitch to give the quilt a polished, professional finish.
Repeat this process across the entire surface until your Cathedral Window Quilt – Pattern reaches its intended size. Because each block is finished as it is added, the moment you sew the last window, the quilt is essentially complete, requiring only a light final press to set the seams.
4. Maintenance and Display Tips for a Cathedral Window Quilt – Pattern
Because a Cathedral Window Quilt – Pattern is often a labor of love involving many hours of work, proper care is essential for longevity. It is highly recommended to hand wash these quilts or use a very gentle machine cycle in a laundry bag to protect the delicate curved seams.
Avoid using a dryer if possible; instead, lay the quilt flat on a clean surface to air dry, which prevents the heavy fabric from stretching. Keeping the Cathedral Window Quilt – Pattern out of direct sunlight will also prevent the vibrant “window” fabrics from fading over the years.
When it comes to display, this quilt’s weight makes it a perfect winter bedspread or a stunning wall hanging. If you choose to hang your Cathedral Window Quilt – Pattern, ensure you use a sturdy quilt rack that supports the weight evenly to avoid putting stress on the top row of blocks.
For storage, avoid folding the quilt in the same way every time, as this can create permanent creases in the cotton fibers. Rolling the quilt around a large acid-free cardboard tube is the best way to store a Cathedral Window Quilt – Pattern without damaging the three-dimensional folds.
If a thread happens to come loose in one of the windows, repair it immediately with a hidden slip stitch. Catching small repairs early ensures the structural integrity of the Cathedral Window Quilt – Pattern remains intact for future generations to enjoy as a family heirloom.
Many modern crafters also use the Cathedral Window Quilt – Pattern technique to make smaller items like throw pillows or table runners. These smaller projects are a great way to practice the technique and add a touch of handcrafted elegance to your home decor without committing to a full-sized bed quilt.
FAQ: Common Questions About the Cathedral Window Quilt – Pattern
Do I need batting for a Cathedral Window Quilt – Pattern?
No, traditional batting is not required. Because the background fabric is folded multiple times, the quilt naturally becomes thick and heavy enough to provide warmth and structure on its own.
Can a beginner attempt this pattern?
Yes! While it looks complex, the Cathedral Window Quilt – Pattern is actually repetitive. If you can measure accurately and use an iron, you can master the folding process. Start with a small project like a cushion cover to build your confidence.
How much fabric do I need?
This pattern is fabric-intensive for the background. You typically need about 2.5 to 3 times the amount of background fabric compared to a standard pieced quilt of the same size. However, the windows are perfect for using up very small fabric remnants.
Is it better to sew the windows by hand or machine?
Hand-stitching gives the most traditional “heirloom” look and allows for more control over the curves. However, a sewing machine is much faster and provides a very durable finish for a quilt that will be used frequently.
What is the best size for the starting squares?
Common starting sizes are 8-inch or 10-inch squares. Keep in mind that the finished size of each window block will be approximately half the size of your starting square once all the folding is complete.
Conclusion
In this article, we have explored the intricate world of the Cathedral Window Quilt – Pattern, covering everything from the importance of choosing high-quality 100% cotton to the specialized origami folding techniques that give this quilt its iconic look.
We discussed the essential tools like rotary cutters and steam irons, and walked through the assembly process of creating units, joining them, and topstitching the beautiful curved “windows.” We also shared vital tips on maintaining your handcrafted heirloom so it remains a centerpiece of your home for years to come.