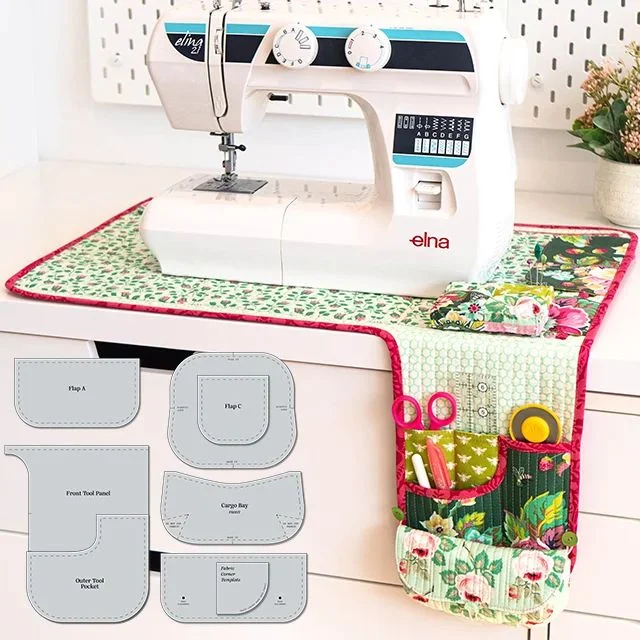
Exploring a new Fabric Organizer – Pattern is one of the most rewarding projects for any sewing enthusiast looking to combine functionality with aesthetic appeal. Whether you are tired of a cluttered workspace or simply want a stylish way to store your supplies, creating a custom Fabric Organizer allows you to tailor every pocket and compartment to your specific needs. This sewing pattern is designed to be accessible for beginners while offering enough complexity to satisfy seasoned quilters who enjoy working with interfacing and binding techniques.
In this detailed guide, we will walk through every step of the Fabric Organizer – Pattern, ensuring that your finished product is both durable and professional. Utilizing high-quality cotton fabrics and sturdy stabilizers is the secret to a long-lasting organizer that maintains its shape even when filled with heavy tools. By following these DIY sewing instructions, you will master the art of creating structured storage solutions that look like they came straight from a boutique craft store.
Beyond the practical benefits, making your own Fabric Organizer is an excellent way to use up your fabric stash or showcase your favorite fat quarters. SEO-driven crafting content often focuses on the “why,” but the “how” is where the magic happens for content creators and hobbyists alike. As we dive into the specifics of this Fabric Organizer – Pattern, remember that customization is key; feel free to adjust the measurements and pocket sizes to fit everything from crochet hooks to quilting rulers.
1. Choosing the Best Materials for Your Fabric Organizer – Pattern
Selecting the right materials is the foundation of a successful Fabric Organizer – Pattern. You want a base fabric that is thick enough to provide structure, such as canvas, denim, or reinforced cotton. If you choose a lighter weight material, ensure you have enough fusible fleece to add the necessary bulk and protection for your items.
The lining fabric is just as important as the exterior, as it provides a clean finish and a pop of color every time you open the organizer. Many crafters prefer contrasting prints to make it easier to see small items tucked deep into the pockets. Don’t forget to coordinate your all-purpose thread with the dominant colors in your Fabric Organizer – Pattern for a seamless look.
Hardware and notions can elevate a simple sewing project into a professional-grade tool. Consider adding magnetic snaps, heavy-duty zippers, or even velcro strips to secure the contents of your organizer. These additions make the Fabric Organizer – Pattern much more versatile for travel or transporting supplies to a crafting workshop.
Preparation is vital before you make your first cut into the material. Always pre-wash your fabric to prevent future shrinkage, especially if you plan on washing your finished organizer later. Once the fabric is dry, a quick press with a steam iron will ensure that your pattern pieces are cut accurately and lie flat during the assembly process.
When working on a Fabric Organizer – Pattern, the choice of interfacing can make or break the final result. For a soft-sided bin style, a medium-weight woven interfacing works wonders, while a stiff peltex is better for wall-hanging organizers. Matching the stabilizer to the intended use of the Fabric Organizer is a professional tip that ensures longevity.
Lastly, gather your essential sewing tools such as rotary cutters, a self-healing mat, and fabric clips. Using clips instead of pins is often easier when dealing with multiple layers of thick fabric and batting. Having everything organized on your table before starting the Fabric Organizer – Pattern will create a much smoother and more enjoyable sewing experience.
2. Cutting and Preparing Your Fabric Organizer – Pattern Pieces
Precision is the most critical element when cutting the components for your Fabric Organizer – Pattern. Use a clear acrylic ruler to measure out the main body panels, the pocket strips, and the handles. Accurate cuts ensure that all the edges line up perfectly during the stitching process, preventing lopsided pockets or uneven seams.
Once your pieces are cut, it is time to apply the fusible stabilizers. Following the manufacturer’s instructions, iron the interfacing onto the wrong side of the exterior pieces. This step provides the “bones” of the Fabric Organizer – Pattern, giving it the strength to stand upright without collapsing under the weight of your sewing notions.
Labeling your pieces is a helpful trick, especially if you are making an organizer with many different-sized pockets. Use washable fabric markers or small sticky notes to identify which piece belongs to the “front pocket,” “interior divider,” or “side panel.” This organization saves time and prevents mistakes as you navigate the Fabric Organizer – Pattern instructions.
If your Fabric Organizer – Pattern includes quilted details, now is the time to perform any free-motion quilting or straight-line stitching. Quilt the exterior fabric to the batting before you begin the final assembly. This adds a beautiful handmade texture and further reinforces the durability of the completed organizer.
The pocket sections often require hemmed edges or bias tape binding before they are attached to the main body. For a professional finish, fold the top edge of each pocket piece twice and topstitch it with a decorative stitch. This not only looks great but also prevents the fabric from fraying with frequent use of the Fabric Organizer.
Finalize your preparation by marking the placement lines for the pockets on the lining fabric. Use a tailor’s chalk to draw straight lines where each pocket will be sewn. Double-checking these measurements against the Fabric Organizer – Pattern ensures that your scissors, pens, and thread spools will fit perfectly into their designated slots.
3. Step-by-Step Assembly of the Fabric Organizer – Pattern
The assembly of a Fabric Organizer – Pattern usually begins with the pockets. Align the bottom of the pocket pieces with the marked lines on your lining and pin them securely. Sew vertical divider lines to create separate compartments, making sure to backstitch at the top of each line to reinforce the areas that experience the most stress.
Next, you will join the side panels to the main base of the Fabric Organizer. Use a 1/4 inch seam allowance unless the Fabric Organizer – Pattern specifies otherwise. Keeping your seams consistent is the secret to a symmetrical and well-balanced storage bin or pouch.
If your design includes handles or carrying straps, baste them into place now. Position them centered on the side panels or the top edge, depending on the style of the organizer. High-stress points like handles should be sewn with a box-stitch pattern (a square with an X inside) to ensure they never pull away from the fabric.
Now comes the “bagging out” method, where you sew the exterior and the lining together. Place the exterior and lining right sides together, nesting one inside the other. Sew around the top perimeter, but leave a 4-inch opening for turning the Fabric Organizer – Pattern right side out.
Carefully clip the corners and trim any excess seam allowance to reduce bulk. Turn the entire project through the opening you left, using a turning tool or a chopstick to push out the corners firmly. This is the moment where your Fabric Organizer – Pattern finally starts to look like a finished product.
Press the top edge of the organizer flat with your iron, tucking the raw edges of the opening inside. Finish the project by topstitching around the entire top rim. This close-to-the-edge stitch closes the turning hole and gives your Fabric Organizer a crisp, professional look that rivals any commercial storage solution.
4. Customization and SEO Tips for Your Fabric Organizer – Pattern
One of the best parts of using a Fabric Organizer – Pattern is the ability to customize the layout. You can add elastic loops for holding pens or mesh pockets for visibility. These personal touches make the sewing pattern uniquely yours and increase the practical value of the finished craft.
If you are a blogger or content creator, sharing your journey with the Fabric Organizer – Pattern is a great way to engage your audience. Use high-quality photos of each step and write descriptions that highlight the SEO keywords like “DIY fabric storage” or “Easy sewing tutorial.” This helps your content rank better on Google and Pinterest.
Consider creating a coordinated set of organizers in different sizes. A small one for makeup, a medium one for sewing supplies, and a large one for knitting projects. Using the same Fabric Organizer – Pattern with scaled measurements creates a beautiful, cohesive look for your home or studio.
Sustainable crafting is a growing trend, so try making a Fabric Organizer – Pattern using upcycled materials. Repurposing old jeans or vintage linens is not only eco-friendly but also gives the project a unique shabby-chic aesthetic. Mentioning “upcycled sewing projects” in your descriptions can also attract a wider audience.
Don’t forget to experiment with decorative embellishments. Adding embroidery, patches, or lace trim can transform a basic Fabric Organizer into a work of art. These details are what make handmade items so special compared to mass-produced plastic bins.
Finally, keep a record of any changes you made to the Fabric Organizer – Pattern. Writing down your adjusted measurements or stitch settings will make it much easier to replicate the project in the future. Sharing these “pro tips” with your readers builds trust and establishes you as an authority in the crafting community.
FAQ – Frequently Asked Questions
What is the best fabric for a Fabric Organizer – Pattern?
The best fabrics are stable, non-stretch materials like quilting cotton, canvas, or duck cloth. These fabrics hold their shape well and are easy to sew on standard home sewing machines.
Do I really need to use interfacing for this project?
Yes, interfacing is crucial for any Fabric Organizer – Pattern. It provides the structure needed to keep the pockets from sagging and helps the organizer stand up on its own.
Can a beginner sew a Fabric Organizer?
Absolutely! This Fabric Organizer – Pattern is designed with simple straight seams. As long as you take your time with the cutting and measuring, it is a perfect project for someone learning basic sewing skills.
How do I clean my handmade Fabric Organizer?
If you used washable cotton and polyester interfacing, you can usually machine wash it on a cold, gentle cycle. However, spot cleaning is recommended to maintain the crispness of the structure.
How long does it take to complete this Fabric Organizer – Pattern?
For an intermediate sewist, it typically takes 2 to 3 hours from cutting to the final topstitch. Beginners may want to set aside a full afternoon to ensure they don’t rush the assembly steps.
Conclusion
In this article, we have covered everything you need to know about creating a stunning and functional Fabric Organizer – Pattern. From selecting the right heavy-duty fabrics and stabilizers to the final topstitching techniques, you now have the knowledge to build a custom storage solution.
We explored the importance of precise cutting, the method of “bagging out” a sewing project, and how to personalize your pockets for maximum efficiency. This Fabric Organizer is not just a utility item; it is a reflection of your creativity and a great way to improve your sewing skills.