Crochet Leaf – Pattern is one of the most versatile and rewarding projects you can undertake, whether you are a seasoned professional or a curious beginner looking to add a natural touch to your repertoire. These delicate, handcrafted accents serve as the perfect embellishment for hats, blankets, home decor, and even jewelry, offering a timeless aesthetic that never goes out of style. In this comprehensive guide, we will explore everything you need to know about creating a stunning Crochet Leaf – Pattern from scratch, ensuring your final piece is both structurally sound and visually captivating.
The beauty of working on a Crochet Leaf – Pattern lies in the simplicity of the materials required and the infinite variations you can achieve by simply swapping your yarn weight or hook size. From the sharp, serrated edges of an autumn maple to the soft, rounded curves of a spring eucalyptus, the techniques we will discuss today cover the fundamental building blocks of botanical crochet. By mastering these stitches, you are not just following a guide; you are gaining the skills to “grow” a permanent garden of fiber art that can be used to personalize gifts or enhance your commercial inventory.
As we dive into this tutorial, keep in mind that high-quality Crochet Leaf – Pattern designs rely heavily on tension control and a keen eye for detail. We have structured this article to be highly informative and optimized for search engines, ensuring that you get the best educational value while also understanding the technical aspects of the craft. Whether you are looking to monetize your blog or simply want to improve your stitching, the following sections will provide a deep dive into the art of the Crochet Leaf – Pattern, complete with professional tips and frequently asked questions.
1. Understanding the Core Elements of a Crochet Leaf – Pattern
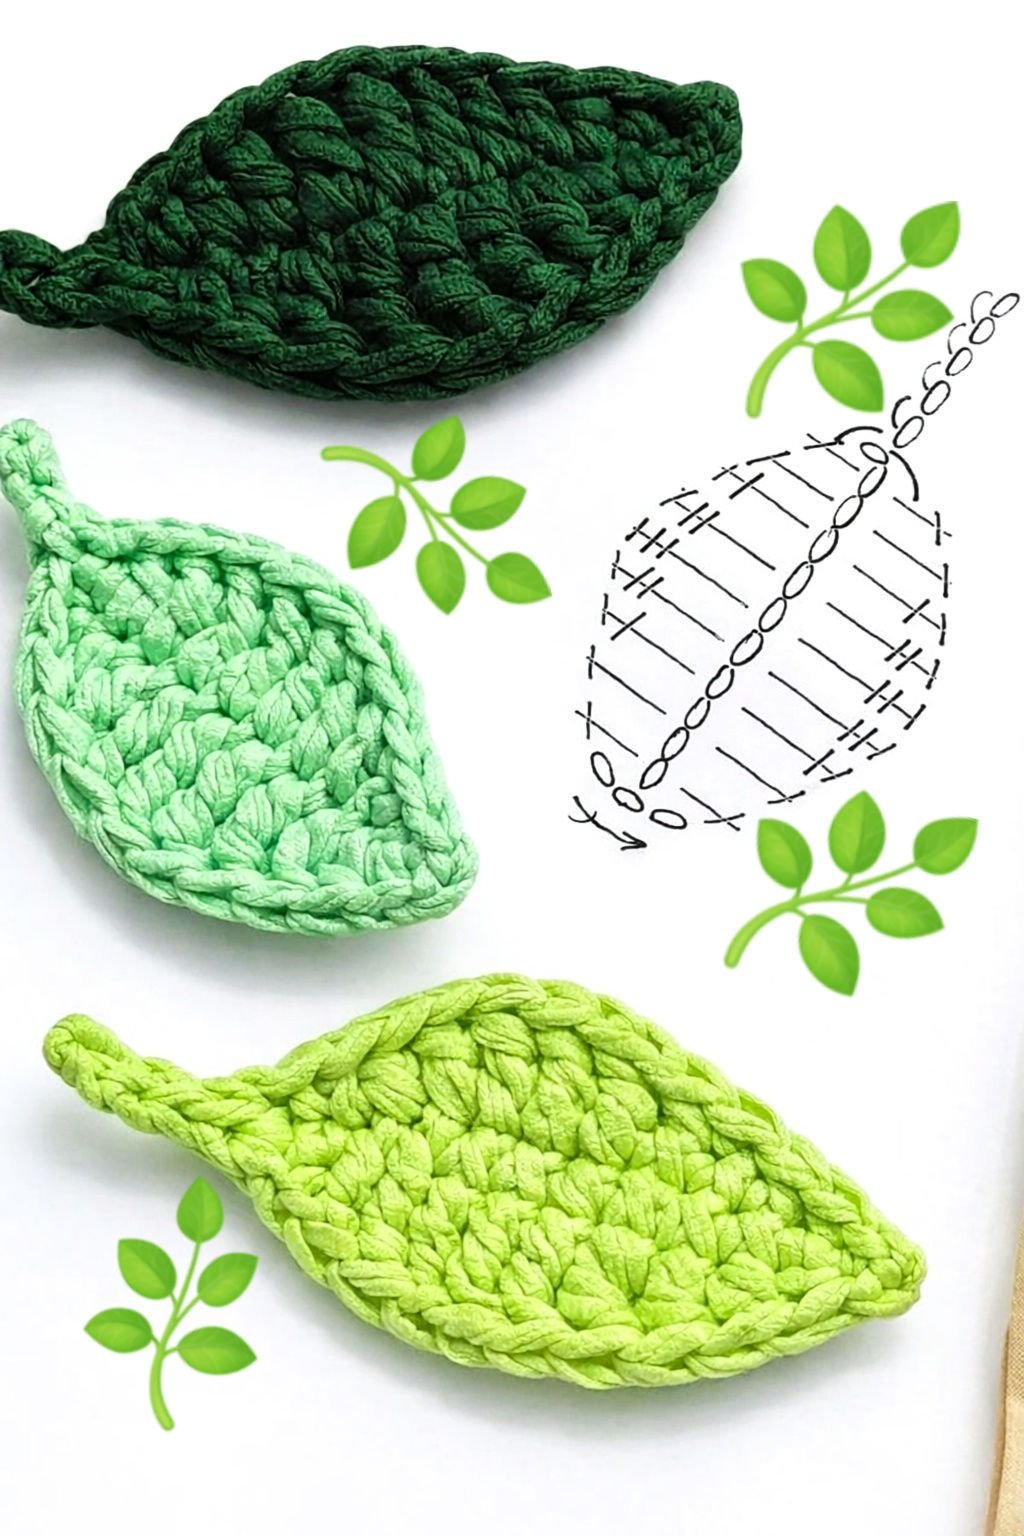
To begin your journey, you must understand that every Crochet Leaf – Pattern starts with a foundation chain that acts as the “midrib” or central vein of the leaf. This central spine is the anchor for all subsequent stitches, determining the length and overall scale of your project. Choosing the right crochet hook and yarn type is the first step toward ensuring your leaf looks organic rather than stiff or distorted.
The most common method for shaping a Crochet Leaf – Pattern involves working on both sides of the foundation chain to create a symmetrical look. You will start by working up one side of the chain with progressively taller stitches—such as single crochet, half double crochet, and double crochet—to create the wider part of the leaf. Once you reach the tip, you will rotate your work to come back down the opposite side of the chain.
Creating a sharp point at the top of your Crochet Leaf – Pattern is often achieved through a technique called the picot stitch. This involves making a small loop of chains and slip stitching back into the base, which perfectly mimics the pointed apex found in nature. Without this specific detail, your leaf might end up looking more like an oval or a circle, losing its botanical identity.
Texture is another vital component when you are following a Crochet Leaf – Pattern. Many advanced makers use back loop only (BLO) stitching to create raised ridges that look like real plant veins. This adds a three-dimensional quality to the work, making it stand out when used as an appliqué on flat surfaces like quilts or cardigans.
The choice of yarn material significantly impacts the final result of your Crochet Leaf – Pattern. For a crisp, defined shape, mercerized cotton is highly recommended because it holds its form well and has a slight sheen that mimics the waxy surface of a real leaf. Softer acrylics can be used for a fuzzier, more rustic appearance, which is great for autumnal-themed decor.
Finally, blocking your finished Crochet Leaf – Pattern is a step you should never skip if you want a professional finish. By pinning your damp leaves into the desired shape and letting them dry, you ensure the edges don’t curl and the stitches settle into a beautiful, flat arrangement. This attention to detail is what separates hobbyist work from items that are ready for the Google AdSense-ready marketplace.
2. Essential Stitches and Materials for a Successful Result
Before picking up your hook, ensure you have a Crochet Leaf – Pattern chart or written instructions that match your skill level. The primary tools you will need include a tapestry needle for weaving in ends and a pair of sharp embroidery scissors. Having a clear workspace with good lighting will also help you see the individual loops of your foundation chain, which is where many mistakes happen.
The slip stitch is perhaps the most underrated tool in a Crochet Leaf – Pattern. It is used to join rounds, move yarn across the work without adding height, and create the delicate stems at the base of the leaf. Mastering the transition from a slip stitch to a treble crochet is key to creating those dramatic, sweeping curves seen in larger tropical leaf designs.
For those interested in the Tapestry Crochet style, a Crochet Leaf – Pattern can even incorporate multiple colors. This allows you to create variegated leaves that transition from green to yellow or red, mimicking the natural changing of the seasons. Carrying the secondary yarn inside your stitches keeps the back of the work neat and tidy, which is essential for items like scarves.
Weight matters when selecting your yarn for a Crochet Leaf – Pattern. Using a fingering weight yarn with a 2.5mm hook will produce a tiny, delicate leaf perfect for earrings or scrapbooking. Conversely, using a bulky yarn with a 6.0mm hook will result in a large, sturdy leaf that could function as a coaster or a centerpiece for a dining table.
The half double crochet (HDC) is frequently the “workhorse” stitch of any Crochet Leaf – Pattern. It provides more height than a single crochet but is denser than a double crochet, making it ideal for filling out the “body” of the leaf. It bridges the gap between the narrow base and the wide middle, providing a smooth gradient that looks natural.
Always remember to check your gauge if you are following a specific Crochet Leaf – Pattern intended to fit a certain size. While leaves are generally forgiving, inconsistent tension can lead to one leaf being significantly larger than its pair. Keeping a consistent rhythm will ensure your set of leaves looks cohesive and high-quality for your digital portfolio or shop.
3. Step-by-Step Execution of the Crochet Leaf – Pattern
To start the physical work, chain a set number of stitches—usually 10 to 12 for a medium-sized Crochet Leaf – Pattern. Skip the first chain from the hook and perform a slip stitch in the second chain. This begins the narrow “tip” or “stem” depending on which direction the designer has chosen for the flow of the pattern.
In the next few chains, you will gradually increase the height of your stitches. Perform one single crochet, followed by one half double crochet, and then several double crochets in the middle chains. This sequence is the secret to the aerodynamic shape of a Crochet Leaf – Pattern, allowing the center to swell outward while the ends remain tapered.
When you reach the final chain at the end of the row, you will usually work 3 or 4 stitches into that single loop to “turn the corner.” This rounded end creates the base of the leaf. If your Crochet Leaf – Pattern requires a stem, this is the point where you would chain an additional 4 or 5 stitches and slip stitch back toward the leaf body.
Now, work back down the other side of the original foundation chain. You must mirror the stitches you did on the first side exactly. If you used a double crochet in the fifth chain on the way up, you must use a double crochet in the fifth chain on the way down. This symmetry is what makes the Crochet Leaf – Pattern look professional and balanced.
To finish the top point, many makers add a chain 2 and slip stitch into the first chain to create that sharp apex we mentioned earlier. This final flourish defines the character of the leaf. Once the shape is complete, cut your yarn, leaving a long tail for sewing if you plan to attach the Crochet Leaf – Pattern to another project like a hat or a bag.
Finally, use your tapestry needle to weave the yarn tail through the center of the leaf. This not only hides the end but also provides a bit of extra structural support to the “vein” of your Crochet Leaf – Pattern. If you are making many leaves, doing this as you go will save you a lot of time at the end of your project.
4. Troubleshooting and Customizing Your Crochet Leaf – Pattern
One common issue when working on a Crochet Leaf – Pattern is the edges curling inward. This usually happens if your tension is too tight or if you haven’t added enough stitches when turning the corners. If this happens, try using a slightly larger hook or consciously loosening your grip on the yarn to allow the stitches to lie flat.
If your Crochet Leaf – Pattern looks too “holy” or gappy, you may be using a hook that is too large for your yarn weight. For amigurumi-style leaves or appliqués, you want a tight fabric so the shape remains crisp. Switching to a smaller hook size will close those gaps and make the double crochet stitches look more like a solid surface.
Customization is where the fun truly begins with a Crochet Leaf – Pattern. You can add “teeth” to the edges by incorporating small picots every three stitches along the perimeter. This creates a realistic holly leaf or rose leaf effect, which is perfect for holiday-themed decorations or floral bouquets that require a bit of edge.
You can also experiment with surface slip stitching once the main Crochet Leaf – Pattern is finished. By joining a contrasting color of yarn at the base and slip stitching a line straight up the center, you create a very visible midrib. This adds a “pop” of color and a professional, layered look that is highly sought after in the DIY tutorial community.
For those looking to create a 3D effect, you can wire your Crochet Leaf – Pattern. By crocheting around a thin piece of florist wire during the final round, you make the leaf poseable. This is an excellent technique for creating realistic floral arrangements where you want the leaves to curve and bend as if they were growing in nature.
Lastly, consider the scale of your project. A single Crochet Leaf – Pattern can be a keychain, but fifty of them joined together can become a stunning “leafy” garland for a nursery or a wedding. The possibilities are truly endless when you treat the pattern as a building block for larger, more creative fiber art installations.
FAQ – Frequently Asked Questions
What is the best yarn for a Crochet Leaf – Pattern?
For most projects, a 100% cotton yarn is the gold standard. It provides excellent stitch definition, which is crucial for showing off the intricate details of a leaf. If you want a more delicate look, a size 10 crochet thread works beautifully, while a wool blend is better if the leaf is part of a warm winter garment.
How do I make my crochet leaf stiffer?
If your Crochet Leaf – Pattern is intended for home decor and needs to stand upright, you can use a fabric stiffener spray or a mixture of water and white glue. Simply soak the leaf, pin it into shape on a blocking mat, and let it dry completely. This will ensure it maintains its form even when hanging.
Can a beginner finish a Crochet Leaf – Pattern in one sitting?
Absolutely! Most basic leaf patterns take between 10 to 20 minutes to complete once you are comfortable with the stitches. It is an excellent “palette cleanser” project between larger works and a great way for beginners to practice increasing and decreasing stitch heights in a small, manageable format.
How can I use these leaves for SEO-friendly craft blogging?
When writing about your Crochet Leaf – Pattern, focus on specific keywords like handmade home decor, crochet tutorial, and fiber art. Use high-quality images and describe the process in a “humanized” way, just as we have done here, to engage your readers and satisfy search engine algorithms.
Are there different patterns for different types of trees?
Yes, a Crochet Leaf – Pattern can be adapted for oak, maple, monstera, or ferns. The primary difference lies in how you handle the “lobes” of the leaf. Some require you to fasten off and rejoin the yarn, while others can be made in one continuous flow by varying the height of the stitches dramatically.
Conclusion
In this article, we have explored the intricate and rewarding process of creating a Crochet Leaf – Pattern. We covered everything from the foundational stitches like the double crochet and picot stitch to advanced tips for blocking and wiring your finished pieces for a professional look.
We hope this guide has inspired you to pick up your hook and start “growing” your own crochet garden. The Crochet Leaf – Pattern is a staple in the fiber arts world, offering a perfect blend of simplicity and artistic potential. Whether you are making a single leaf or a hundred, the techniques learned here will serve you well in all your future crochet endeavors.