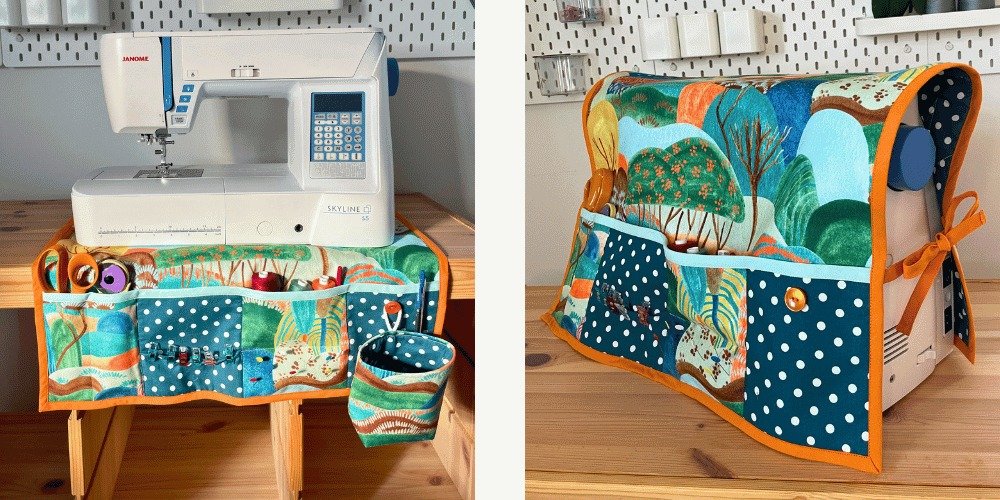
A Fabric Sewing Machine Organizer – Pattern is the ultimate solution for any crafter looking to transform a cluttered workspace into a streamlined sanctuary of creativity. Whether you are a seasoned quilter or a beginner just finding your footing, having your seam rippers, bobbins, and fabric shears within arm’s reach is essential for maintaining a steady workflow. By utilizing a Fabric Sewing Machine Organizer – Pattern, you can custom-build a storage caddy that sits perfectly under your machine, doubling as a noise-dampening mat while providing accessible pockets for all your essential notions.
The beauty of working with a dedicated Fabric Sewing Machine Organizer – Pattern lies in the ability to personalize every single detail to fit your specific tools. Standard store-bought organizers often lack the depth for larger rotary cutters or the specific slots needed for specialized marking pens, but a handmade version solves this beautifully. Using high-quality cotton fabric and sturdy interfacing, you can create a durable piece that not only keeps you organized but also adds a splash of color and personality to your sewing room, reflecting your unique aesthetic.
In the world of DIY crafts, the Fabric Sewing Machine Organizer – Pattern is considered a foundational project because it teaches vital skills like pocket construction, binding edges, and managing layers of thick material. As you follow the Pattern, you will notice how the strategic placement of weight—often using the sewing machine itself—keeps the organizer from slipping, ensuring that your tools stay exactly where you put them even during high-speed stitching. This article will dive deep into how to select the right materials and execute this project to achieve professional, long-lasting results in your studio.
1. Understanding the Core Elements of a Fabric Sewing Machine Organizer
The term Fabric Sewing Machine Organizer refers to a textile-based storage system designed to drape over or sit beneath a sewing machine. Its primary function is to consolidate small tools into one localized area, preventing the common frustration of losing track of your “must-have” items mid-project. A well-designed organizer usually features a mix of pleated pockets, flat slots, and sometimes even a built-in pincushion or a detachable scrap bag.
When we talk about the Fabric component, durability is the most important factor to consider. Since the organizer will endure the constant vibration of the machine and the sharp points of various tools, choosing a tightly woven duck canvas or a reinforced quilting cotton is highly recommended. The weight of the fabric ensures that the pockets don’t sag over time, maintaining the structural integrity of your workspace setup.
A high-quality Fabric Sewing Machine Organizer acts as a protective barrier for your tabletop, preventing scratches from metal tools or the machine’s base. Many crafters choose to add a layer of batting or fleece between the fabric layers to provide cushioning. This extra padding helps absorb the sound of the motor, making for a much quieter and more pleasant sewing experience during long sessions.
Functionality is the heart of this project, and the Fabric Sewing Machine Organizer must be designed with ergonomics in mind. The pockets should be positioned so they do not interfere with the fabric you are currently sewing. Most designs place the storage hanging off the front edge of the table, allowing the sewer to reach down naturally to swap out tools without having to look away from their needle.
Customization is another reason why the Fabric Sewing Machine Organizer is so popular among enthusiasts. You can incorporate magnetic strips for pins, elastic loops for thread spools, or even zippered compartments for valuable items like specialty presser feet. This level of organization ensures that every tool has a “home,” which significantly reduces the time spent tidying up after a long day of garment construction.
Finally, the Fabric Sewing Machine Organizer serves as a decorative accent in your craft room. By selecting prints that coordinate with your room’s decor, you turn a functional utility item into a piece of art. It is a fantastic way to use up fabric scraps from previous projects, creating a “memory mat” that showcases the different materials you have worked with over the years.
2. Deciphering the Importance of a Professional Pattern
A Pattern is essentially the blueprint or the architectural map for your sewing project. In the context of a sewing machine organizer, the Pattern provides the exact dimensions and cutting instructions required to ensure all pieces fit together perfectly. Without a reliable template, you risk creating pockets that are too tight for your hands or a base that doesn’t align with the dimensions of your specific sewing machine model.
Following a Pattern allows you to benefit from the trial and error of professional designers who have already calculated the necessary seam allowances. These small mathematical details are what separate a homemade-looking project from a professional-grade accessory. A good design will include “ease,” ensuring that once the pockets are filled with bulky tools, the fabric doesn’t pull or distort the shape of the main mat.
When looking for the perfect Pattern, you will often encounter both digital (PDF) and physical versions. Digital patterns are incredibly convenient as they offer instant access and the ability to print only the pages you need. They frequently come with step-by-step photographic tutorials, which are invaluable for visual learners trying to understand complex steps like mitered corners or bias tape application.
The structural logic of a Pattern often includes instructions for interfacing, which is a hidden layer of material used to add stiffness. Many beginners overlook this, but a professional guide will specify exactly which weight of stabilizer to use. This ensures that your organizer remains crisp and functional even after months of heavy use, preventing the fabric from becoming limp or losing its shape.
Furthermore, a well-written Pattern will offer “variation” options, such as different pocket configurations or sizes. This versatility means you can adapt the project for a small travel machine or a large long-arm quilter. Having a standard set of instructions as a baseline gives you the confidence to make these modifications without worrying about the project failing structurally.
Lastly, using a Pattern is the best way to improve your technical sewing skills. It introduces you to industry-standard terminology and techniques that can be applied to future projects, like garment making or upholstery. By mastering the assembly of a Fabric Sewing Machine Organizer – Pattern, you are building a foundation of precision and attention to detail that will serve you throughout your entire crafting journey.
3. Essential Materials and Tools for a High-Quality Build
To successfully execute your Fabric Sewing Machine Organizer – Pattern, you need more than just fabric; you need the right supportive materials. Fusible interfacing is perhaps the most critical secondary material, as it bonds to the wrong side of your fabric to provide “body.” For an organizer that holds heavy tools like shears, a heavy-weight firm stabilizer or even a thin layer of Peltex is often suggested by experts.
The choice of thread also plays a significant role in the longevity of your organizer. Since the pockets will be under constant tension, using a high-quality polyester thread is usually better than 100% cotton, as polyester has a bit more “give” and is less likely to snap under pressure. Ensure your bobbin is wound evenly to maintain consistent stitch tension across the long, flat expanses of the organizer base.
Your sewing machine needles should be matched to the weight of the material you choose. If you are using heavy canvas or multiple layers of denim for your Fabric Sewing Machine Organizer, a denim needle (90/14 or 100/16) will be necessary to pierce through the thick layers without skipping stitches. Using a sharp, fresh needle will also prevent the fabric from puckering, resulting in a much cleaner and more professional finish.
Measuring tools are non-negotiable when working with a Pattern. A long acrylic ruler and a rotary cutter will provide the straight, clean edges needed for a rectangular project like this. Precise cutting is the secret to ensuring that the pockets align perfectly with the edges of the base mat, creating that satisfying, symmetrical look that characterizes high-end handmade goods.
Don’t forget the notions that add functionality to your Fabric Sewing Machine Organizer. Small items like Wonder Clips are often preferred over pins for this project because they can hold together multiple thick layers of fabric and interfacing without bending. Additionally, you might want to include a swivel hook for your keys or a small scrap bin attachment made from a matching fabric scrap.
Finally, consider the finishing touches like bias tape for the edges. You can buy pre-made tape, but making your own from a contrasting fabric adds a bespoke touch to your Fabric Sewing Machine Organizer – Pattern. A walking foot is also highly recommended during the final assembly stages, as it helps feed the thick “sandwich” of fabric layers through the machine evenly, preventing the dreaded “shove” or misalignment of layers.
4. Step-by-Step Tips for Successful Pattern Execution
The first step in tackling your Fabric Sewing Machine Organizer – Pattern is the preparation of the fabric. Always pre-wash your materials to account for any shrinkage, especially if you are using cotton. Once dried, a thorough pressing with a steam iron is essential; you cannot get accurate cuts on wrinkled fabric. Flat, crisp fabric is much easier to align with your pattern pieces, ensuring your final dimensions are spot on.
When you begin cutting your pieces, pay close attention to the grainline indicated on the Pattern. Cutting with the grain ensures that the organizer doesn’t stretch out of shape over time. If your fabric has a “directional print” (a pattern that only looks right one way up), double-check your placement before cutting to ensure that your little owls or floral bouquets aren’t upside down once the pockets are folded.
Assembling the pockets is where the Fabric Sewing Machine Organizer truly comes to life. Use a fabric marking pen to transfer all the “fold lines” and “placement lines” from the Pattern onto your fabric. It is often helpful to “stay-stitch” the tops of the pockets or add a decorative topstitch to give them extra strength. This prevents the pocket edges from stretching out when you’re frequently reaching in for your tools.
When it comes time to attach the pockets to the main base, basting is your best friend. Instead of relying solely on pins, sew a long, loose stitch around the edges to hold everything in place. This prevents the layers from shifting as you apply the final binding. It’s a small extra step that makes a massive difference in the alignment and overall quality of the Fabric Sewing Machine Organizer.
The most challenging part of the Pattern is often the corners. If you are using binding to finish the edges, practice your mitered corners on a scrap piece of fabric first. A perfect 45-degree angle at the corner gives the organizer a high-end, store-bought appearance. Take your time with this step, as the corners are the most visible part of the project once it’s draped over your sewing table.
Once the sewing is complete, give the entire Fabric Sewing Machine Organizer a final press. This “sets” the stitches into the fabric and gives the project a polished look. If your Pattern included a detachable scrap bag, check the strength of the Velcro or snaps you used. Now, simply place it under your machine, fill the pockets with your favorite tools, and enjoy the newfound efficiency of your organized creative space.
FAQ: Frequently Asked Questions
What is the best fabric for a sewing machine organizer?
The best fabrics are stable, medium-to-heavyweight materials like quilting cotton, canvas, or linen blends. These fabrics hold their shape well, especially when paired with the right interfacing. Avoid stretchy fabrics like knits, as they will sag under the weight of your tools.
Do I really need to use a Pattern, or can I just wing it?
While you can certainly “freehand” a design, using a Pattern ensures that the proportions are correct and that you don’t run into issues with bulk in the seams. A pattern also provides professional techniques for finishing edges that make the item much more durable.
How do I keep the organizer from sliding off the table?
Most Fabric Sewing Machine Organizer designs use the weight of the sewing machine itself to “anchor” the mat. However, if your machine is very light, you can add a layer of non-slip shelf liner to the bottom of the organizer or fill a small section of the mat with weighted plastic pellets.
Can I wash my organizer once it’s finished?
Yes, provided you used washable fabrics and interfacing. It is best to wash it on a gentle cycle and air dry it to maintain the integrity of the stabilizers. If you used magnetic strips or heavy cardboard inserts, make sure they are removable before washing.
Is this a good project for a beginner?
Absolutely! Executing a Fabric Sewing Machine Organizer – Pattern is a fantastic way to practice straight-line stitching, topstitching, and basic binding. It is a rewarding project because it results in a tool you will use every single time you sit down to sew.
Conclusion
In conclusion, creating a Fabric Sewing Machine Organizer – Pattern is one of the most practical and rewarding projects any sewing enthusiast can undertake.
Throughout this article, we have explored the vital role of selecting high-quality fabrics, the structural necessity of a well-engineered Pattern, and the technical steps required to assemble a durable, functional, and beautiful workspace accessory. By following these guidelines, you not only improve your technical sewing skills but also invest in a more organized and stress-free creative environment.