Creating a Fabric Wall Organizer – Pattern is one of the most rewarding sewing projects for anyone looking to combine home organization with personal style. Whether you are a seasoned quilter or a beginner picking up a needle for the first time, having a reliable Fabric Wall Organizer – Pattern allows you to transform scraps of cloth into a functional masterpiece. These organizers are perfect for clearing clutter from desks, nurseries, or craft rooms, providing a dedicated space for mail, pens, and tools while adding a soft, textural element to your interior design.
Beyond the sheer utility, working with a Fabric Wall Organizer – Pattern offers a unique opportunity to experiment with textile combinations and sturdy interfacings. In today’s world of mass-produced plastic bins, a handmade Fabric Wall Organizer – Pattern stands out as a sustainable and aesthetic alternative. It allows you to customize pocket sizes specifically for the items you use most, ensuring that your organization system isn’t just beautiful, but also perfectly tailored to your daily workflow and spatial requirements.
Choosing the right materials is the first step in bringing your Fabric Wall Organizer – Pattern to life, as the weight and durability of the fabric will dictate the longevity of the piece. When you follow a professional Fabric Wall Organizer – Pattern, you learn the importance of structural integrity, such as using wooden dowels or heavy-duty grommets for hanging. This article will guide you through the essential components of creating your own, ensuring your finished product is high-quality, SEO-optimized, and ready to enhance any room in your home with a touch of handmade charm.
1. Selecting the Ideal Materials for Your Fabric Wall Organizer – Pattern
When you begin your journey with a Fabric Wall Organizer – Pattern, the choice of “Base Fabric” is paramount. Most experts recommend heavy-weight cotton canvas or upholstery-grade linen to ensure the back panel doesn’t sag under the weight of stored items. Using a sturdy foundation makes the Fabric Wall Organizer – Pattern much easier to sew and guarantees it stays flush against the wall.
The next term to consider is “Interfacing,” which is the hidden hero of any Fabric Wall Organizer – Pattern. Fusible fleece or extra-firm stabilizers are often applied to the back of the pockets to give them “pop” and prevent them from flopping open. This step is crucial for maintaining the crisp, clean lines that make a DIY wall organizer look professional and high-end.
For the pockets, the Fabric Wall Organizer – Pattern usually suggests using “Contrast Prints” or “Fat Quarters.” This is where you can get creative with colors and textures, mixing florals with geometric shapes or bold solids. Selecting vibrant fabrics for the pockets not only makes the Fabric Wall Organizer – Pattern visually appealing but also helps you categorize items by color-coding their storage spots.
Don’t forget the “Hanging Mechanism” described in your Fabric Wall Organizer – Pattern. This usually involves a “Wooden Dowel” or “Metal Rod” that slides through a casing at the top of the organizer. Proper weight distribution is key to SEO-friendly home decor projects, as a well-hung piece maintains its shape and photographic appeal for years, making your Fabric Wall Organizer – Pattern a true staple.
“Thread Tension” and “Needle Size” are technical terms you will encounter when executing a Fabric Wall Organizer – Pattern. Because you will be sewing through multiple layers of heavy fabric and interfacing, using a Denim or Topstitch needle is often recommended. A high-quality polyester thread ensures that the seams of your Fabric Wall Organizer – Pattern won’t snap when the pockets are filled with heavier objects.
Finally, “Seam Allowance” is a critical concept in any Fabric Wall Organizer – Pattern. Most patterns use a standard 1/4 inch or 1/2 inch allowance to ensure all pieces fit together perfectly. Paying close attention to these measurements while following your Fabric Wall Organizer – Pattern prevents the final product from being lopsided and ensures a symmetrical, aesthetically pleasing result for your wall.
2. Understanding the Layout and Cutting Process
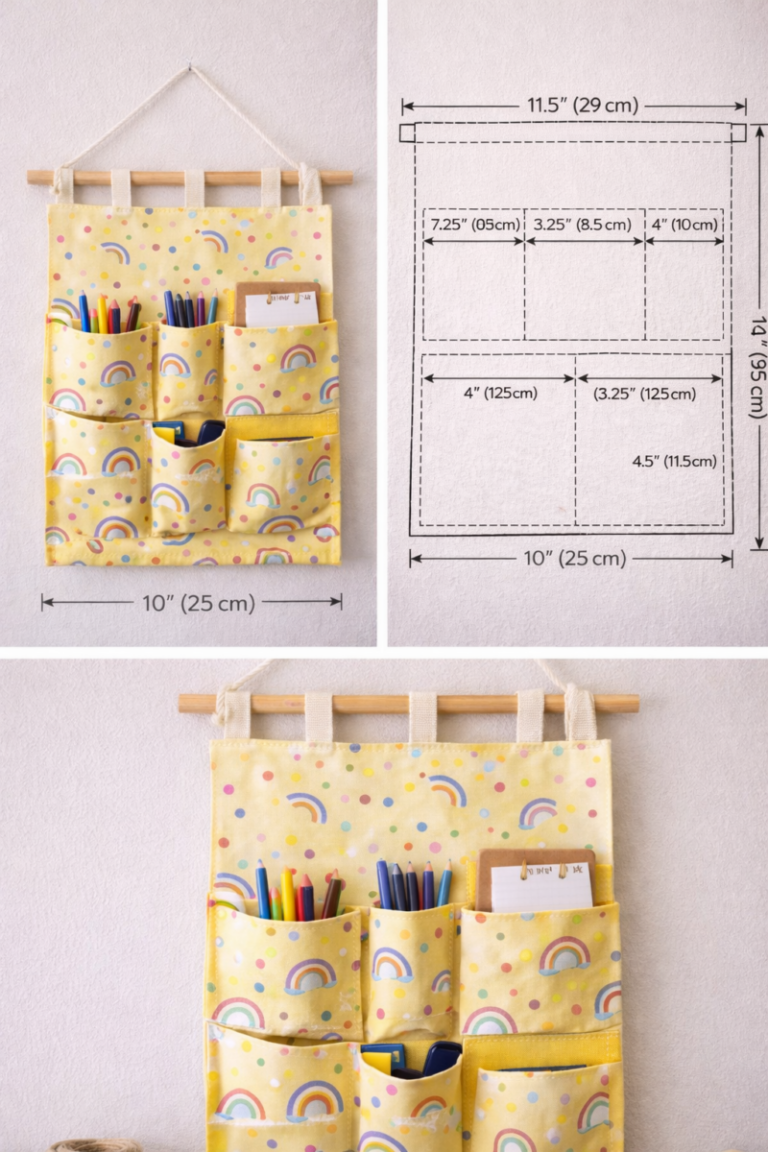
Before you make your first cut, you must study the “Template Layout” provided in the Fabric Wall Organizer – Pattern. This involves laying out your fabric pieces to maximize the use of the material and ensure that any directional prints are facing the right way. A well-planned Fabric Wall Organizer – Pattern layout saves money by reducing fabric waste and ensures a professional finish.
The term “Rotary Cutter” is frequently mentioned in modern Fabric Wall Organizer – Pattern instructions. Unlike traditional scissors, a rotary cutter used with a self-healing mat allows for incredibly precise, straight edges. Precision is vital because the pockets of your Fabric Wall Organizer – Pattern need to be perfectly rectangular to align correctly with the base fabric during the assembly phase.
“Marking Tools,” such as tailor’s chalk or heat-erasable pens, are essential for transferring the Fabric Wall Organizer – Pattern lines to the cloth. You will need to mark exactly where each pocket sits on the main panel. Accuracy in this stage of the Fabric Wall Organizer – Pattern ensures that your finished organizer doesn’t look tilted or “handmade” in a messy way, but rather “hand-crafted” with precision.
“Pocket Pleating” is a technique used in more advanced Fabric Wall Organizer – Pattern designs to create “bellows” or expanded storage. This involves folding the fabric at the bottom of the pocket to allow it to hold bulkier items like remote controls or yarn balls. Mastering this part of the Fabric Wall Organizer – Pattern adds significant functional value to your project and improves the overall user experience.
In the Fabric Wall Organizer – Pattern, you will also find instructions for “Backing Fabric.” This is a secondary layer of cloth that hides all the raw edges and stitching on the reverse side of the organizer. A clean back is a hallmark of a high-quality Fabric Wall Organizer – Pattern, providing a smooth surface that won’t scratch your walls or snag on hanging hooks.
Lastly, “Trimming and Notching” are terms used when you need to turn fabric right-side out. When following the Fabric Wall Organizer – Pattern, you must clip the corners of the pockets to remove bulk. This ensures that when you press the fabric, the corners of your Fabric Wall Organizer – Pattern are sharp and square, which is a key indicator of expert sewing craftsmanship.
3. Sewing Techniques for a Durable Wall Organizer
The “Stay-Stitching” phase is an important part of a Fabric Wall Organizer – Pattern that prevents the fabric from stretching out of shape. By sewing a line of stitches near the edge of the fabric pieces before assembly, you lock the weave in place. This is especially important for the top edges of the pockets in your Fabric Wall Organizer – Pattern, which will experience the most “wear and tear.”
“Topstitching” is both a functional and decorative element in a Fabric Wall Organizer – Pattern. It involves sewing a visible line of stitches very close to the edge of the finished pockets. In a Fabric Wall Organizer – Pattern, topstitching provides extra reinforcement to the pocket openings and gives the entire project a “boutique” look that is highly sought after in home organization trends.
Another key term is “Backstitching,” which you must do at the start and end of every seam in your Fabric Wall Organizer – Pattern. This “locks” the thread so the pockets don’t start pulling away from the base panel over time. Given that a Fabric Wall Organizer – Pattern is designed to hold weight, reinforcing these stress points is non-negotiable for a durable result.
“Appliqué” or “Embellishment” can also be incorporated into a Fabric Wall Organizer – Pattern. This refers to adding decorative patches, embroidery, or labels to the pockets. While not strictly necessary for function, adding these details to your Fabric Wall Organizer – Pattern allows you to personalize the organizer for specific family members or craft supplies, increasing its “visual SEO” in your home.
The “Dowel Casing” is a specific sewing task within the Fabric Wall Organizer – Pattern. This involves folding the top edge of the base fabric over and sewing a straight line to create a tube or “sleeve.” The Fabric Wall Organizer – Pattern will specify the width of this casing based on the diameter of the rod you plan to use, ensuring a snug and secure fit for hanging.
“Binding” is a technique used to finish the outer edges of the Fabric Wall Organizer – Pattern. If you don’t want to turn the whole project inside out, you can use “Bias Tape” to wrap the raw edges. This adds a beautiful framed look to the Fabric Wall Organizer – Pattern, allowing you to introduce a pop of a third color or pattern that ties the whole design together.
4. Customizing and Hanging Your Finished Project
Once the sewing is complete, the Fabric Wall Organizer – Pattern project moves into the “Finishing Touches” stage. This might include “Pressing,” which is using a steam iron to flatten all seams. A well-pressed Fabric Wall Organizer – Pattern looks significantly more professional than one that is wrinkled, as heat helps “set” the stitches and gives the fabric a crisp, new appearance.
“Weight Distribution” is a concept you should keep in mind even after the Fabric Wall Organizer – Pattern is finished. When filling the pockets, place heavier items toward the bottom or center. This prevents the Fabric Wall Organizer – Pattern from leaning to one side, keeping the aesthetics of your wall gallery or office space balanced and visually pleasing to anyone who enters.
For those using the Fabric Wall Organizer – Pattern in a “Modular” way, you might consider “Snap Fasteners” or “Velcro.” These allow you to swap out pockets or add new sections to the organizer later. Adapting a standard Fabric Wall Organizer – Pattern to be modular is a great way to ensure the project grows with your needs, whether you’re organizing baby clothes or power tools.
The “Wall Mounting” stage requires choosing the right hardware for your finished Fabric Wall Organizer – Pattern. Depending on the weight, you might use “Command Hooks,” “Nails,” or “Wall Anchors.” Ensuring your Fabric Wall Organizer – Pattern is hung securely is the final step in the process, turning a piece of fabric into a permanent fixture of your home’s organizational system.
If you are making the Fabric Wall Organizer – Pattern as a gift, “Personalized Tags” are a wonderful addition. Sewing a small “Handmade by” label into the side seam of the Fabric Wall Organizer – Pattern adds a professional touch. It celebrates the effort put into following the Fabric Wall Organizer – Pattern and makes the item a cherished keepsake for the recipient.
Finally, “Photography and Sharing” is the best way to celebrate your completed Fabric Wall Organizer – Pattern. Taking high-quality photos in natural light highlights the textures and patterns you chose. Sharing your version of the Fabric Wall Organizer – Pattern on social media or craft forums helps inspire others to start their own DIY journey, building a community around creative organization.
FAQ – Frequently Asked Questions
What is the best fabric for a Fabric Wall Organizer – Pattern?
The most recommended fabrics are heavy-weight cottons like canvas, duck cloth, or denim. These materials provide the necessary “structure” to hold items without stretching or sagging. For a more decorative look, you can use quilting cotton for the pockets, provided they are reinforced with interfacing.
How do I clean my fabric wall organizer once it’s hung?
Since most organizers contain wooden dowels or heavy interfacing, “Spot Cleaning” is usually best. Use a damp cloth with mild detergent. If the Fabric Wall Organizer – Pattern allows for it, you can remove the dowel and hand wash the fabric, but air drying is essential to prevent shrinking or warping the shape.
Can a beginner sew a Fabric Wall Organizer – Pattern?
Absolutely! Most Fabric Wall Organizer – Pattern designs consist of straight lines and rectangular shapes, making it an ideal project for beginners. It’s a great way to practice “Topstitching” and learning how to handle thicker layers of fabric on a standard sewing machine.
How much fabric do I need for a standard organizer?
Generally, one yard of “Base Fabric” and a few “Fat Quarters” for the pockets are sufficient for a medium-sized organizer. However, always check the specific requirements of your Fabric Wall Organizer – Pattern to ensure you have enough for the backing and the dowel casing.
Do I need a special sewing machine for this project?
A standard home sewing machine can handle a Fabric Wall Organizer – Pattern, but you will need a “Heavy-Duty Needle” (size 90/14 or 100/16). If your fabric is exceptionally thick, a “Walking Foot” attachment can help feed the layers through evenly without shifting.
How can I make the pockets on my organizer more sturdy?
The secret is “Iron-on Interfacing.” By applying a firm stabilizer to the wrong side of your pocket fabric before sewing, you give the material “body.” This ensures the pockets stay open and hold their shape even when they are empty.
Conclusion
In conclusion, following a Fabric Wall Organizer – Pattern is an excellent way to merge creativity with practicality. We have covered everything from selecting the right “Canvas” and “Interfacing” to mastering “Topstitching” and “Dowel Casing” to ensure a durable and stylish result. This project not only helps declutter your home but also provides a platform to showcase your favorite textile designs and sewing skills. By paying attention to “Seam Allowance” and “Weight Distribution,” you can create a professional-grade piece that rivals any store-bought organization system.
We hope this guide has inspired you to start your own Fabric Wall Organizer – Pattern project today! Whether you are organizing a small apartment or a large craft room, a handmade touch makes all the difference.