Butterfly Crochet – Pattern is one of the most enchanting projects any crafter can undertake, blending the delicate beauty of nature with the timeless art of needlework. Whether you are a seasoned professional or a curious beginner, creating a butterfly crochet masterpiece allows you to experiment with vibrant colors and intricate textures. These versatile pieces can be used as appliques, home decor, or even unique jewelry, making the crochet pattern a staple in every maker’s digital library.
The beauty of a Butterfly Crochet – Pattern lies in its adaptability; you can scale the size by simply changing your yarn weight or hook size. Many enthusiasts find that working on a handmade butterfly is a meditative process, offering a quick win between larger, more demanding projects like blankets or sweaters. As the fiber arts community continues to grow, these winged motifs have soared in popularity on social media platforms, inspiring thousands to pick up their hooks and start stitching.
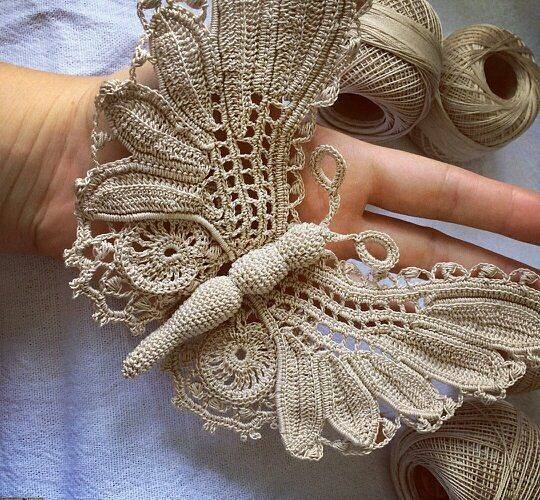
To achieve the best results with your Butterfly Crochet – Pattern, it is essential to focus on stitch definition and tension. Using a merino wool or a merchandized cotton can ensure that the delicate “wings” hold their shape over time. In this comprehensive guide, we will explore the essential steps to mastering this design, ensuring your finished work looks professional, polished, and absolutely stunning.
1. Choosing the Right Materials for Your Butterfly Crochet – Pattern
Selecting high-quality supplies is the foundational step for a successful Butterfly Crochet – Pattern. For a crisp, defined look, many designers recommend using number 10 cotton thread or a fine sport weight yarn. These thinner fibers allow the intricate details of the butterfly’s anatomy to shine without looking bulky.
Your choice of crochet hook is equally important when following a detailed pattern. If your stitches are too loose, the butterfly might lose its structural integrity; if they are too tight, the fabric may curl. A 2.5mm or 3.0mm hook is often the “sweet spot” for standard decorative butterflies intended for clothing or hats.
Don’t forget the importance of stitch markers and a sharp tapestry needle. Since butterflies are often worked in the round or involve complex chain spaces, marking the beginning of your rounds prevents confusion. A sharp needle ensures that when you weave in your ends, the finish is invisible and secure.
Color palettes play a huge role in the final aesthetic of your crochet project. You might opt for variegated yarn to mimic the natural transitions found in a Monarch butterfly. Alternatively, solid neon colors can create a modern, pop-art feel that stands out on denim jackets or tote bags.
Before starting the Butterfly Crochet – Pattern, ensure you have a comfortable workspace with plenty of light. Working with smaller hooks and darker yarn colors can strain the eyes, so a neck light or a bright desk lamp is a game-changer. Having all your crochet notions organized saves time and keeps the creative flow going.
Lastly, consider the application of the finished piece. If you are making a keychain, you will need metal rings; if it’s a brooch, a safety pin backing is required. Planning these details before you start the first slip knot ensures a smooth transition from a simple yarn strand to a finished work of art.
2. Understanding Basic Stitches and Techniques for the Pattern
Before diving into the Butterfly Crochet – Pattern, you must be comfortable with foundational stitches like the double crochet (dc) and treble crochet (tr). Most butterfly wings are created by clustering these taller stitches together to create a fan-like shape. Mastering the magic ring (or magic circle) is also vital, as it provides a seamless center for the body.
The Butterfly Crochet – Pattern often utilizes the picot stitch to create the tiny points on the tips of the wings. This technique involves a small chain sequence that is slip-stitched back into itself. While it may seem intimidating at first, it adds a level of professional detail that distinguishes a beginner’s work from an expert’s.
Increasing and decreasing are the “shaping” tools of any crochet butterfly. By placing multiple stitches into a single base, you create the expansion needed for the upper wings. Conversely, using slip stitches to move across a row helps in tapering the lower wings to create a realistic, aerodynamic silhouette.
Many modern butterfly patterns are worked as a flat circle that is later folded in half. This “folded technique” is incredibly beginner-friendly because it eliminates the need for sewing separate wings together. You simply crochet a textured lace circle and secure the center with a chain to form the body and antennae.
Consistency in yarn tension is the secret to a symmetrical butterfly. If one wing is worked tighter than the other, your crochet insect will look lopsided. Practicing your tension control on a small swatch before starting the actual Butterfly Crochet – Pattern can prevent the frustration of having to frog (undo) your work later.
Understanding how to read a crochet chart or a written PDF pattern is a skill that will serve you well beyond this project. Look for terms like “sp” (space), “ch-sp” (chain space), and “st” (stitch). Being fluent in this “crochet shorthand” allows you to follow the butterfly instructions with speed and accuracy.
3. Step-by-Step Execution of the Butterfly Body and Wings
To start the Butterfly Crochet – Pattern, create a magic ring and work a series of clusters separated by chains. This center will eventually become the heart of the butterfly. Ensure the ring is pulled tight so there is no visible hole in the middle of your crochet work, which keeps the design looking elegant.
The first round usually involves shell stitches, which consist of several high stitches worked into the same space. These shells form the “skeleton” of the wings. When working on a Butterfly Crochet – Pattern, the symmetry is created by mirroring the number of stitches on the left and right sides of the center.
As you move to the second round, you will likely switch to taller stitches like the double treble crochet. This creates the height necessary for the large upper wings. Incorporating contrasting yarn colors at this stage can highlight the “eye” spots often seen on real butterflies, adding a touch of artistic realism.
The body of the butterfly is typically formed by a long chain stitch sequence that wraps around the folded wings. This not only secures the shape but also provides the base for the antennae. For a sturdier body, some crochet designers prefer to work a row of single crochets over a piece of floral wire.
Finishing the edges with a reverse single crochet (also known as the crab stitch) can provide a beautiful, corded look to the wing borders. This is an advanced step in a Butterfly Crochet – Pattern, but it significantly increases the durability of the item, especially if it will be handled frequently as a toy or applique.
Once the crochet portion is complete, blocking is the final “magic” step. Pin your butterfly to a foam board, spray it with a bit of water or fabric stiffener, and let it dry. This process ensures the wings stay flat and the intricate lace pattern is fully blocked out for maximum visual impact.
4. Creative Ways to Use Your Finished Crochet Butterfly
One of the most popular uses for a Butterfly Crochet – Pattern is as a 3D applique for baby blankets and hats. By sewing only the body to the fabric, the wings remain free to “flutter,” giving the garment a whimsical, lively feel. It’s a favorite among crochet for kids enthusiasts.
In the world of interior design, these butterflies can be strung together to create a crochet bunting or mobile. Imagine a nursery decorated with dozens of colorful yarn butterflies hanging from the ceiling. It’s a cost-effective and personalized decor option that adds warmth and texture to any room.
For fashion lovers, a tiny crochet butterfly makes for an exquisite pair of boho earrings. By using embroidery floss and a very small hook, you can create miniature versions of the Butterfly Crochet – Pattern. Applying a layer of clear resin or fabric stiffener will make them sturdy enough for everyday wear.
Gifting a handmade item always feels special, and these butterflies make perfect “happy mail” additions. You can slip a flat crochet butterfly into a birthday card as a surprise bookmark. It’s a small gesture that showcases your skills and provides the recipient with a lasting keepsake.
If you are a fan of mixed media art, try mounting your finished Butterfly Crochet – Pattern inside a shadow box. You can arrange them by color to create a “specimen” display that mimics a vintage entomology collection. This is a cruelty-free way to enjoy the beauty of butterflies in your home gallery.
Finally, don’t forget the power of seasonal decorating. White and silver butterflies look stunning on a Christmas tree, while pastel versions are perfect for Easter baskets. The versatility of the Butterfly Crochet – Pattern means you can find a reason to pick up your hook all year round.
FAQ: Frequently Asked Questions about Butterfly Crochet
What is the best yarn for a Butterfly Crochet – Pattern? The best yarn is usually a mercerized cotton or a cotton blend. These yarns have a slight sheen and excellent stitch definition, which is crucial for the delicate details of a crochet butterfly.
How long does it take to finish one butterfly? Depending on the complexity of the pattern, a single butterfly can take anywhere from 15 to 45 minutes. This makes it an ideal “scrap buster” project for using up leftover yarn.
Can a beginner try this Butterfly Crochet – Pattern? Yes! Many patterns are designed specifically for beginners using only basic stitches. It is recommended to start with a medium-weight yarn and a larger hook to see your stitches more clearly before moving to thread.
Do I need to stiffen my crochet butterflies? It depends on the use. If they are for jewelry or wall art, using a mixture of water and white glue or a commercial fabric stiffener helps them hold their shape. If they are for blankets, leave them soft.
How do I attach the butterfly to other projects? You can either sew it on using a tapestry needle and matching yarn, or use fabric glue for items that won’t be washed frequently. For a temporary attachment, a small safety pin works well.
Can I sell items made from this pattern? Generally, yes. Most designers allow you to sell finished items, though it is polite to credit the Butterfly Crochet – Pattern creator. Always check the specific terms of the pattern you are following.
Conclusion
The Butterfly Crochet – Pattern is more than just a craft project; it is a gateway to creativity and a way to bring a touch of nature’s elegance into your home.
Throughout this guide, we have covered the importance of quality materials, the mastery of essential stitches, and the various ways to display your finished crochet art. By following these steps and focusing on SEO-friendly techniques and high-quality finishes, you can create pieces that are truly unique.